An Introduction to JUnit
An overview of JUnit 4, including its impact on testing.
Join the DZone community and get the full member experience.
Join For FreeTesting is an essential part of creating software and one that is often looked at as a second class citizen in the realm of application code. Despite this mischaracterization, test code often plays just as much — or an even larger — role in successfully releasing software that contains as few bugs as possible.
In this tutorial, we will walk through each of the steps required to develop simple but well-thought-out tests, starting with the theory and concepts behind creating tests. With this theory in hand, we will create a test fixture in JUnit 4 to exercise an example application and add test cases to this fixture as necessary. We will also learn how to mock external dependencies and use the setup mechanism provided by JUnit to abstract the initialization logic for our test cases. Along the way, we will cover the given-when-then approach to testing and the standard naming conventions used in many large-scale projects.
The goal of this tutorial is not to provide a comprehensive introduction to all of JUnit's features, but rather, provide a start-to-finish walkthrough on how experienced Java developers think, create, and support test cases on critical projects. As a companion, all of the source code used in the examples, as well as the script necessary to run our test cases in Maven or Gradle, can be found on GitHub.
In order to dive into JUnit and how to create sound and concise JUnit tests, we must first understand the purpose of tests and the history of how automated testing became an essential facet of software development.
Understanding Tests
Before creating a set of test cases, we must first understand the theory behind test cases and how to apply them for maximum efficacy. When we write code, we naturally wish to know whether it behaves as expected. For example, if we create a calculator application, we assume that adding 0 and 1 will result in 1. If it does not, we say that our application is incorrect. More generally, the correctness of our application is defined by how well our application meets its specifications.
Definition of Tests
We measure this adherence to specifications by testing our application. In our example, our specification is that our calculator performs addition per the arithmetical definition of addition. We test how well our application adheres to this specification by verifying that it can complete an example operation, namely 0 + 1, and produce the expected results.
In the infancy of software engineering, developers wrote code, compiled it, executed it, and then fed in inputs to ensure that the executing code returned the expected outputs. For example, to know if our calculator application was correct, we could supply in 0 + 1 and test that the output is 1. This process of injecting inputs and inspected outputs is called black-box testing. I.e., we treat the application we are testing as a black-box, where we hide its internals from the test case.

Tests at this level are called unit tests since they exercise small units of a system. There are also other types of tests, including integration tests, which exercise the interaction between multiple components and system tests, which exercise the entire system.
The process of manually unit testing is useful, but it is also cumbersome. Suppose that we make a change to our calculator application and recompile it. We must then test that our changes did not break functionality that was previously working. Bugs of this type are called regressions since they break a feature that was previously working. To check that we have not introduced regressions into our application, we must retry all of the test cases that we already performed — i.e., inputting 0 + 1 and expecting 1.
We need to repeat this process each time we recompile the application. Even the smallest changes may have introduced a regression. To ensure that no such regressions exist, we must rerun our tests every time we make any change to the code. It quickly becomes infeasible to manually rerun all of our tests, especially as the number of tests starts to grow in proportion to the scale of our application.
Automated Testing
Near the turn of the millennium, the Agile movement brought about automated tests. Automated tests are code that tests other code. While this may appear self-referential, but in practice, this means that we can write test code that exercises our application code. Instead of manually rerunning tests each time our application code changes, we can write test code and execute this test code after each change. Since we codified our tests, we know that they will be executed quickly and, and just as important, consistently.
In the nearly two decades since automated testing became the standard, numerous frameworks have been created, but JUnit is the most common. At the time of writing, JUnit has bifurcated into JUnit 4 and JUnit 5. While JUnit 5 has a richer feature set, JUnit 4 is still more popular, and we are more likely to find JUnit 4 test cases in practice. For this reason, we will focus on creating automated tests in JUnit 4.
Setting Up the Project
To create JUnit 4 tests, we need to add the following Maven dependency to our project (version latest at the time of writing):
<dependency>
    <groupId>junit</groupId>
    <artifactId>junit</artifactId>
    <version>4.12</version>
    <scope>test</scope>
</dependency>
If we use Gradle, we need to add the following dependency (version latest at the time of writing):
testCompile group: 'junit', name: 'junit', version: '4.12'With our dependencies added, we can now begin testing a feature.
Testing a Feature
The first step to testing a feature is creating a feature to test. Throughout this introduction, we will use our calculator application as an example. While a real calculator would have many features, our calculator will only perform simple integer addition:
public class Calculator {

    public int add(int a, int b) {
        return a + b;
    }
}
While this code appears trivial — and tests appear unneeded — it is a trap to think that code is too simple to test. We are fallible as developers, and anywhere we create code is an opportunity for a mistake. For example, suppose that we accidentally typed a - b instead of a + b. This mistake would result in incorrect results from our add method. In general, it is essential to view all code that we create — no matter how simple — as suspect and a place for bugs to hide. Creating tests is how we root out these potential bugs.
Creating a Test Fixture
To test our calculator, we must first create a test fixture. A test fixture is a module that contains the environment, state, and other supporting logic used to test a feature. In electronics testing, a test fixture physically holds the electronics under test in place and may provide pins for extracting necessary output signals. A software test fixture is analogous to its hardware counterpart and is represented in JUnit by a class. It is common to create one test fixture for each class under unit test (i.e., a one-to-one correspondence between test fixture and classes under test). The naming convention for test fixtures is is to append Test to the name of the class under test:
public class CalculatorTest {

}
In JUnit, we do not need to add any annotations or other markers to our class to it to be considered a test fixture. As we will see later, the location of the fixture and the Test suffix is sufficient for most Integrated Development Environments (IDEs) and build systems to recognize our test fixture.
Creating a Test Case
With our fixture created, we can now create a test case. We represent our test case in JUnit as a method—annotated with @Test— in our fixture. There are numerous naming conventions for test case methods, but one of the most popular is the Given-When-Then nomenclature. In this approach, a test is broken up into three distinct parts:
- Given: The assumptions and setup logic that configures the state of the features under test
- When: The execution of the feature under test
- Then: The expected results of the executed feature
If we wanted to test the addition of two non-negative values—0 and 1—with our calculator in its default state, we could create a given-when-then statement as follows:
Given a default calculator,
when adding two non-negative values,
then the result is their sum
When naming a test case, the given, when, and then clauses are usually separated by underscores and follow the standard Java camelcase naming convention. Capturing this in a test case, we obtain:
public class CalculatorTest {

    @Test
    public void givenDefaultCalculator_WhenAddingTwoNonZeroValues_ThenResultIsSum() {

    }
}
Following the given-when-then approach, we must first create a default Calculator instance (given) and then execute the addition of 0 and 1 (when):
public class CalculatorTest {

    @Test
    public void givenDefaultCalculator_WhenAddingTwoNonZeroValues_ThenResultIsSum() {

        Calculator calculator = new Calculator();       // Given

        int result = calculator.add(0, 1);              // When
    }
}
While we can cover the given and when clauses with non-JUnit Java code, we require a new, JUnit-specific mechanism to handle the then clause—namely, assertions.
Making Assertions
An assertion is a statement that we expect to be true at a specific point in the execution of code. For example, we can assert that a parameter passed to a method is not null before performing some action on the parameter or that the result of a computation is equal to an expected value. In a test case, assertions provide us with a mechanism to create a then clause.
For our test case, this means asserting that the result of the addition is equal to 1. We create this assertion using the static methods provided in the Assert class. Specifically, we use the assertEquals method (class name omitted for brevity):
public class CalculatorTest {

    @Test
    public void givenDefaultCalculator_WhenAddingTwoNonZeroValues_ThenResultIsSum() {

        Calculator calculator = new Calculator();       // Given

        int result = calculator.add(0, 1);              // When

        assertEquals(1, result);                        // Then
    }
}
If our assertion evaluates to true, the test passes; if it evaluates to false, the test fails. As we will see later, JUnit plugins can use these assertions to visual display which test cases passed and which failed. Apart from evaluating the equality of two values, JUnit also has numerous other assertions. Some of the most popular include:
| Statement | Description |
|---|---|
assertTrue(condition) |
Asserts that the boolean condition evaluates to true |
assertFalse(condition) |
Asserts that the boolean condition evaluates to false |
assertEquals(expected, actual) |
Asserts that the expected and actual values are equal according to the expression expected.equals(actual) |
assertNotEquals(expected, actual) |
Asserts that the expected and actual values are not equal according to the expression !expected.equals(actual) |
assertNull(value) |
Asserts that value is null |
assertNotNull |
Asserts that value is not null |
If needed, we could also have more than one assertion. For the test case to pass, all assertions must evaluate to true. If any assertion evaluates to false, the test case fails without proceeding to the subsequent assertions (if any are defined).
Setting Up State and Environment
Our examples so far have been relatively simple, but typically, the classes that we will test contain state and may require non-trivial instantiation. For example, suppose that we want to track the history of the additions that our calculator completes. To do this, we can create a CalculationHistory class that stores the operands — augend and addend — and the sum of a calculation. We can then add a CalculationHistory field to our Calculator class. Following the Inversion of Control principle, we will add a constructor parameter to our Calculator class that will allow clients to pass in a CalculatorHistory object.
public class CompletedCalculation {

    private int augend;
    private int addend;
    private int sum;

    public CompletedCalculation(int augend, int addend, int sum) {
        this.augend = augend;
        this.addend = addend;
        this.sum = sum;
    }

    // ... getters & setters ...
}

public class CalculationHistory {

    private final List<CompletedCalculation> calculations = new ArrayList<>();

    public void append(CompletedCalculation calculation) {
        calculations.add(calculation);
    }

    // ... getter ...
}

public class Calculator {

    private CalculationHistory history;

    public Calculator(CalculationHistory history) {
        this.history = history;
    }

    public int add(int a, int b) {
        int sum = a + b;
        history.append(new CompletedCalculation(a, b, sum));
        return sum;
    }
}
We must now change the existing test case to reflect this change to the constructor:
public class CalculatorTest {

    @Test
    public void givenDefaultCalculator_WhenAddingTwoNonZeroValues_ThenResultIsSum() {

        CalculationHistory history = new CalculationHistory();  // Given
        Calculator calculator = new Calculator(history);        // Given

        int result = calculator.add(0, 1);              // When

        assertEquals(1, result);                        // Then
    }
}
As we add more test cases to our fixture, the setup logic will begin to repeat. Instead of instantiating a new CalculationHistory object and passing it to a Calculator object at the beginning of each test case, we can create fields in our fixture for the CalculationHistory and Calculator objects and pull this common logic out into a setup method. JUnit provides the @Before annotation, which allows for methods to be executed before each test case. Adding a setup method — conventionally called setUp— to our fixture, we obtain the following code:
public class CalculatorTest {

    private CalculationHistory history;
    private Calculator calculator;

    @Before
    public void setUp() {
        history = new CalculationHistory();
        calculator = new Calculator(history);
    }

    @Test
    public void givenDefaultCalculator_WhenAddingTwoNonZeroValues_ThenResultIsSum() {

        int result = calculator.add(0, 1);              // When

        assertEquals(1, result);                        // Then
    }
}
Note that our test case no longer has a given clause. Instead, JUnit executes the setUp method before running the test case, acting as the given clause for each of our test cases.
Mocking Dependencies
Our CalculationHistory class acts as an external dependency to our Calculator class, and therefore, this dependency should be mocked, instead of passing an actual object during instantiation. Mocking this dependency will allow us to verify that specific methods were called. In the case of our calculator, we will be able to create a new test case and verify that performing an addition adds a new entry into the calculation history.
To mock our CalculationHistory dependency, we can use Mockito. Mockito is a mocking framework that provides simple methods for creating mocks, verifying mocks, and configuring the expected behavior of mocks.
The Maven dependency for Mockito is as follows (the version is latest at the time of writing):
<dependency>
    <groupId>org.mockito</groupId>
    <artifactId>mockito-core</artifactId>
    <version>3.0.0</version>
    <scope>test</scope>
</dependency>
If we are using Gradle, we must add the following dependency (version is latest at the time of writing):
testCompile group: 'org.mockito', name: 'mockito-core', version: '3.0.0'=In our case, we need to do two things: (1) create a mock CalculationHistory and (2) verify that the append method of our mock CalculationHistory object was called when calling the add method of our Calculator class. To complete the first task, we use the mock method and supply a Class object of CalculationHistory, and for the second task, we use the verify method:
package com.dzone.albanoj2.junit.intro;

import static org.junit.Assert.assertEquals;
import static org.mockito.Matchers.any;
import static org.mockito.Mockito.times;

import org.junit.Before;
import org.junit.Test;
import org.mockito.Mockito;

public class CalculatorTest {

    private CalculationHistory history;
    private Calculator calculator;

    @Before
    public void setUp() {
        history = Mockito.mock(CalculationHistory.class);
        calculator = new Calculator(history);
    }

    @Test
    public void givenDefaultCalculator_WhenAddingTwoNonZeroValues_ThenResultIsSum() {

        int result = calculator.add(0, 1);              // When

        assertEquals(1, result);                        // Then
    }

    @Test
    public void givenDefaultCalculator_WhenAddingTwoNonZeroValues_ThenEntryIsAddedToHistory() {

        calculator.add(0, 1);                                                       // When

        Mockito.verify(history, times(1)).append(any(CompletedCalculation.class));  // Then
    }
}
While the verification logic appears complex, it is simple. The verify method accepts an object to verify, and verification criteria. In our case, we pass Mockito.times, which verifies the number of invocations we supply. Lastly, we expect the append method to be called, so we call append on the object returned by Mockito.verify. The argument we pass acts as a matcher for the expected arguments. In our case, we pass Matchers.any with the Class object for CompletedCalculation. This matcher means that we expect the append method to be called with any object of type CompletedCalculation.
Putting this together, our verify call amounts to verification that there will be one invocation of the append method with a CompletedCalculation object as its argument.
This verification is only one example of how to use Mockito to mock an object. Mockito is a feature-rich framework and provides numerous methods for everyday tasks. These include throwing exceptions when a mocked method is called, returning an expected value when a mock method is called, and verifying that a method is never called. See the official Mockito documentation for more information.
Running Tests
Although creating our tests consume the bulk of the effort, tests without an execution mechanism would serve no purpose. Generally, there are four common ways to execute JUnit tests: (1) on the command line using Maven, (2) on the command line using Gradle, (3) within Eclipse, and (4) within IntelliJ IDEA.
Maven
With a Maven JUnit project, we can execute our test cases by running the following command:
mvn testExecuting this command will produce output resembling the following (package names may vary):
-------------------------------------------------------
 T E S T S
-------------------------------------------------------
Running com.dzone.albanoj2.junit.intro.CalculatorTest
Tests run: 2, Failures: 0, Errors: 0, Skipped: 0, Time elapsed: 1.135 sec

Results :

Tests run: 2, Failures: 0, Errors: 0, Skipped: 0
We can see from the last line that both of our test cases were run and none failed, resulted in errors — such as a test case unexpectedly throwing an exception — or were skipped.
Gradle
To execute our tests within a Gradle project, we run the following command:
gradle testThe Gradle output will not include any messages of interest regarding our tests unless one or more tests fail. I.e., Gradle opts for a no news is good news approach and will only notify the user in the case of failures or errors. For example, if one of our tests fail, we will see output resembling the following (package names may vary):
> Task :test

com.dzone.albanoj2.junit.intro.CalculatorTest > givenDefaultCalculator_WhenAddingTwoNonZeroValues_ThenResultIsSum FAILED
    java.lang.AssertionError at CalculatorTest.java:25

2 tests completed, 1 failed

> Task :test FAILED
We can see from the end of the output that both tests were run, but one — the givenDefaultCalculator_WhenAddingTwoNonZeroValues_ThenResultIsSum method of the com.dzone.albanoj2.junit.intro.CalculatorTest class — failed, which caused the entire test task to fail.
Eclipse
To run our tests inside of Eclipse, we first need to install the Java EE Developer Tools. Note when using Eclipse IDE for Java EE Developers, Eclipse already installs the Java EE Developer Tools — which includes the JUnit plugin. If the Java EE Developer Tools are not installed, we can complete the following steps to install the required packages:
- Navigate to the Eclipse Java EE Developer Tools page
- Click the download icon
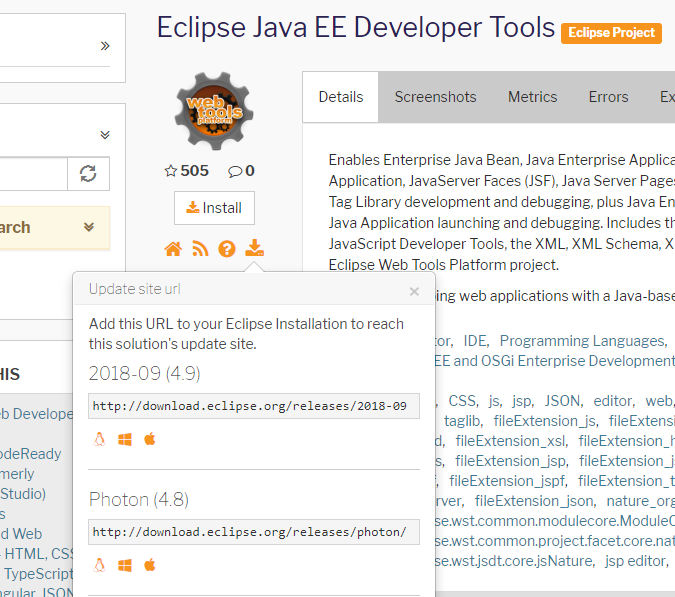
- Copy the URL corresponding to the desired Eclipse version
- Open Eclipse
- Click Help on the top toolbar
- Click Install New Software...
- Click Add...
- Type a name to remember the new mirror by in the Name field
- Enter the URL copied in step (3) into the Location field
- Click Add
- Check Eclipse Java EE Developer Tools under Web, XML, Java EE and OSGi Enterprise Development
- Click Next >
- Click Next > on the Install Remediation Page (if this page is displayed)
- Click Next > on the Install Details page
- Check the I accept the terms of the license agreement box
- Click Finish
Accept any certificates if prompted and restart Eclipse when the installation completes. Once we have installed the Java EE Developer Tools, we can execute our test using the following steps:
- Right-click on the
CalculatorTest.javafile in the Project Explorer panel - Mouseover Run As
- Click JUnit Test
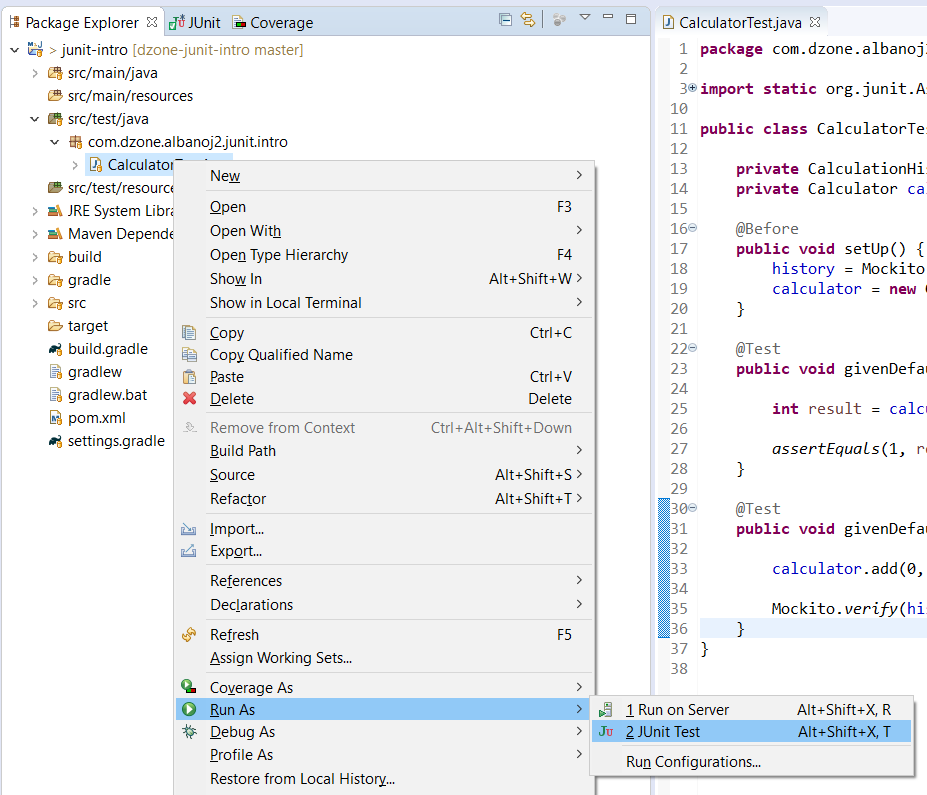
This will open the JUnit window and will display a green bar if all our tests pass:
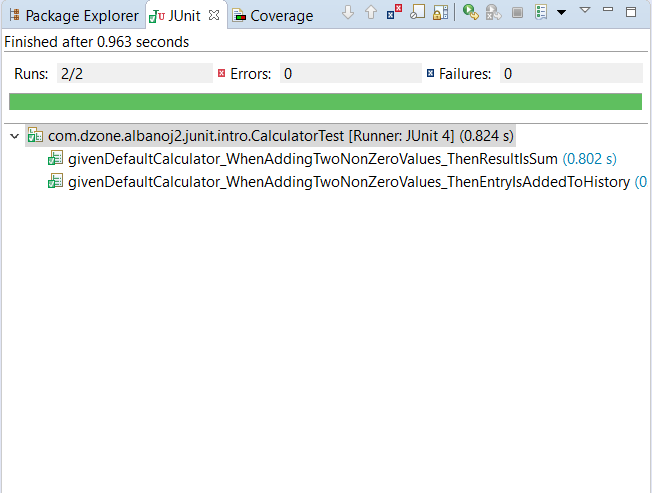
Note that right-clicking the package containing CalculatorTest or the src/test/java folder will execute all tests — including CalcatuorTest— included in the package or folder, respectively.
IntelliJ IDEA
Running our tests in IDEA is similar to Eclipse except that IDEA includes the needed tools by default. To execute our tests, we need to complete the following steps:
- Right-click on the
CalculatorTest.javafile in the Project panel - Click Run 'CalculatorTest'
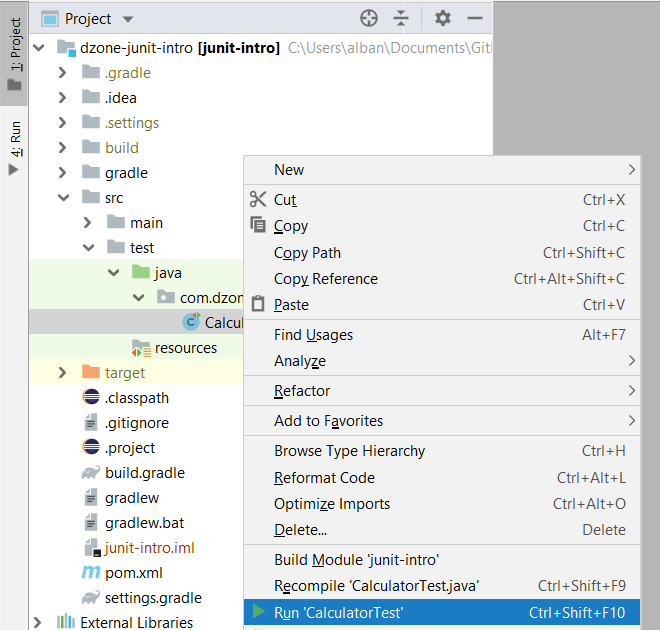
This will open the Run panel, which will including a green checkmark if all of our tests pass:
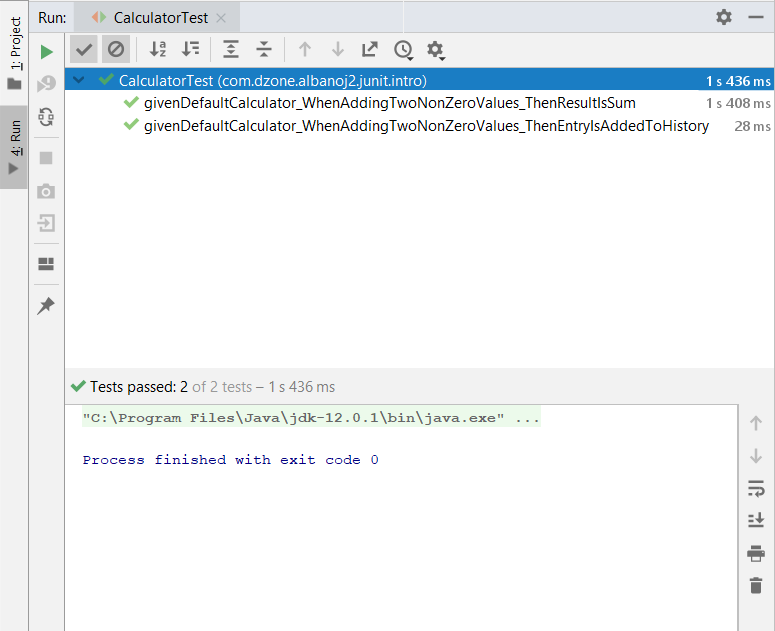
Similar to Eclipse, right-clicking the java directory under src/test and clicking Run 'All Tests' will execute all test cases contained in src/test/java— including CalculatorTest.
Conclusion
Testing is an essential facet of software development, and automated unit tests are a crucial part of testing. For most Java projects, JUnit is the go-to framework for creating automated unit tests, due in large part to its simplicity and its support by most IDEs — such as Eclipse and IDEA — and build systems — such as Maven and Gradle. Although JUnit was first created in the late 1990s, it remains one of the most popular Java frameworks and will likely continue to be so long into the future.
The interested reader can find the source code for this tutorial on GitHub.
Opinions expressed by DZone contributors are their own.
Comments