Auto Deploy Spring Boot App Using GitLab CI/CD
Create a Spring Boot application, set up your server, and configure GitLab to build your app, run tests, and deploy automatically to your server.
Join the DZone community and get the full member experience.
Join For FreeIn this tutorial, we're going to be looking at how to use GitLab CI/CD to build, test, and deploy a Spring Boot web application to a cloud server. GitLab CI/CD serves as a software development tool, covering continuous integration (CI), continuous delivery (CD), and continuous deployment. It enables organizations to implement ongoing methodologies.
Although we used DigitalOcean in the example, this will work with AWS, Azure, or any other cloud providers that provide server instances.
GitLab offers unlimited free private repositories and 400 CI/CD runner minutes per month.
We will be using GitLab as our cloud Git repository in this article, and you can create your own free account if you don't have one.
Step 1. Application Setup
For the purpose of this article, we will create a simple Spring Boot application using Spring Initializr. Spring Boot is a Java-based framework that simplifies the development of production-ready applications by offering conventions, embedded servers, and pre-built templates. Spring Initializr simplifies the setup of Spring Boot projects by allowing developers to customize configurations, choose dependencies, and more.
After downloading the generated project, the pom.xml should contain the following dependencies:
Listing 2.1 pom.xml
<dependencies>
	<dependency>
		<groupId>org.springframework.boot</groupId>
		<artifactId>spring-boot-starter-web</artifactId>
	</dependency>

	<dependency>
		<groupId>org.springframework.boot</groupId>
		<artifactId>spring-boot-starter-test</artifactId>
		<scope>test</scope>
	</dependency>
</dependencies>
Next, let's create a controller mapping for the index endpoint. The endpoint will simply return a "Hello World" string concatenated with the current timestamp:
Listing 2.2 IndexController.java
@Controller
public class IndexController {

	@GetMapping("/")
	@ResponseBody
	public String index() {
		return "Hello World " + LocalDateTime.now();
	}

}
Let's start the application, which will be running on port 8080 by default. We can send a simple curl command to test the endpoint.
Listing 2.3 Shell/Terminal:
curl --location 'http://localhost:8080'; echo

Hello World 2023-10-07T20:32:45.361850
Now that we have a working application, head over to GitLab, and create a new project without initialising with a README.md file. Take note of the repo URL for subsequent use.
Afterward, we will commit the code locally and push it to the remote repo using the following commands from the project's root directory on our local machine:
Listing 2.4 Shell/Terminal:
git init

git add .

git commit -m "initial commit"

git remote add origin https://gitlab.com/SeunMatt/gitlab-ci-demo.git

git push origin master
Note that your project URL will be slightly different depending on the chosen username and project name.
Step 2. Server Setup
For this tutorial, we will create a new DigitalOcean droplet, and install JRE (Java Runtime Environment) and Nginx on it.
Nginx will be our reverse proxy server that will run on port 80 and forward HTTP traffic to our Spring Boot application that will be running on port 8080.
We'll use the Terraform configuration files from another article to provision the droplet.
Learn the difference between JDK, JRE, and JVM.
Step 3. GitLab CI/CD
Following the server setup, we don't want to be copying JAR files manually to the server — this is why we are here, after all.
Hence, we need to set up auto-deployment via GitLab CI/CD. We'll achieve this in two steps: first, add pipeline logic to build the application, and then, expand it to deploy to our newly provisioned server.
Application Building
In order for us to use GitLab CI/CD, we need to add a .gitlab-ci.yml file to the root of our project directory.
The .gitlab-ci.yml is a simple plain text file that defines the jobs we want to execute and what scripts we want to run in each job.
Let's create a .gitlab-ci.yml file in our project's root directory with the following content:
Listing 4.1 .gitlab-ci.yml:
stages:

 - build

 - deploy
The snippet above defines two stages that should run in the order they appear. A stage is a grouping of one or more jobs, it also provides hierarchical ordering of the jobs.
The combination of different stages makes a pipeline.
The name of each stage should reflect the type of job(s) in it. For example, the build stage will have jobs that test and package our application as a JAR file, whereas the deploy stage will contain jobs that copy the generated JAR file to the server.
Let's define a job that will run the Maven package command and generate a single JAR file. We will call the job maven-build:
Listing 4.2 .gitlab-ci.yml:
maven-build:

  image: maven:3-jdk-11

  stage: build

  script: "mvn package -B"

  artifacts:

    paths:

      - target/gitlab-ci-demo.jar
In the snippet above, we configured the job to use a Docker container that has Maven version 3 and JDK 11 pre-installed.
The stage keyword indicates that this job belongs to the build stage and the script keyword indicates what command to execute in the Docker container once it's ready.
Another special keyword to take note of is artifacts. It instructs GitLab CI/CD runner to preserve the end result of our script command so we can use it in subsequent jobs. In this case, we're keeping the final JAR file so we can reference it in the coming sections.
The complete .gitlab-ci.yml file looks like this:
Listing 4.3 .gitlab-ci.yml:
stages:

 - build

 - deploy


maven-build:

  image: maven:3-jdk-11

  stage: build

  script: "mvn package -B"

  artifacts:

    paths:

      - target/gitlab-ci-demo.jar
To see this in action, let's commit and push our changes to GitLab. GitLab will auto-detect the .gitlab-ci.yml file and trigger GitLab CI/CD runner.
We can monitor the progress of the running jobs on GitLab by going to the CI/CD menu >> Jobs.
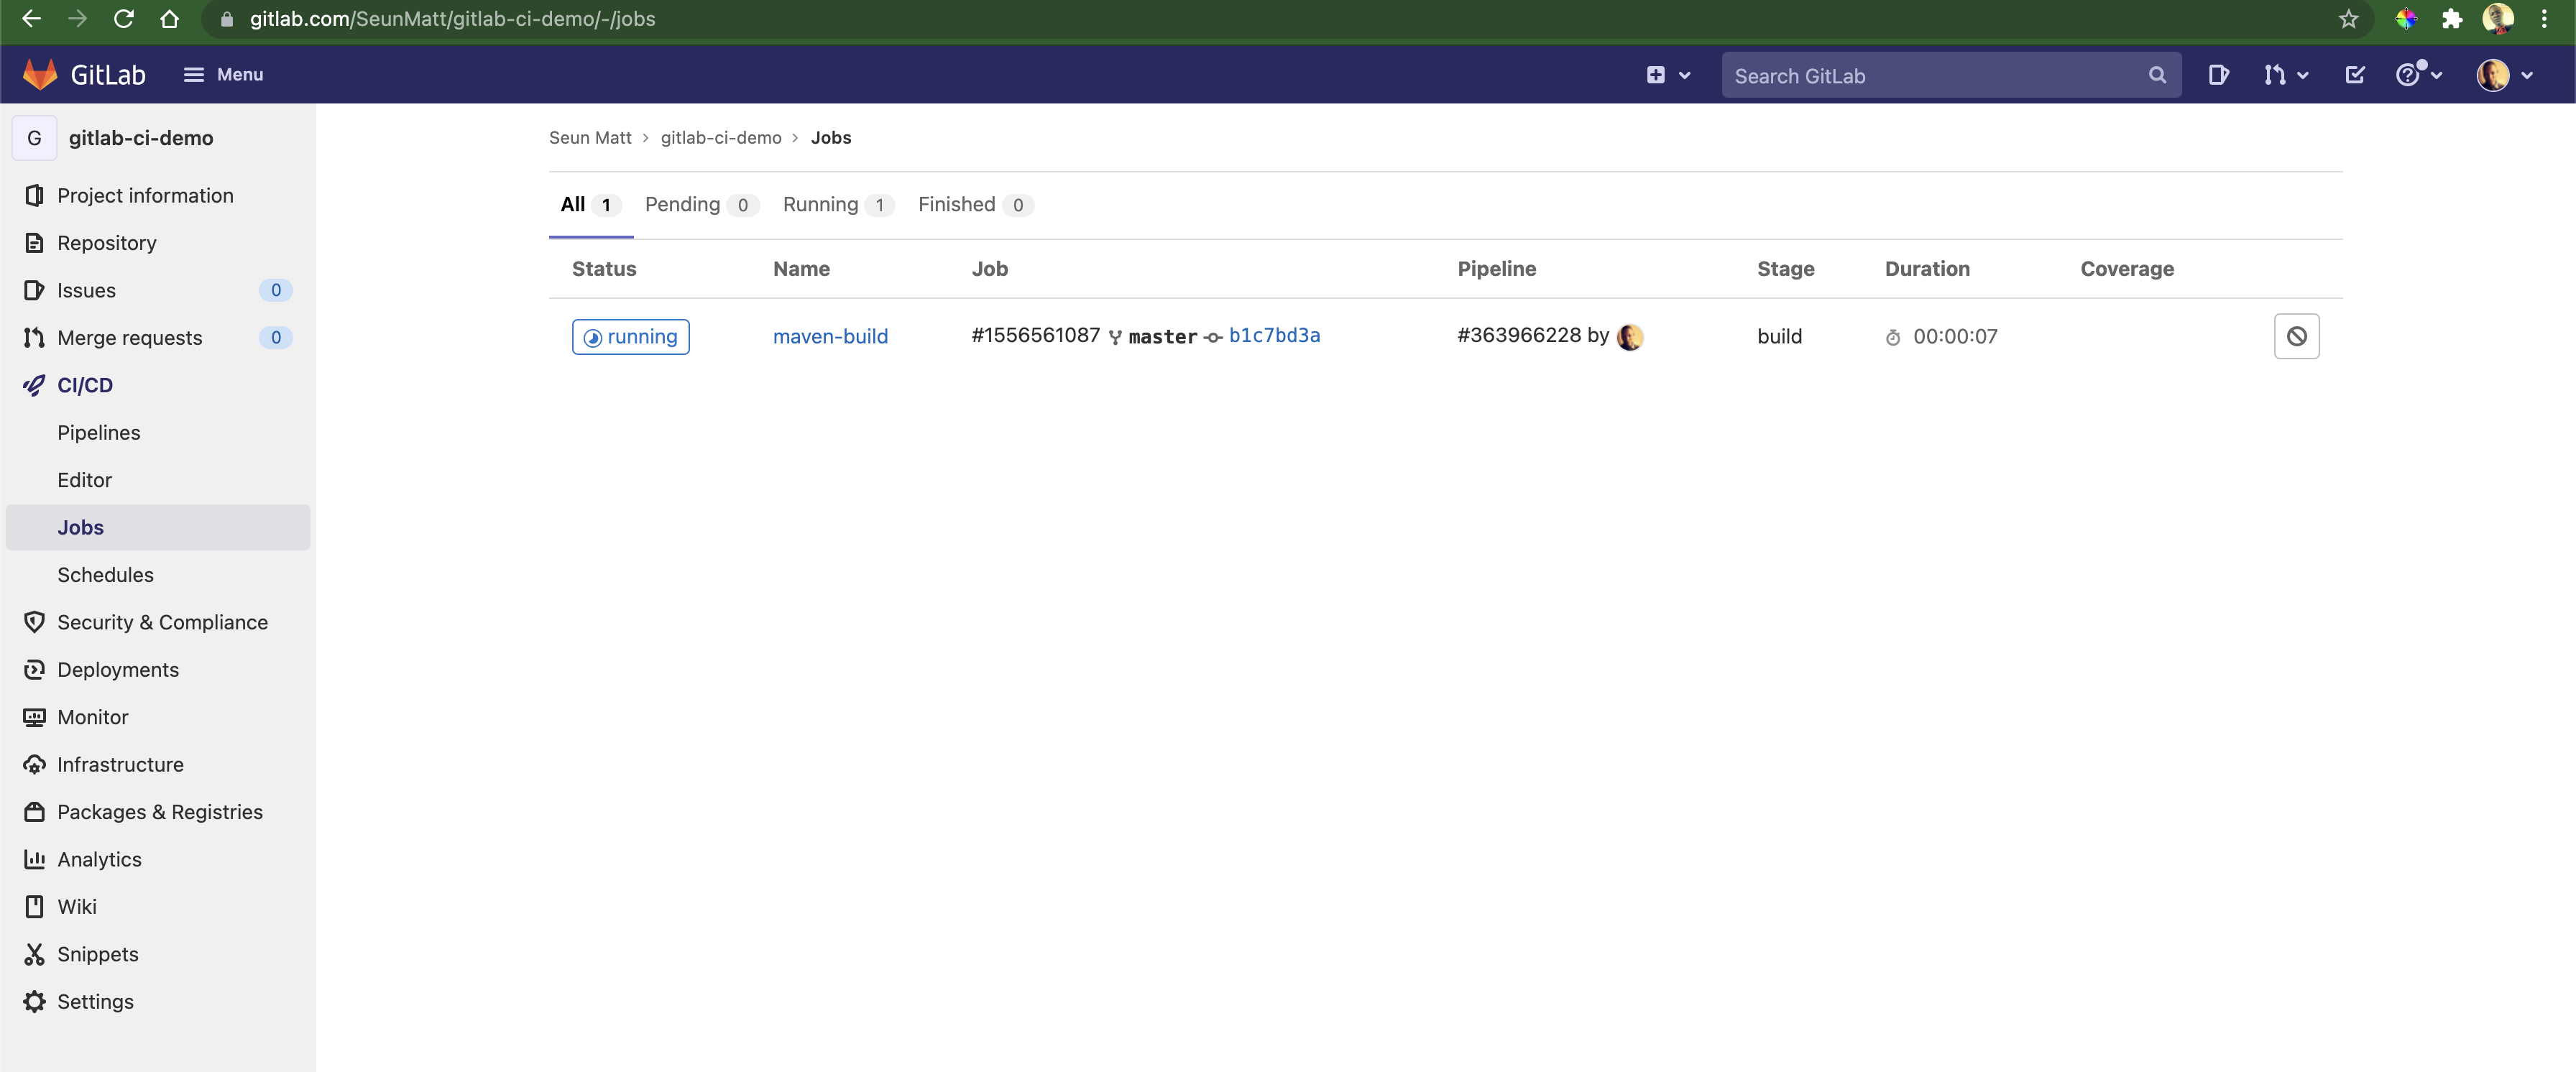
We can click on the running button to see the live output from the different commands. Once the build is complete, the running button will change to green and the text will now be passed:

Application Deployment
For our deployment process, we will first create a CI/CD user on our server, then use the scp command to copy the JAR file from GitLab to our server.
Once the JAR file is on our server, we will SSH to the server, move the JAR file to the appropriate directory, and restart the application service using systemctl.
Let's SSH into the server instance we provisioned earlier and execute the following commands to create and configure the CI/CD user:
Listing 4.4 Remote server Terminal:
adduser --quiet --shell $SHELL --disabled-password --gecos 'GitlabCI User' gitlab-ci
usermod -a -G sudo gitlab-ci
echo 'gitlab-ci:changemepassword' | chpasswd
printf 'Match User gitlab-ci\n\tPasswordAuthentication yes\n' >> /etc/ssh/sshd_config
systemctl restart sshd
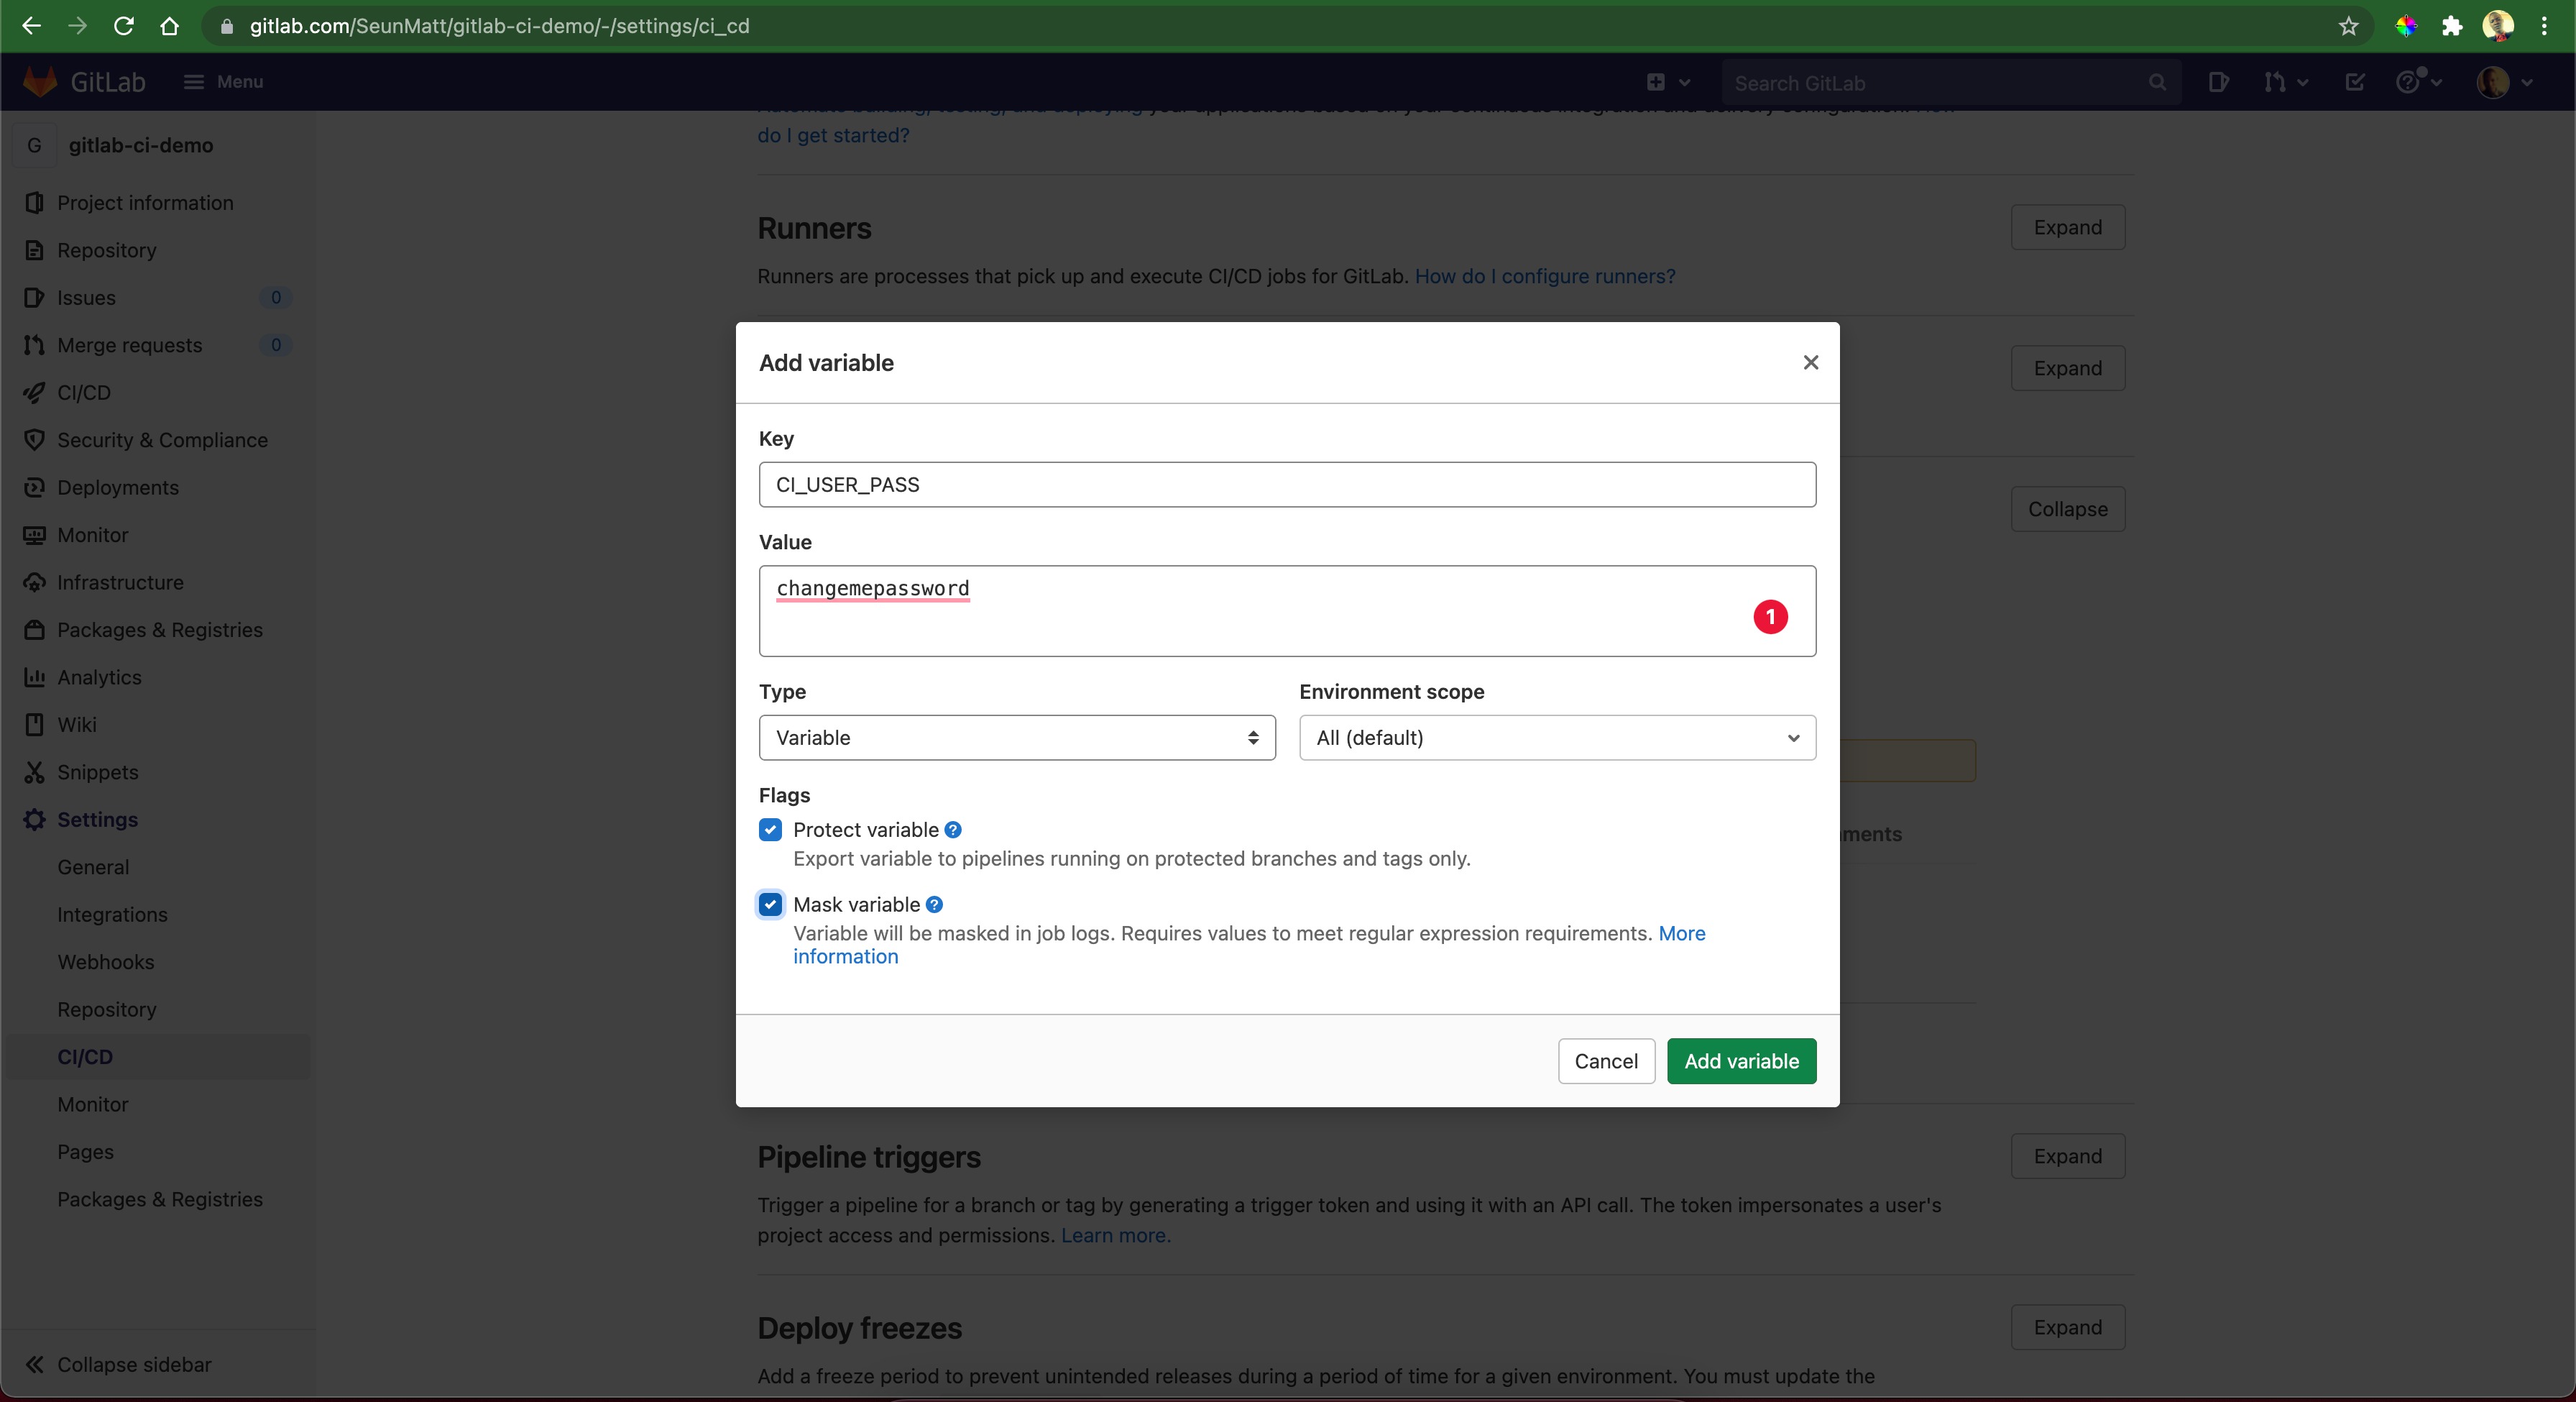
echo 'gitlab-ci ALL=(ALL) NOPASSWD: /bin/mv, NOPASSWD: /usr/bin/systemctl, NOPASSWD: /bin/cp' | sudo EDITOR='tee -a' visudoFirst, we created a new user called gitlab-ci and then we changed the user's password to changemepassword. Then we updated the ssh_config file to allow our new user to authenticate via password, and we restarted the sshd service.
The last command is very important, it disables prompting for the sudo password when we execute any of the following commands: mv, systemtctl and cp.
We need to set this because we'll be using the user in the CI/CD pipeline where there'll be no one available to input a `sudo` password.
We need to add gitlab-ci's password as an environment variable on GitLab so that we can reference it, securely, in our .gitlab-ci.yml file. To do that, we need to log in to our GitLab account >> Settings >> CI/CD >> Variables.
Once we expand the Variables section, we will see the button to add a new variable. We should click on it to add the variable:
Let's update our .gitlab-ci.yml file with the deploy job:
Listing 4.5 .gitlab-ci.yml:
deploy-master:

  before_script:

    - apt-get update -qq && apt-get install -y -qq sshpass

  stage: deploy

  script:

    - sshpass -V

    - export SSHPASS=$CI_USER_PASS

    - sshpass -e scp -o StrictHostKeyChecking=no target/gitlab-ci-demo.jar gitlab-ci@167.172.188.139:/home/gitlab-ci

    - sshpass -e ssh -tt -o StrictHostKeyChecking=no gitlab-ci@167.172.188.139 sudo mv /home/gitlab-ci/gitlab-ci-demo.jar /opt/java/webapps

    - sshpass -e ssh -tt -o StrictHostKeyChecking=no gitlab-ci@167.172.188.139 sudo systemctl restart gitlab-ci-demo.service
We installed sshpass in the before_script section. While in the script section, we exported the password for the CI user into the current environment as SSHPASS.
By so doing, sshpass will auto-respond to password prompts from the ssh and scp commands with the value of the environment variable SSHPASS.
The SSH commands we executed are pretty straightforward: we first use scp to copy the file to the home directory of the CI user on the server. Then we moved the file to the right directory and restarted the service using systemtctl.
The complete .gitlab-ci.yml fill will have the following contents:
Listing 4.6 .gitlab-ci.yml:
stages:

 - build

 - deploy


maven-build:

  image: maven:3-jdk-11

  stage: build

  script: "mvn package -B"

  artifacts:

    paths:

      - target/gitlab-ci-demo.jar


deploy-master:

  before_script:

    - apt-get update -qq && apt-get install -y -qq sshpass

  stage: deploy

  script:

    - sshpass -V

    - export SSHPASS=$CI_USER_PASS

    - sshpass -e scp -o StrictHostKeyChecking=no target/gitlab-ci-demo.jar gitlab-ci@167.172.188.139:/home/gitlab-ci

    - sshpass -e ssh -tt -o StrictHostKeyChecking=no gitlab-ci@167.172.188.139 sudo mv /home/gitlab-ci/gitlab-ci-demo.jar /opt/java/webapps

    - sshpass -e ssh -tt -o StrictHostKeyChecking=no gitlab-ci@167.172.188.139 sudo systemctl restart gitlab-ci-demo.service
Let's commit the new changes and push. As usual, GitLab will start the runner automatically and we can monitor the progress of the pipeline.
Once the pipeline has passed, we can navigate to our domain/IP address and see our web application running.
Step 5. Addendum
With what we've set up so far, every time we push to our Git repository, GitLab will build and deploy. What if we want GitLab to only deploy if we push to master? We can easily achieve that by adding a rules tag to the deploy-master:
Listing 4.7 .gitlab-ci.yml:
deploy-master:
  rules:
    - if: '$CI_COMMIT_BRANCH =~ /^master$/'
  before_script:
    - apt-get update -qq && apt-get install -y -qq sshpass
  stage: deploy
  script:
    - sshpass -V
    - export SSHPASS=$CI_USER_PASS
    - sshpass -e scp -o StrictHostKeyChecking=no target/gitlab-ci-demo.jar gitlab-ci@167.172.188.139:/home/gitlab-ci
    - sshpass -e ssh -tt -o StrictHostKeyChecking=no gitlab-ci@167.172.188.139 sudo mv /home/gitlab-ci/gitlab-ci-demo.jar /opt/java/webapps
    - sshpass -e ssh -tt -o StrictHostKeyChecking=no gitlab-ci@167.172.188.139 sudo systemctl restart gitlab-ci-demo.service
This way, if we push to any other branch other than master, only the maven-build job will run. However, if we merge or push to the master branch, both maven-build and deploy-master will run.
Conclusion
In this tutorial, we've looked at the basics of setting up a CI/CD pipeline on GitLab, and in the process, we deployed a simple Spring Boot application. Continue your learning by reading how to use Git submodules in GitLab.
GitLab CI/CD has more capabilities and features than those mentioned. I encourage you to read the official documentation to know more.
The complete source code is available on GitLab.
Opinions expressed by DZone contributors are their own.
Comments