Automate Your Flutter Testing With Appium
Automate Flutter testing using Appium for efficient, reliable testing, ensuring app quality and faster development cycles with ease.
Join the DZone community and get the full member experience.
Join For FreeIn the fast-paced development landscape, building high-quality mobile apps that provide a great user experience is crucial. This high quality can be ensured with thorough testing of these apps. The availability of numerous devices and platforms can be incredibly time-consuming. Thankfully, there are effective tools available for automating mobile app testing.
One increasingly popular framework for building mobile apps is Flutter. It enables you to build cross-platform mobile apps, leading to fast development times. However, testing the Flutter apps thoroughly is still required as the impact of issues can be huge on the customer base. Since manual testing can be time-consuming and error-prone, the best approach is to use the Appium automation framework.
In this article, we will go through an overview of Flutter, and see how Flutter apps can be automated using Appium.
Overview of Flutter and Appium
Flutter is an open-source framework developed by Google to build high-performance and beautiful mobile apps for iOS and Android using a single Dart codebase. It comes with reactive views, powerful widgets, and native performance. It provides the advantage of a fast development cycle as well.
Appium is an open-source automation testing framework for mobile apps. It allows automation across native, hybrid, and mobile web apps for iOS, Android, and Windows. Appium uses the WebDriver protocol to interact with the apps.
Appium enables you to write tests against Flutter apps using any WebDriver-compatible language, such as Java, Python, C#, Ruby, JavaScript, or PHP. We will be using Java in this article for demonstrations.
Setting up Flutter
To start working with the Flutter framework, you need to have Appium installed and set up in your system. You can easily install Flutter by following the steps in the Flutter Official Documentation.
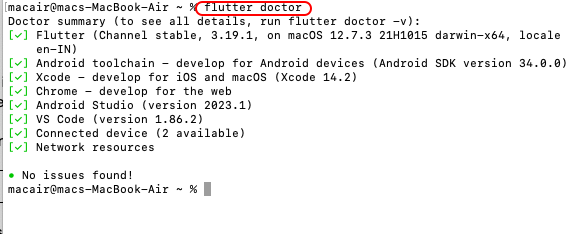
You can check the status of the Flutter setup by using the below command in the terminal-
flutter doctor
If everything is installed, you will see results like the following screenshot, if not, you can manually fix the errors as would be listed in the report.
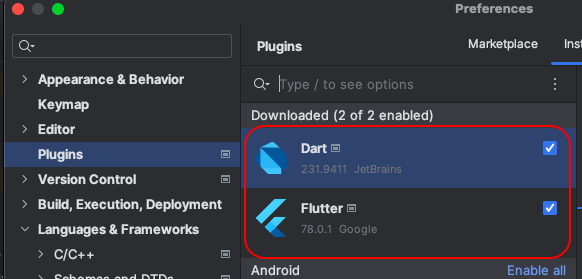
Before jumping onto creating or opening a Flutter app in Android Studio, ensure that Flutter and Dart plugins are installed in your Android Studio.
Running the Flutter App on an Android Emulator
Once you are done with setting up Flutter, the next step would be to clone or import the Flutter app that you would want to automate. You may either use your application or refer to any of the sample apps available for Flutter practice. For this article, we will be using a simple calculator application.
- Open Android Studio, and open the application folder of your Flutter app.
- Next, we will open the pubspec.yml file and update the
dev_dependenciesas below:
dev_dependencies:

 test: any

 flutter_driver:

   sdk: flutter

 flutter_test:

   sdk: flutter
The below screenshot shows the pubspec.yml file and the added dependencies.
 3. After adding the dependencies, we will have to import them, which can be done using the below command in the terminal:
flutter pub get 
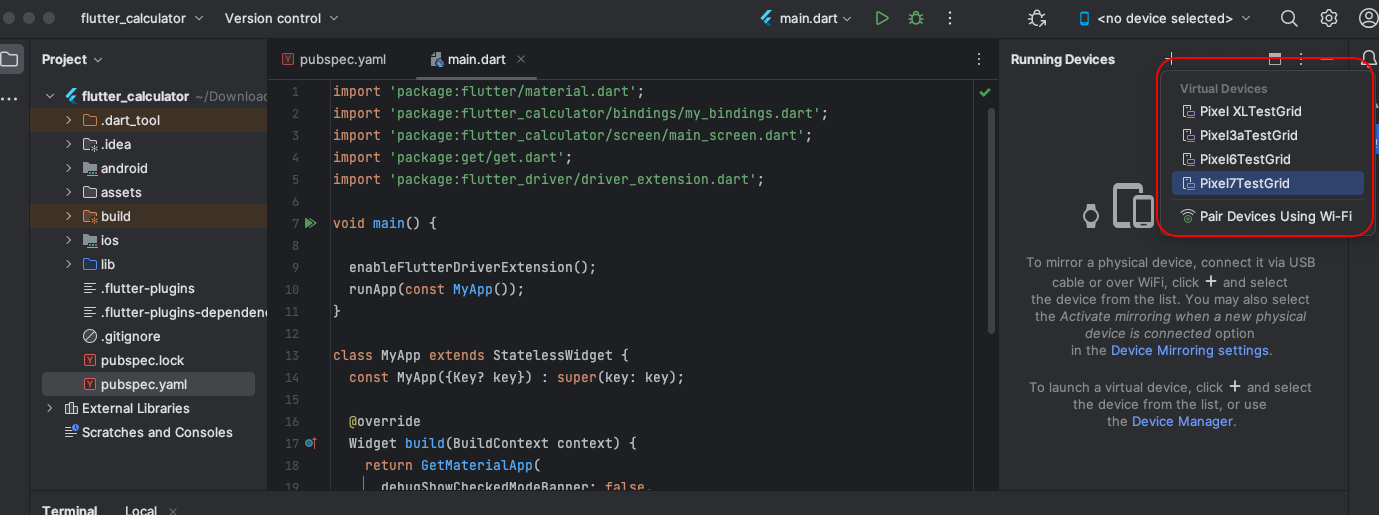
4. Now, we will update the main.dart file to import the flutter_driver_extension. We will be writing an import statement- import ‘package:flutter_driver/driver_extension.dart’; and also add a method- enableFlutterDriverExtension() in the main method. This should be written before the runApp() method. The code would look like the following:
import 'package:flutter/material.dart';

import 'package:flutter_calculator/bindings/my_bindings.dart';

import 'package:flutter_calculator/screen/main_screen.dart';

import 'package:get/get.dart';

import 'package:flutter_driver/driver_extension.dart';


void main() {


 enableFlutterDriverExtension();

 runApp(const MyApp());

}


class MyApp extends StatelessWidget {

 const MyApp({Key? key}) : super(key: key);


 @override

 Widget build(BuildContext context) {

   return GetMaterialApp(

     debugShowCheckedModeBanner: false,

     initialBinding: MyBindings(),

     title: "Flutter Calculator",

     home: MainScreen(),

   );

 }

}
5. After the above changes are made, we will start the Flutter app on the Android emulator. We will be selecting the device that we would want to use to run our application.
6. Once the emulator is connected, click on the Run button
 7. You will notice that the Flutter app opens up in the emulator as shown in the screenshot.

Now that we know how we run a Flutter app on our system, in the next section we will learn about Appium Flutter Driver to automate Flutter apps.
Using Appium Flutter Driver for Flutter App Automation
Appium comes with a powerful extension called Appium Flutter Driver, which simplifies the automation of Flutter App using Appium. It acts as a bridge between the test scripts and the Flutter Driver.
The Appium Flutter Driver handles all the complex configurations of sending the commands to the Flutter Driver, like
- Automatically launching the Flutter Driver extension.
- Managing the connection channels.
- Sending instructions to the tests running in isolation.
It also enables cross-platform operations by allowing you to write test code once and apply it across both iOS and Android platforms.
The Appium Flutter Driver offers advanced locator strategies through
- Flutter Finder: Which queries widgets present on the screen
- Semantics: Which locates widgets based on accessible names or labels
- Ancestor: Traverses widget hierarchy
Inspecting Widgets With Flutter Inspector
Flutter provides a handy tool called the Flutter Inspector that helps in visually inspecting and checking widgets in your application. It simplifies locating the app’s interactable elements, hence smoothes Appium test automation.
- It allows you to select any widget rendered by Flutter and copy its unique element locators like the accessibility_id. By doing so, you can achieve precise locator targeting.
- UI structure can be validated by looking at the widget hierarchy and structure.
- The inspector outlines the selected widget in the app preview, which highlights the bounds used for processing taos and touches in Flutter. This helps in proper gesture placement.
Flutter Inspector acts as a companion that helps elevate automation workflows to the next level in Appium test automation.
The Flutter Inspector can be opened after the emulator is launched by clicking on the Flutter Inspector Icon on the right pane:

Suppose, I want to find the locator for numbers 4 and 6, operator ‘x’ and =, then I will click on the Toggle Select Widget Mode in the Flutter Inspector.
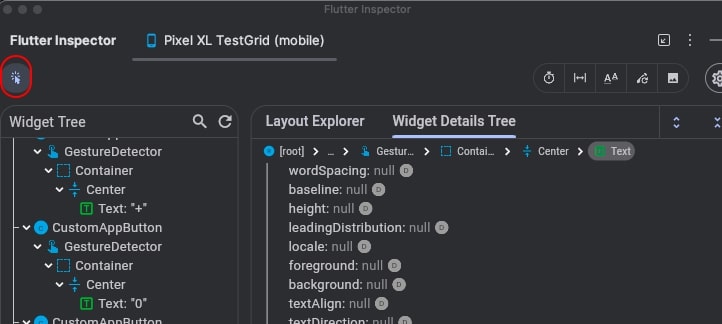
Then I will click on the elements that I would want to assess, which will open up the structure of the elements as shown below:

From here, you can capture the locator details and use them in your test script later.
As you may see, most of the elements are using the text widget, hence, I will add a property valueKey to the user output text to uniquely identify it and then build the application.
Updated code in main_screen.dart file.
Container(

 alignment: Alignment.bottomRight,

 child: Text(

   controller.userOutput,

   key:ValueKey("res"),

   style: GoogleFonts.ubuntu(

     fontWeight: FontWeight.bold,

     color: themeController.isDark ? Colors.white : Colors.black,

     fontSize: 60,

   ),

 ),

),
The file should look as shown in the snapshot below:
![file]() Generating the Flutter App Build
Generating the Flutter App Build
 Generating the Flutter App Build
Now that our application is working fine, and we know how to use Flutter Inspector to locate mobile elements, we will generate an Android build of our app. To do so, run the below command in the terminal:
flutter build apk --debug
You may use the –profile mode as well to create the build.
If you wish to create an iOS build, you may use the below commands:
flutter build ios --debug
flutter build ios --profile
flutter build ios --simulator
You will see the apk has been built successfully and resides in the location as shown in the logs.
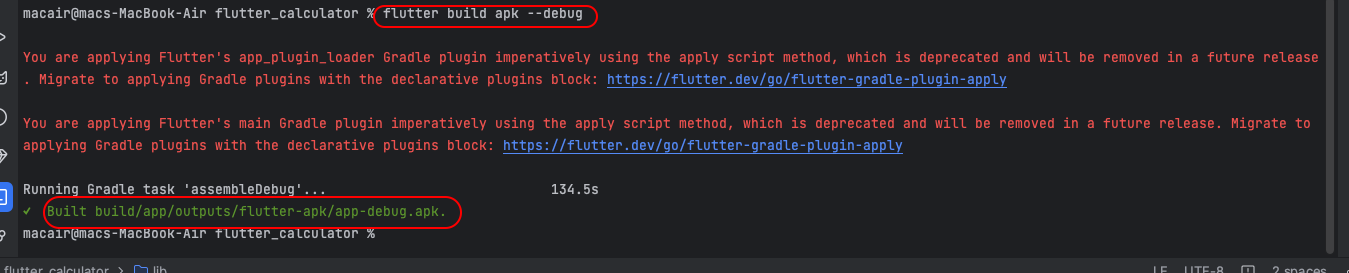
 We will now use this apk in our automation tests.
Using Appium To Automate Flutter App
We will be using the below use case for the automation demo:
- Open the Calculator app.
- Perform the addition of two numbers.
- Validate the result.
To start implementing the test scenario, we will first install the flutter driver using the below command:
appium driver install –source=npm appium-flutter-driver
You may confirm the installation using the below command:
appium driver list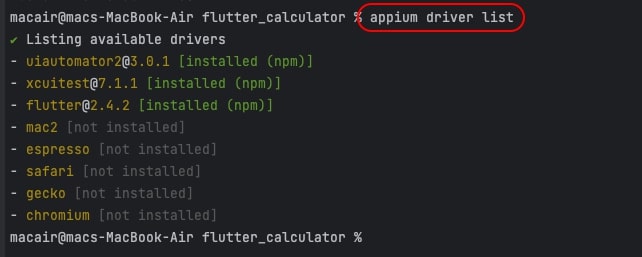
We are now all set to write our automation script for the calculator app. We have created a Maven project in Eclipse and added the Appium, flutter-finder, and TestNG dependencies to the pom.xml file. The Flutter finder helps to locate elements in the app with its multiple methods.
<project xmlns="http://maven.apache.org/POM/4.0.0"

 xmlns:xsi="http://www.w3.org/2001/XMLSchema-instance" xsi:schemaLocation="http://maven.apache.org/POM/4.0.0

https://maven.apache.org/xsd/maven-4.0.0.xsd">

 <modelVersion>4.0.0</modelVersion>

 <groupId>AppiumProject</groupId>

 <artifactId>AppiumProject</artifactId>

 <version>0.0.1-SNAPSHOT</version>

 <dependencies>
 <!-- https://mvnrepository.com/artifact/org.testng/testng -->

<dependency>

   <groupId>org.testng</groupId>

   <artifactId>testng</artifactId>

   <version>7.9.0</version>

   <scope>test</scope>

</dependency>

<!-- https://mvnrepository.com/artifact/io.appium/java-client -->

<dependency>

   <groupId>io.appium</groupId>

   <artifactId>java-client</artifactId>

   <version>9.0.0</version>

</dependency>

<!-- https://mvnrepository.com/artifact/io.github.ashwithpoojary98/appium_flutterfinder_java -->

<dependency>

   <groupId>io.github.ashwithpoojary98</groupId>

   <artifactId>appium_flutterfinder_java</artifactId>

   <version>1.0.5</version>

</dependency>
</dependencies>

</project>
We’re creating a simple class to test our scenario:
package flutter;

import org.testng.annotations.AfterTest;

import org.testng.annotations.BeforeTest;

import org.testng.annotations.Test;

import java.net.MalformedURLException;

import java.net.URL;

import org.openqa.selenium.remote.DesiredCapabilities;

import org.testng.annotations.Test;

import io.appium.java_client.android.AndroidDriver;

import io.github.ashwith.flutter.FlutterFinder;


public class Flutter_Calc {

    AndroidDriver driver;

    @BeforeTest

    public void setUp() throws MalformedURLException {

        //Setting desired capabilities for the android device with details like device name, version,etc

          DesiredCapabilities dc = new DesiredCapabilities();

          dc.setCapability("platformName", "android");

          dc.setCapability("platformVersion","14.0");

          dc.setCapability("deviceName","Pixel7_TestGrid");

          dc.setCapability("automationName", "Flutter");

//          //setting capability for application we want to test

          dc.setCapability("app","/Users/macair/Documents/Selenium/app-debug.apk");

//          //Instantiating Android Driver and using Appium server host and port

           driver= new AndroidDriver(new URL("http://192.168.29.88:4723/wd/hub"), dc);

          System.out.println("Created AppiumDriver");

    }

    @Test

    public void multiply() {

        //Instantiating the FlutterFinder object and passing driver to it

         FlutterFinder finder = new FlutterFinder(driver);

        //Locating numbers, mathematical operator and equals button on the calculator app

        finder.byText("4").click();

        finder.byText("x").click();

        finder.byText("7").click();

        finder.byText("=").click();

        String res1 = finder.byValueKey("res").getText();

        System.out.println(res1);


    }


    @AfterTest

    public void tearDown() {

        driver.quit();

    }


}
Ensure that your Appium server is up and running. You can start the same using the Terminal command:
appium -p 4723 --base-path /wd/hub
Once the Appium server is up, upon executing the above test, we will see the execution happening in the emulator and logs getting printed in the console.

And that’s how you can easily automate your Flutter application and use a single codebase to automate both your iOS and Android apps.
Automating Flutter App Using TestGrid
TestGrid is a dedicated test orchestration platform that not only simplifies but also enhances test automation at scale. TestGrid also offers automation of Flutter Apps through its easy codeless feature. This feature not only simplifies the entire automation process but also allows quick onboarding of team members to automation. Let us automate the same scenarios using TestGrid’s codeless automation.
After logging in to TestGrid, navigate to the Codeless tab.

2. Within your module, navigate to Test Cases, and click on Add Test Case With Scriptless.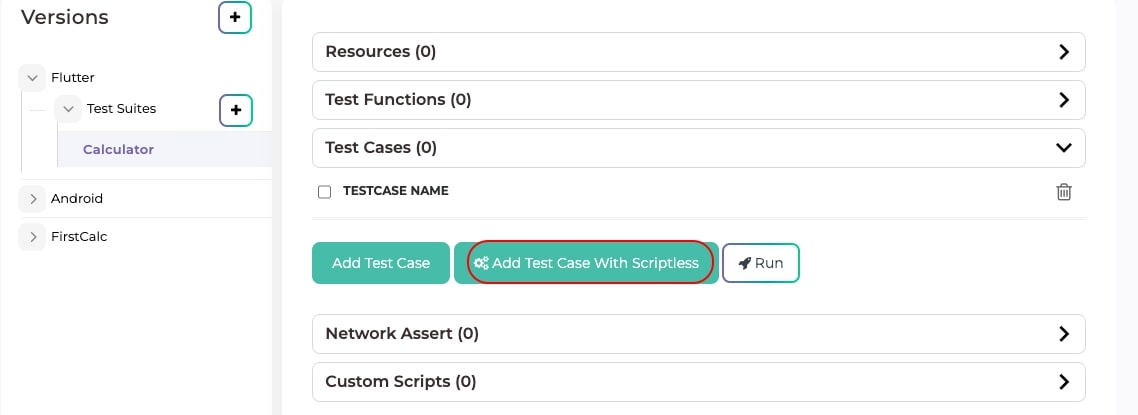
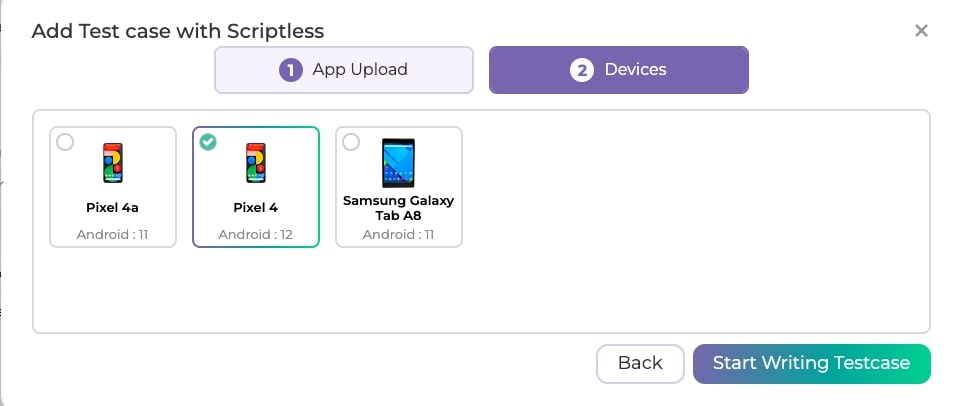
3. Now, add the test case name, and description, and upload the Flutter apk. Note that you can use your iOS build as well.

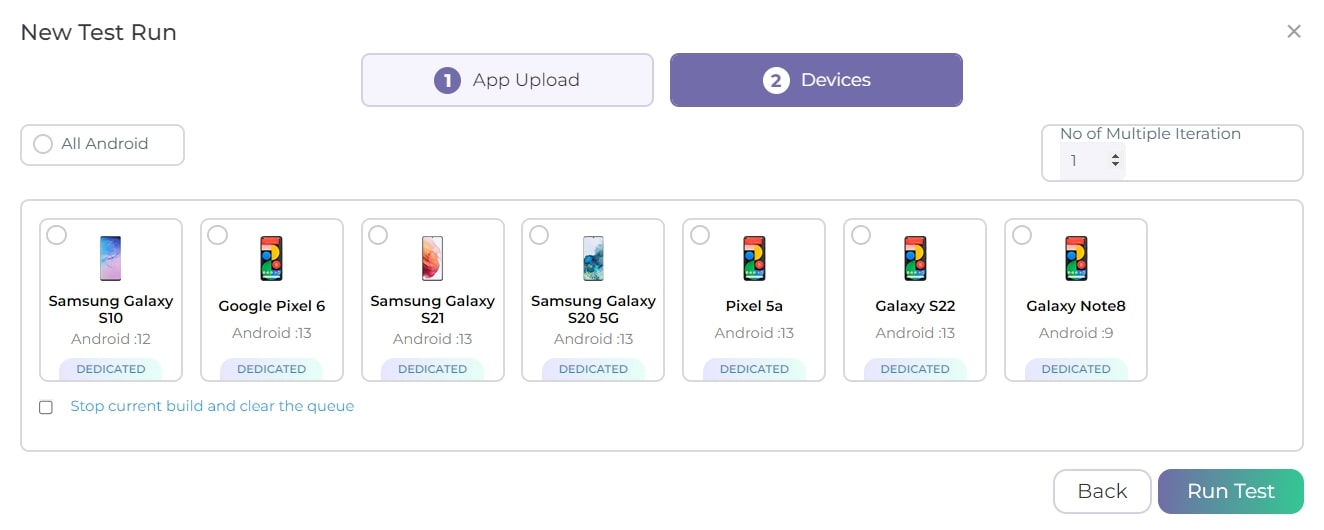
4. Now, select the device you would want to execute your test with and click on Start Writing the Test Case.
5. Now, through TestGrid’s interactive user interface select the Action and the corresponding Elements for the Test Case steps. Alternatively, you may choose to start recording your actions for them to be automatically captured. Once done, click on the Save button.

6. Your Test Case is now ready for execution, and you can execute the same using the Run button.
7. As you can see from the below screenshot, proper execution logs are displayed for your run.

You may review the logs, make changes to your script based on the results, and re-run the test case.
With its powerful integrations, automated reporting, and customizable dashboards, TestGrid enables engineers to focus on enhancing the test coverage and performance of their Flutter Apps. The platform takes care of the rest!
Conclusion
Appium enables comprehensive test automation for Flutter mobile applications by configuring the Appium Flutter Driver and Flutter Inspector. The Flutter Driver handles unit and widget testing. Appium then thoroughly validates UI, user journeys, localization, device integration, and many other aspects. Robust selectors generated using Flutter Finder help accurately target elements. Integrations with solutions like TestGrid help in monitoring automation quality via dashboards.
Published at DZone with permission of Gunjan Kaushik. See the original article here.
Opinions expressed by DZone contributors are their own.
Comments