AWS: Integrating OpenAPI With the Amazon API Gateway and Lambda Functions
Learn how to use OpenAPI to adopt an IaC approach consisting in defining an API in a repeatable and deterministic manner.
Join the DZone community and get the full member experience.
Join For FreeAPI Gateway is the AWS service that allows interfacing an application's back-end with its front-end. The figure below shows an example of such an application, consisting of a web/mobile-based front-end and a back-end residing in a REST API, implemented as a set of serverless Lambda functions, as well as a number of legacy services.
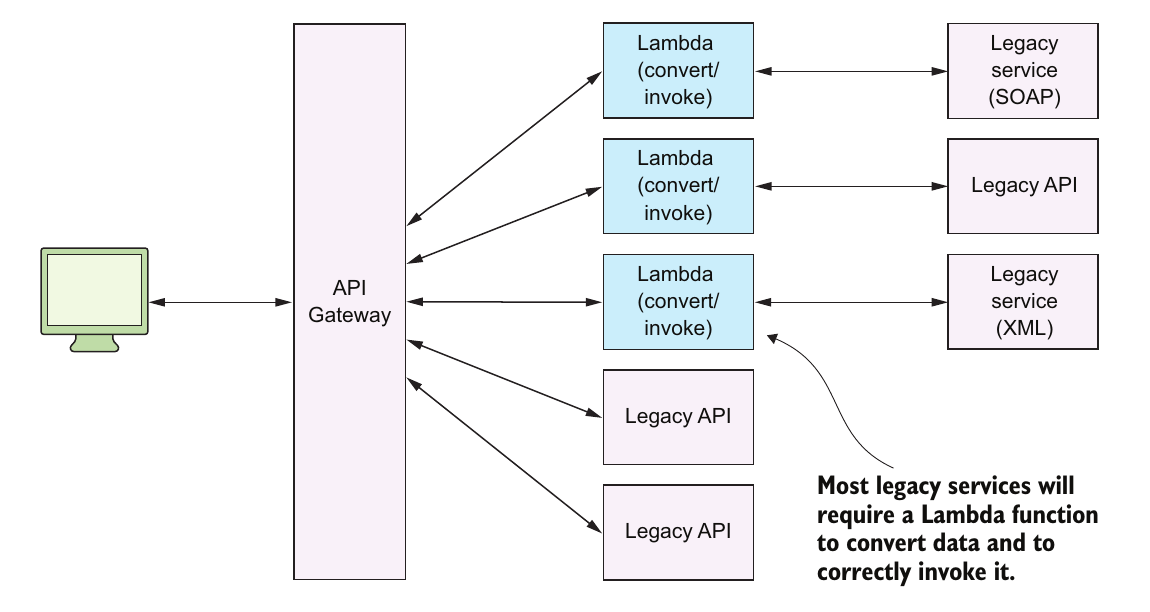
The figure above illustrates the so-called design pattern Legacy API Proxy, as described by Peter Sbarski, Yan Cui, and Ajay Nair in their excellent book Serverless Architectures on AWS (Manning, 2022). This pattern refers to a use case where Amazon API Gateway and Lambda are employed together, in order to create a new API layer over legacy APIs and services, such that to adapt and reuse them. In this design, the API Gateway exposes a REST interface invoking Lambda functions which, in turn, modify the requests and the responses or transform data to legacy-specific formats. This way, legacy services may be consumed by modern clients that don't support older protocols.
This can be done, of course, using the AWS Console, by selecting the API Gateway service and, on the behalf of the proposed GUI (Graphical User Interface), by browsing among the dozens of possible options such that, about one hour later, to come to a functional skeleton. And when our API specifications are changing, i.e., several times per month, we need to start again, from the beginning.
We shall not proceed accordingly. We will rather adopt an IaC (Infrastructure as Code) approach consisting in defining our API in a repeatable and deterministic manner. This could be done in several ways, via a script-based automation process using, for example, AWS CLI (Command Line Interpreter), CloudFormation, or Terraform. But there is another interesting alternative that most developers prefer: OpenAPI. And it's this alternative that we chose to use here, as shown further.
Designing the REST Interface With OpenAPI
In 2011, SmartBear Software, a small company specializing in testing and monitoring tools, developed Swagger, a set of utilities dedicated to the creation and documentation of RESTful services. Several years later in November 2015 under the auspices of the Linux Foundation, this same company was announcing the creation of a new organization, named OpenAPI Initiative. Other majors, like Google, IBM, etc., got committed as founding members. In January 2016, Swagger changed its name and became OpenAPI.
OpenAPI is a formalism based on the YAML notation, which could also be expressed in JSON. It aims at defining REST APIs in a language-agnostic manner. There are currently a lot of tools around OpenAPI and our goal here isn't to extensively look at all the possibilities which are open to us, as far as these tools and their utilization is concerned. One of the most common use cases is probably to login to the SwaggerHub online service, create a new API project, export the resulted YAML file, and use it in conjunction with the SAM (Serverless Application Model) tool in order to expose the given API via Amazon API Gateway.
And since we need to illustrate the modus operandi described above, let's consider the use case of a money transfer service, named send-money. This service, as its name clearly shows it, is responsible to perform bank account transfers. It exposes a REST API whose specifications are presented in the table below:
| Resource | HTTP Request | Action | Java Class |
|---|---|---|---|
| /orders | GET | Get the full list of the currently registered orders | GetMoneyTransferOrders |
| /orders | POST | Create a new money transfer order | CreateMoneyTransferOrder |
| /orders | PUT | Update an existing money transfer order | UpdateMoneyTransferOrder |
| /orders/{ref} | GET | Get the money transfer order identified by its reference passed as an argument |
GetMoneyTransferOrder |
| /orders/{ref} | DELETE | Remove the money transfer order identified by its reference passed as an argument | RemoveMoneyTransferOrder |
This simple use case, consisting of a CRUD (Create, Read, Update, Delete) and exposed as a REST API, is the one that we chose to implement here, such that to illustrate the scenario described above and here are the required steps:
- Go to the Send Money API on SwaggerHub. Here you'll find an already prepared project showing the OpenAPI specification of the REST API defined in the table above. This is a public project and, in order to get access, one doesn't need to register and log in.
- You'll be presented with a screen similar to the one in the figure below:
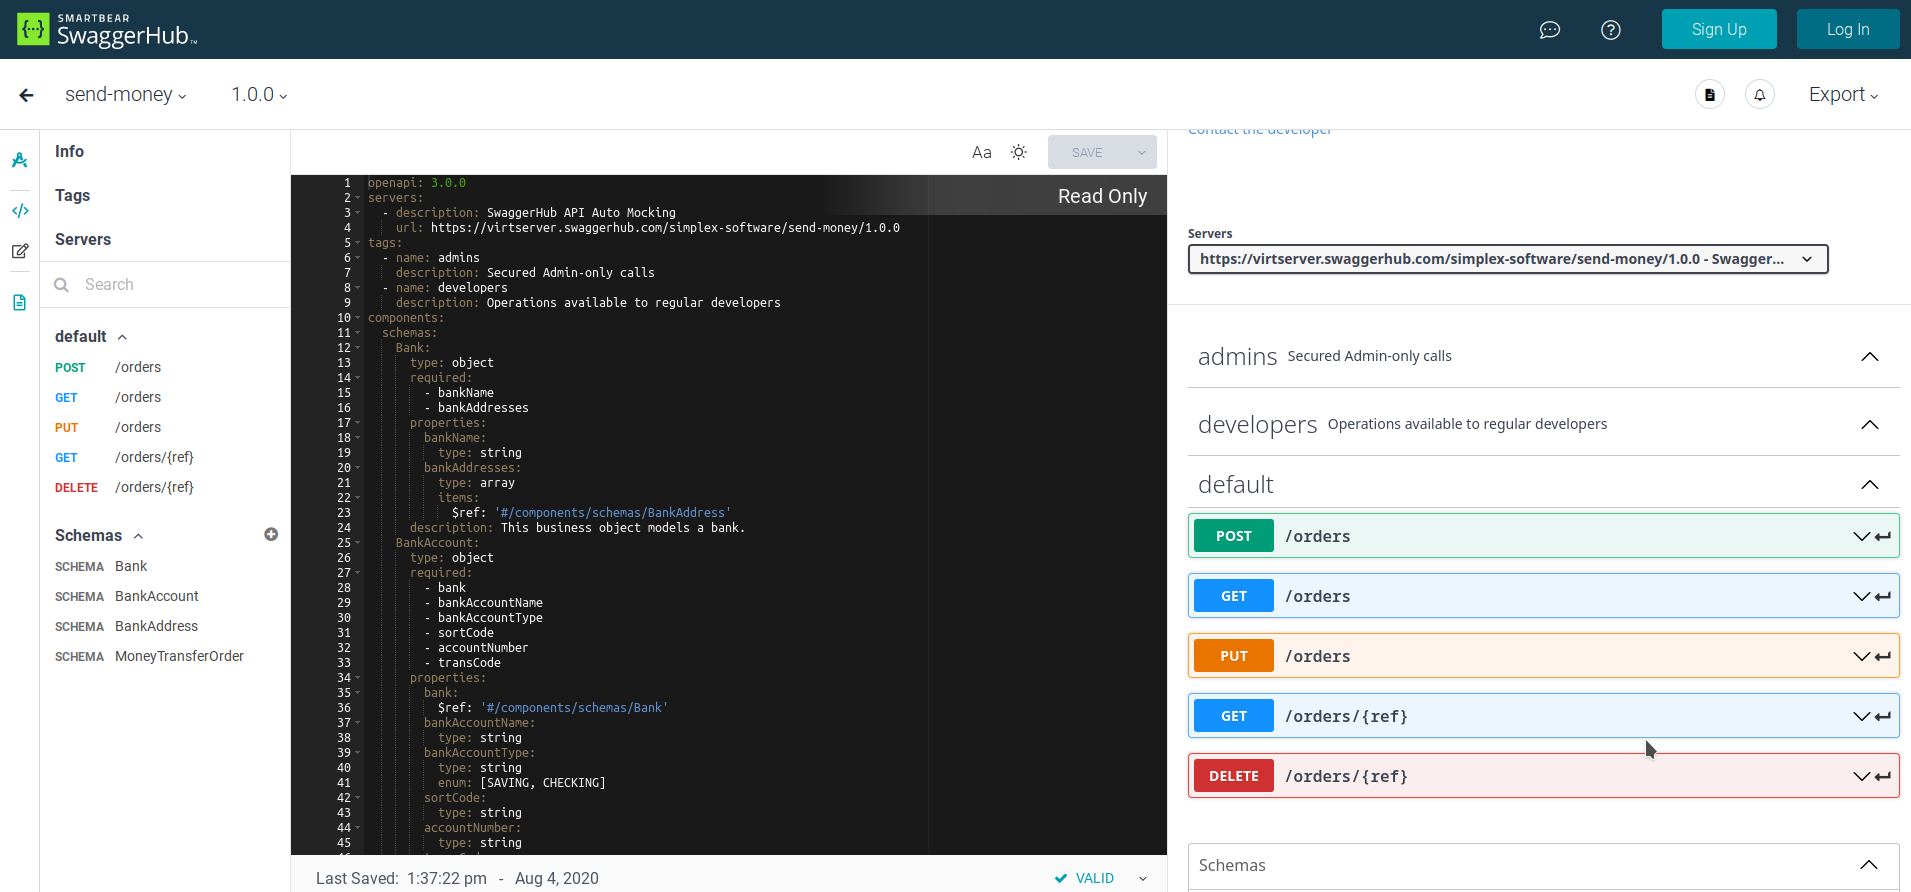
This screen shows in its left pane the OpenAPI description of our API. Once again, the full explanation of the OpenAPI notation is out of our scope here, as this topic might make the subject of an entire book, like the excellent one of Joshua S. Ponelat and Lukas L. Rosenstock, titled Designing APIs with Swagger and OpenAPI (Manning 2022).
The right pane of the screen presents schematically the HTTP requests of our API and allows, among others, to test it. You may spend some time browsing in this part of the screen, by clicking the button labeled with an HTTP request and then selecting Try it out. Notice that these tests are simulated, of course, as there is no concrete implementation behind them. However, they allow you to make sure that the API is correctly defined, from a syntactical and a semantic point of view.
Now that you finished playing with the test interface, you can use the Export -> Download API -> YAML Resolved function located in the screen's rightmost upper corner to download our API OpenAPI definition in YAML format. In fact, you don't really have to do that because you can find this same file in the Maven project used to exemplify this blog ticket.
Let's have now a quick look at this YAML file. The first thing we notice is the declaration openapi: which defines the version of the notation that we're using: in this case, 3.0.0. The section labeled info identifies general information like the API name, its author, and the associated contact details, etc.
The next element, labeled servers: defines the auto-mocking function. It allows us to run the simulated tests outside the SwagerHub site. Just copy the URL declared here and use it with your preferred browser.
Last but not least, we have the element labeled paths: where our API endpoints are defined. There are two such endpoints: /orders and /orders/{ref}. For each one, we define the associated HTTP requests, their parameters as well as the responses, including the HTTP headers. OpenAPI is an agnostic notation and, consequently, it isn't bound to any specific technology, framework, or programming language. However, AWS-specific extensions are available. One of these extensions is x-amazon-apigateway-integration which allows a REST endpoint to connect to the API Gateway. As you can see looking at the OpenAPI YAML definition, each endpoint includes an element labeled x-amazon-apigateway-integration which declares, among others, the URL of the Lambda function where the call will be forwarded.
The Project
Ok, we have an OpenAPI specification of our API. In order to generate an API Gateway stack out of it and deploy it on AWS, we will use SAM, as explained above. For more details on SAM and how to use it, please don't hesitate to have a look here.
Our Java project containing all the required elements may be found here. Once you cloned it from GitHub, open the file template.yaml. We reproduce it below:
AWSTemplateFormatVersion: '2010-09-09'
Transform: 'AWS::Serverless-2016-10-31'
Description: Send Money SAM Template
Globals:
  Function:
    Runtime: java11
    MemorySize: 512
    Timeout: 10
    Tracing: Active
Parameters:
  BucketName:
    Type: String
    Description: The name of the S3 bucket in which the OpenAPI specification is stored
Resources:
  SendMoneyRestAPI:
    Type: AWS::Serverless::Api
    Properties:
      Name:
        send-money-api
      StageName:
        dev
      DefinitionBody:
        Fn::Transform:
          Name: AWS::Include
          Parameters:
            Location:
              Fn::Join:
                - ''
                - - 's3://'
                  - Ref: BucketName
                  - '/openapi.yaml'
  MoneyTransferOrderFunction:
    Type: AWS::Serverless::Function
    Properties:
      FunctionName: MoneyTransferOrderFunction
      CodeUri: send-money-lambda/target/send-money.jar
      Handler: fr.simplex_software.aws.lambda.send_money.functions.MoneyTransferOrder::handleRequest
      Events:
        GetAll:
          Type: Api
          Properties:
            RestApiId:
              Ref: SendMoneyRestAPI
            Path: /orders
            Method: GET
        Get:
          Type: Api
          Properties:
            RestApiId:
              Ref: SendMoneyRestAPI
            Path: /orders
            Method: GET
        Create:
          Type: Api
          Properties:
            RestApiId:
              Ref: SendMoneyRestAPI
            Path: /orders
            Method: POST
        Update:
          Type: Api
          Properties:
            RestApiId:
              Ref: SendMoneyRestAPI
            Path: /orders
            Method: PUT
        Delete:
          Type: Api
          Properties:
            RestApiId:
              Ref: SendMoneyRestAPI
            Path: /orders
            Method: DELETE
  ConfigLambdaPermissionForMoneyTransferOrderFunction:
    Type: "AWS::Lambda::Permission"
    DependsOn:
      - SendMoneyRestAPI
    Properties:
      Action: lambda:InvokeFunction
      FunctionName: !Ref MoneyTransferOrderFunction
      Principal: apigateway.amazonaws.com
Our template.yaml file will create an AWS CloudFormation stack containing an API Gateway. This API Gateway will be generated from the OpenAPI specification that we just discussed. The DefinitionBody element in the SendMoneyAPI resource says that the API's endpoints are described by the file named openapi.yaml located in an S3 bucket, which name is passed as an input parameter. The idea here is that we need to create a new S3 bucket, copy into it our OpenAPI specifications in the form of an yaml file, and use this bucket as an input source for the AWS CloudFormation stack containing the API Gateway.
A Lambda function, named MoneyTransferOrderFunction, is defined in this same SAM template as well. The CodeUri parameter configures the location of the Java archive which contains the associated code, while the Handler one declares the name of the Java method implementing the AWS Lambda Request Handler. Last but not least, the Event paragraph sets the HTTP requests that our Lambda function is serving. As you can see, there are 5 endpoints, labeled as follows (each defined in the OpenAPI specification):
GetAllmapped to theGET /ordersoperationGetmapped to theGET /orders/{ref}operationCreatemapped to thePOST /ordersoperationUpdatemapped to thePUT /ordersoperationDeletemapped to theDELETE /orders/{ref}operation
To build and deploy the project, proceed as shown in the listing below:
$ mkdir test-aws
$ cd test-aws
$ git clone https://github.com/nicolasduminil/aws-showcase
...
$mvn package
...
$ ./deploy.sh
...
make_bucket: bucketname-3454
upload: ./open-api.yaml to s3://bucketname-3454/openapi.yaml
        Uploading to 73e5d262c96743505970ad88159b929b  2938384 / 2938384  (100.00%)

        Deploying with following values
        ===============================
        Stack name                   : money-transfer-stack
        Region                       : eu-west-3
        Confirm changeset            : False
        Disable rollback             : False
        Deployment s3 bucket         : bucketname-3454
        Capabilities                 : ["CAPABILITY_IAM"]
        Parameter overrides          : {"BucketName": "bucketname-3454"}
        Signing Profiles             : {}

Initiating deployment
=====================

        Uploading to b0cf548da696c5a94419a83c5088de48.template  2350 / 2350  (100.00%)


Waiting for changeset to be created..

CloudFormation stack changeset
...
Successfully created/updated stack - money-transfer-stack in eu-west-3

Your API with ID mtr6ryktjk is deployed and ready to be tested at https://mtr6ryktjk.execute-api.eu-west-3.amazonaws.com/dev
In this listing, we start by cloning the Git repository containing the project. Then, we execute a Maven build, which will package the Java archive named send-money-lambda.jar, after having performed some unit tests.
The script deploy.sh, like its name implies, is effectively responsible to fulfill the deployment operation. Its code is reproduced below:
#!/bin/bash
RANDOM=$$
BUCKET_NAME=bucketname-$RANDOM
STAGE_NAME=dev
AWS_REGION=$(aws configure list | grep region | awk '{print $2}')
aws s3 mb s3://$BUCKET_NAME
echo $BUCKET_NAME > bucket-name.txt
aws s3 cp open-api.yaml s3://$BUCKET_NAME/openapi.yaml
sam deploy --s3-bucket $BUCKET_NAME --stack-name money-transfer-stack --capabilities CAPABILITY_IAM --parameter-overrides BucketName=$BUCKET_NAME
aws cloudformation wait stack-create-complete --stack-name money-transfer-stack
API_ID=$(aws apigateway get-rest-apis --query "items[?name=='send-money-api'].id" --output text)
aws apigateway create-deployment --rest-api-id $API_ID --stage-name $STAGE_NAME >/dev/null 2>&1
echo "Your API with ID $API_ID is deployed and ready to be tested at https://$API_ID.execute-api.$AWS_REGION.amazonaws.com/$STAGE_NAME"
We're using here the $$ Linux command which generates a random number. By appending this randomly generated number to the S3 bucket name that will be used in order to store the OpenAPI specification file, we satisfy its region-wide uniqueness condition. This bucket name is further stored in a local file, such that it can be later retrieved and cleaned up. Notice also the aws configure command used in order to get the current AWS region.
The command aws s3 mb is creating the S3 bucket. Here mb states for make bucket. Once the bucket is created, we'll be using it in order to store inside the open-api.yaml file, containing the API specifications. This is done on the behalf of the command aws s3 cp.
Now, we are ready to start the deployment process. This is done through the sam deploy command. Since this operation might take a while, we need to wait until the AWS CloudFormation stack is completely created before continuing. This is done by the statement aws cloudformation wait, as shown in the listing above.
The last operation is the deployment of the previously created API Gateway, done by running the aws apigateway create-deployment command. Here we need to pass, as an input parameter, the API Gateway identifier, retrieved on the behalf of the command aws apigateway get-rest-api, which returns information about all the current API Gateways. Then, using the --query option, we filter among the JSON payload, in order to find ours, named send-money-api.
At the end of its execution, the script displays the URL of the newly created API Gateways. This is the URL that can be used for testing purposes. For example, you may use Postman, if you have it installed, or simply the AWS Console, which benefits a nice and intuitive test interface.
If you decide to use the AWS Console, you need to select the API Gateway service and you'll be presented with the list of all current existent ones. Clicking on the one named send-money-api will display the list of the endpoint to be tested. For that, you need to start, of course, by creating a new money transfer order. You can do this by pasting the JSON payload below in the request body:
{
    "amount": 200,
    "reference": "reference",
    "sourceAccount": {
        "accountID": "accountId",
        "accountNumber": "accountNumber",
        "accountType": "CHECKING",
        "bank": {
            "bankAddresses": [
                {
                    "cityName": "poBox",
                    "countryName": "countryName",
                    "poBox": "cityName",
                    "streetName": "streetName",
                    "streetNumber": "10",
                    "zipCode": "zipCode"
                }
            ],
            "bankName": "bankName"
        },
        "sortCode": "sortCode",
        "transCode": "transCode"
    },
    "targetAccount": {
        "accountID": "accountId",
        "accountNumber": "accountNumber",
        "accountType": "CHECKING",
        "bank": {
            "bankAddresses": [
                {
                    "cityName": "poBox",
                    "countryName": "countryName",
                    "poBox": "cityName",
                    "streetName": "streetName",
                    "streetNumber": "10",
                    "zipCode": "zipCode"
                }
            ],
            "bankName": "bankName"
        },
        "sortCode": "sortCode",
        "transCode": "transCode"
    }
}
If the status code appearing in the AWS Console is 200, then the operation has succeeded and now you can test the two GET operations, the one retrieving all the existent money transfer orders and the one getting the money transfer order identified by its reference. For this last one, you need to initialize the input parameter of the HTTP GET request with the value of the money transfer order reference which, in our test, is simply "reference".
In order to test the PUT operation, just paste in its body the same JSON payload used previously to test the POST, and slightly modify it. For example, modify the amount to 500 instead of 200. Test again now the two GET operations and they should retrieve a newly updated money transfer order, this time having an amount of 500.
When you finished playing with the AWS Console interface, test the DELETE operation and paste the same reference in its input parameter. After that, the two GET operations should return an empty result set.
If you're tired to use the AWS Console, you can switch to the provided integration test. First, you need to open the FunctionsIT class in the send-money-lambda Maven module. Here, you need to make sure that the static constant named AWS_GATEWAY_URL matches the URL displayed by the deploy.sh script. Then compile and run the integration tests as follows:
mvn test-compile failsafe:integration-testYou should see statistics showing that all the integration tests have succeeded.
Have fun!
Opinions expressed by DZone contributors are their own.
Comments