Build a Digital Collectibles Portal Using Flow and Cadence (Part 1)
Understand more about the Flow blockchain and Cadence smart contract language by building a new website focused on collecting digital collectibles.
Join the DZone community and get the full member experience.
Join For FreeIn this tutorial, we’ll learn how to build a website for collecting digital collectibles (or NFTs) on the blockchain Flow. We'll use the smart contract language Cadence along with React to make it all happen. We'll also learn about Flow, its advantages, and the fun tools we can use.
By the end of this article, you’ll have the tools and knowledge you need to create your own decentralized application on the Flow blockchain.
Let’s dive right in!

What Are We Building?
We're building an application for digital collectibles. Each collectible is a Non-Fungible Token (NFT). (If you are new and don’t understand NFT, then take a look here.) Our app will allow you to collect NFTs, and each item will be unique from the others.
To make all this work, we’ll use Flow's NonFungibleToken Standard, which is a set of rules that helps us manage these special digital items (similar to ERC-721 in Ethereum).
Prerequisites
Before you begin, be sure to install the Flow CLI on your system. If you haven't done so, follow these installation instructions.
Setting Up
If you're ready to kickstart your project, first, type in the command flow setup.
This command does some magic behind the scenes to set up the foundation of your project. It creates a folder system and sets up a file called flow.json to configure your project, making sure everything is organized and ready to go!

Project Structure
The project will contain a cadence folder and flow.json file. (A flow.json file is a configuration file for your project, automatically maintained.)
The Cadence folder contains the following:
/contracts:Contains all Cadence contracts./scripts: Holds all Cadence scripts./transactions: Stores all Cadence transactions.
Follow the steps below to use Flow NFT Standard.
Step 1: Create a File
First, go to the flow-collectibles-portal folder and find the cadence folder. Then, open the contracts folder. Make a new file and name it NonFungibleToken.cdc.
Step 2: Copy and Paste
Now, open the link named NonFungibleToken, which contains the NFT standard. Copy all the content from that file and paste it into the new file you just created ("NonFungibleToken.cdc"). That's it! You've successfully set up the standards for your project.
Now, let’s write some code!
However, before we dive into coding, it's important for developers to establish a mental model of how to structure their code.
At the top level, our codebase consists of three main components:
- NFT: Each collectible is represented as an NFT.
- Collection: A collection refers to a group of NFTs owned by a specific user.
- Global Functions and Variables: These are functions and variables defined at the global level for the smart contract and are not associated with any particular resource.
Smart Contract Structure
Smart Contract Basic Structure
Create a new file named Collectibles.cdc inside cadence/contracts. This is where we will write the code.
Contract Structure
import NonFungibleToken from "./NonFungibleToken.cdc"

pub contract Collectibles: NonFungibleToken{

  pub var totalSupply: UInt64
  // other code will come here

  init(){
  	self.totalSupply = 0
  }
}
Let's break down the code line by line:
- First, we'll need to standardize that we are building an NFT by including the so-called "NonFungibleToken." This is an NFT standard built by Flow which defines the following set of functionality that must be included by each NFT smart contract.
- After importing, let's create our contract. To do that, we use
pub contract [contract name]. Use the same syntax each time you create a new contract. You can fill in thecontract namewith whatever you’d like to call your contract. In our case, let’s call itCollectibles. - Next, we want to make sure our contract follows a certain set of functionality and rules of NonFungibleToken. To do that, we add NonFungibleToken interface with the help of `:`.
Like this (`pub contract Collectibles: NonFungibleToken{}`) - Every single contract MUST have the
init()function. It is called when the contract is initially deployed. This is similar to what Solidity calls a Constructor. - Now let’s create a global variable called
totalSupplywith a data typeUInt64. This variable will keep track of your total Collectibles. - Now initialize
totalSupplywith value0.
That's it! We set up the foundation for our Collectibles contract. Now, we can start adding more features and functionalities to make it even more exciting.
Before moving forward, please check out the code snippet to understand how we define variables in Cadence:

Resource NFT
Add the following code to your smart contract:
import NonFungibleToken from "./NonFungibleToken.cdc"
pub contract Collectibles: NonFungibleToken{
  // above code…

  pub resource NFT: NonFungibleToken.INFT{
        pub let id: UInt64
        pub var name: String
        pub var image: String

        init(_id:UInt64, _name:String, _image:String){
            self.id = _id
            self.name = _name
            self.image = _image
        }
    }
  // init()...
}
As you have seen before, the contract implements the NFT standard interface, represented by pub contract Collectibles: NonFungibleToken. Similarly, resources can also implement various resource interfaces. So let’s add NonFungibleToken.INFT interface to the NFT Resource, which mandates the existence of a public property called id within the resource.
Here are the variables we will use in the NFT resource:
id:Maintains the ID of NFTname:Name of the NFT.image:Image URL of NFT.
After defining the variable, be sure to initialize the variable in the init() function.
Let’s move forward and create another resource called Collection Resource.
Collection Resource
First, you need to understand how Collection Resources work.
If you need to store a music file and several photos on your laptop, what would you do? Typically, you’d navigate to a local drive (let’s say your D-Drive) create a music folder, and photos folder. You’d then copy and paste the music and photo files into your destination folders.
Similarly, this is how your digital collectibles on Flow work.
Imagine your laptop as a Flow Blockchain Account, your D-Drive as Account Storage, and Folder as a Collection.
So when interacting with any project to buy NFTs, the project creates its collection in your account storage, similar to creating a folder on your D-Drive. When you interact with 10 different NFT projects, you’ll end up with 10 different collections in your account.
It's like having a personal space to store and organize your unique digital treasures!
import NonFungibleToken from "./NonFungibleToken.cdc"
pub contract Collectibles: NonFungibleToken{

  //Above code NFT Resource…

  // Collection Resource
  pub resource Collection{

  }


 // Below code…
}
Each collection has a ownedNFTs variable to hold the NFT Resources.
pub resource Collection {
        pub var ownedNFTs: @{UInt64: NonFungibleToken.NFT}
        init(){
            self.ownedNFTs <- {}
        }
}
Resource Interfaces
A resource interface in Flow is similar to interfaces in other programming languages. It sits on top of a resource and ensures that the resource that implements it has the required functionality as defined by the interface. It can also be used to restrict access to the whole resource and be more restrictive in terms of access modifiers than the resource itself.
In the NonFungibleToken standard, there are several resource interfaces like INFT, Provider, Receiver, and CollectionPublic. Each of these interfaces has specific functions and fields that need to be implemented by the resource that uses them.
In this contract, we’ll use these three interfaces from NonFungibleToken: Provider, Receiver, and CollectionPublic. These interfaces define functions such as deposit, withdraw, borrowNFT, and getIDs. We’ll explain each of these in detail as we go.
We will also add some events that we’ll emit from these functions, as well as declare some variables we’ll use further along in the tutorial.
pub contract Collectibles:NonFungibleToken{

  // rest of the code…

  pub event ContractInitialized()
  pub event Withdraw(id: UInt64, from: Address?)
  pub event Deposit(id: UInt64, to: Address?)

  pub let CollectionStoragePath: StoragePath
  pub let CollectionPublicPath: PublicPath


  pub resource interface CollectionPublic{
  		pub fun deposit(token: @NonFungibleToken.NFT)
  		pub fun getIDs(): [UInt64]
        	pub fun borrowNFT(id: UInt64): &NonFungibleToken.NFT
    	}

  pub resource Collection: CollectionPublic,
				   NonFungibleToken.Provider,
				   NonFungibleToken.Receiver,
   NonFungibleToken.CollectionPublic{

	pub var ownedNFTs: @{UInt64: NonFungibleToken.NFT}
        init(){
            self.ownedNFTs <- {}
        }
  }
}
Withdraw
Now, let's create the withdraw() function required by the interface.
pub resource Collection: CollectionPublic,
				   NonFungibleToken.Provider,
				   NonFungibleToken.Receiver,
   NonFungibleToken.CollectionPublic{
  // other code
  pub fun withdraw(withdrawID: UInt64): @NonFungibleToken.NFT {
    let token <- self.ownedNFTs.remove(key: withdrawID) ??
                 panic("missing NFT")
    emit Withdraw(id: token.id, from: self.owner?.address)
    return <- token
  }

  init()...
}
With the help of this function, you can move the NFT resource out of the collection. If it:
- Fails: Panic and throws an error.
- Successful: It emits a withdraw event and returns the resource to the caller.
The caller can then use this resource and save it within their account storage.
Deposit
Now it’s time for the deposit() function required by NonFungibleToken.Receiver.
pub resource Collection: CollectionPublic,
				   NonFungibleToken.Provider,
				   NonFungibleToken.Receiver,
   NonFungibleToken.CollectionPublic{
  // other code
  pub fun withdraw(withdrawID: UInt64): @NonFungibleToken.NFT {
    let token <- self.ownedNFTs.remove(key: withdrawID) ??
                 panic("missing NFT")
    emit Withdraw(id: token.id, from: self.owner?.address)
    return <- token
  }

  pub fun deposit(token: @NonFungibleToken.NFT) {
       let id = token.id
       let oldToken <- self.ownedNFTs[id] <-token
       destroy oldToken
       emit Deposit(id: id, to: self.owner?.address)
  }

  init()...
}
Borrow and GetID
Now, let’s focus on the two functions required by NonFungibleToken.CollectionPublic: borrowNFT() and getID().
pub resource Collection: CollectionPublic,
				   NonFungibleToken.Provider,
				   NonFungibleToken.Receiver,
   NonFungibleToken.CollectionPublic{

  // other code
  pub fun withdraw(withdrawID: UInt64): @NonFungibleToken.NFT {
    let token <- self.ownedNFTs.remove(key: withdrawID) ??
                 panic("missing NFT")
    emit Withdraw(id: token.id, from: self.owner?.address)
    return <- token
  }

  pub fun deposit(token: @NonFungibleToken.NFT) {
       let id = token.id
       let oldToken <- self.ownedNFTs[id] <-token
       destroy oldToken
       emit Deposit(id: id, to: self.owner?.address)
  }

  pub fun borrowNFT(id: UInt64): &NonFungibleToken.NFT {
    if self.ownedNFTs[id] != nil {
        return (&self.ownedNFTs[id] as &NonFungibleToken.NFT?)!
    }
    panic("NFT not found in collection.")
  }

  pub fun getIDs(): [UInt64]{
    return self.ownedNFTs.keys
  }

  init()...
}
Destructor
The last thing we need for the Collection Resource is a destructor.
destroy (){
    destroy self.ownedNFTs
}
Since the Collection resource contains other resources (NFT resources), we need to specify a destructor. A destructor runs when the object is destroyed. This ensures that resources are not left "homeless" when their parent resource is destroyed. We don't need a destructor for the NFT resource as it doesn’t contain any other resources.
Let’s look at the complete collection resource source code:
import NonFungibleToken from "./NonFungibleToken.cdc"

pub contract Collectibles: NonFungibleToken{

    pub var totalSupply: UInt64

    pub resource NFT: NonFungibleToken.INFT{
        pub let id: UInt64
        pub var name: String
        pub var image: String

        init(_id:UInt64, _name:String, _image:String){
            self.id = _id
            self.name = _name
            self.image = _image
        }
    }

    pub resource interface CollectionPublic{
        pub fun deposit(token: @NonFungibleToken.NFT)
        pub fun getIDs(): [UInt64]
        pub fun borrowNFT(id: UInt64): &NonFungibleToken.NFT
    }

    pub event ContractInitialized()
    pub event Withdraw(id: UInt64, from: Address?)
    pub event Deposit(id: UInt64, to: Address?)

    pub let CollectionStoragePath: StoragePath
    pub let CollectionPublicPath: PublicPath


    pub resource Collection: CollectionPublic, NonFungibleToken.Provider, NonFungibleToken.Receiver, NonFungibleToken.CollectionPublic{
        pub var ownedNFTs: @{UInt64: NonFungibleToken.NFT}

        init(){
            self.ownedNFTs <- {}
        }

        destroy (){
            destroy self.ownedNFTs
        }

        pub fun withdraw(withdrawID: UInt64): @NonFungibleToken.NFT {
            let token <- self.ownedNFTs.remove(key: withdrawID) ?? panic("missing NFT")
            emit Withdraw(id: token.id, from: self.owner?.address)
            return <- token
        }

        pub fun deposit(token: @NonFungibleToken.NFT) {
            let id = token.id
            let oldToken <- self.ownedNFTs[id] <-token
            destroy oldToken
            emit Deposit(id: id, to: self.owner?.address)
        }

        pub fun borrowNFT(id: UInt64): &NonFungibleToken.NFT {
            if self.ownedNFTs[id] != nil {
                return (&self.ownedNFTs[id] as &NonFungibleToken.NFT?)!
            }
            panic("NFT not found in collection.")
        }

        pub fun getIDs(): [UInt64]{
            return self.ownedNFTs.keys
        }
    }

    init(){
        self.CollectionPublicPath = /public/NFTCollection
        self.CollectionStoragePath = /storage/NFTCollection

        self.totalSupply = 0
        emit ContractInitialized()
    }
}
Now we have finished all the resources. Next, we’ll look at the global function.
Global Function
Global Functions are functions that are defined on the global level of the smart contract, meaning they are not part of any resource. These are accessible and called by the public and expose the core functionality of the smart contract to the public.
createEmptyCollection: This function initializes an emptyCollectibles.Collectioninto caller account storage.checkCollection: This handy function helps you discover whether or not your account already has acollectionresource.mintNFT: This function is super cool because it allows anyone to create an NFT.
// pub resource Collection…

pub fun createEmptyCollection(): @Collection{
        return <- create Collection()
}

pub fun checkCollection(_addr: Address): Bool{
    return getAccount(_addr)
    .capabilities.get<&{Collectibles.CollectionPublic}>
    (Collectibles.CollectionPublicPath)!
    .check()
}

pub fun mintNFT(name:String, image:String): @NFT{
    Collectibles.totalSupply = Collectibles.totalSupply + 1
    let nftId = Collectibles.totalSupply
    var newNFT <- create NFT(_id:nftId, _name:name, _image:image)
    return <- newNFT
}

init()...
Wrapping up the Smart Contract
And now, FINALLY, with everything in place, we’re done writing our smart contract. Take a look at the final code here.
Now, let’s look at how a user interacts with smart contracts deployed on the Flow blockchain.
There are two steps to interact with the Flow blockchain:
- Mutate the state by running transactions.
- Query the blockchain by running a script.
Mutate the State by Running Transactions
Transactions are cryptographically signed data that contain a set of instructions that interact with the smart contract to update the Flow state. In simple terms, this is like a function call that changes the data on the blockchain. Transactions usually involve some cost, which can vary depending on the blockchain you are on.
A transaction includes multiple optional phases: prepare, pre, execute, and post phase.
You can read more about this in the Cadence reference document on transactions. Each phase has a purpose; the two most important phases are prepare and execute.
Prepare Phase: This phase is used to access data and information inside the signer's account (allowed by the AuthAccount type).
Execute Phase: This phase is used to execute actions.
Now, let’s create a transaction for our project.
Follow the steps below to create a transaction in your project folder.
Step 1: Create a File
First, go to the project folder and open the cadence folder. Inside it, open the transaction folder and make a new file with the name Create_Collection.cdc and mint_nft.cdc
Step 2: Add the Create Collection Transaction Code
import Collectibles from "../contracts/Collectibles.cdc"
transaction {
    prepare(signer: AuthAccount) {
        if signer.borrow<&Collectibles.Collection>(from: Collectibles.CollectionStoragePath) == nil {
            let collection <- Collectibles.createEmptyCollection()
            signer.save(<-collection, to: Collectibles.CollectionStoragePath)
            let cap = signer.capabilities.storage.issue<&{Collectibles.CollectionPublic}>(Collectibles.CollectionStoragePath)
            signer.capabilities.publish( cap, at: Collectibles.CollectionPublicPath)
        }
    }
}
Let's break down this code line by line:
- This transaction interacts with the Collectibles smart contract. Then, it checks if the sender (signer) has a Collection resource stored in their account by borrowing a reference to the Collection resource from the specified storage path
Collectibles.CollectionStoragePath. If the reference is nil, it means the signer does not yet have a collection. - If the signer does not have a collection, then it creates an empty collection by calling the
createEmptyCollection()function. - After creating the empty collection, place it into the signer's account under the specified storage path
Collectibles.CollectionStoragePath.
This establishes a link between the signer's account and the newly created collection using link().
Step 3: Add the Mint NFT Transaction Code
import NonFungibleToken from "../contracts/NonFungibleToken.cdc"
import Collectibles from "../contracts/Collectibles.cdc"

transaction(name:String, image:String){
    let receiverCollectionRef: &{NonFungibleToken.CollectionPublic}

prepare(signer:AuthAccount){
     self.receiverCollectionRef =
            signer.borrow<&Collectibles.Collection>(from:
Collectibles.CollectionStoragePath)
?? panic("could not borrow Collection reference")
}

execute{
        let nft <- Collectibles.mintNFT(name:name, image:image)
        self.receiverCollectionRef.deposit(token: <-nft)
    }
}
Let's break down this code line by line:
- We first import the
NonFungibleTokenandCollectibles contract. transaction(name: String, image: String)This line defines a new transaction. It takes two arguments, name, and image, both of type String. These arguments are used to pass the name and image of the NFT being minted.let receiverCollectionRef: &{NonFungibleToken.CollectionPublic}This line declares a new variablereceiverCollectionRef.It is a reference to a public collection of NFTs of typeNonFungibleToken.CollectionPublic. This reference will be used to interact with the collection where we will deposit the newly minted NFT.prepare(signer: AuthAccount)This line starts the prepare block, which is executed before the transaction. It takes an argument signer of typeAuthAccount.AuthAccountrepresents the account of the transaction's signer.- It borrows a reference to the
Collectibles.Collectionfrom the signer's storage inside the prepare block. It uses the borrow function to access the reference to the collection and store it in thereceiverCollectionRefvariable. If the reference is not found (if the collection doesn't exist in the signer's storage, for example), it will throw the error message “could not borrow Collection reference.” - The
executeblock contains the main execution logic for the transaction. The code inside this block will be executed after theprepareblock has successfully completed. nft <- Collectibles.mintNFT(_name: name, image: image)Inside theexecuteblock, this line calls themintNFTfunction from theCollectiblescontract with the provided name and image arguments. This function is expected to create a new NFT with the given name and image. The<-symbol indicates that the NFT is being received as an object that can be moved (a resource).self.receiverCollectionRef.deposit(token: <-nft)This line deposits the newly minted NFT into the specified collection. It uses the deposit function on thereceiverCollectionRefto transfer ownership of the NFT from the transaction's executing account to the collection. The<-symbol here also indicates that the NFT is being moved as a resource during thedepositprocess.
Query the Blockchain by Running a Script
We use a script to view or read data from the blockchain. Scripts are free and don’t need signing.
Follow the steps below to create a script in your project folder.
Step 1: Create a File
First, go to the project folder and open the cadence folder. Inside it, open the script folder and make a new file with the name view_nft.cdc.
Step 2: View the NFT Script
import NonFungibleToken from "../contracts/NonFungibleToken.cdc"
import Collectibles from "../contracts/Collectibles.cdc"

pub fun main(user: Address, id: UInt64): &NonFungibleToken.NFT? {
  	let collectionCap= getAccount(user).capabilities
.get<&{Collectibles.CollectionPublic}>(/public/NFTCollection)
      ?? panic("This public capability does not exist.")

  	let collectionRef = collectionCap.borrow()!

  	return collectionRef.borrowNFT(id: id)
}
Let's break down this code line by line:
- First, we import the
NonFungibleTokenandCollectiblescontract. pub fun main(acctAddress: Address, id: UInt64): &NonFungibleToken.NFT?This line defines the entry point of the script, which is a public function named main. The function takes two parameters:acctAddress: AnAddresstype parameter representing the address of an account on the Flow blockchain.id: AUInt64type parameter representing the unique identifier of the NFT within the collection.- Then we use
getCapabilityto fetch theCollectibles.Collectioncapability for the specifiedacctAddress. A capability is a reference to a resource that allows access to its functions and data. In this case, it is fetching the capability for theCollectibles.Collectionresource type. - Then, we borrow an NFT from the
collectionRefusing theborrowNFTfunction. TheborrowNFTfunction takes theidparameter, which is the unique identifier of the NFT within the collection. Theborrowfunction of a capability allows reading the resource data. - Finally, we return the NFT from the function.
Step 3: Testnet Deployment
Now, it's time to deploy our smart contract to the Flow testnet.
1. Set up a Flow account
Run the following command in the terminal to generate a Flow account:
flow keys generateBe sure to write down your public key and private key.
Next, we’ll head over to the Flow Faucet, create a new address based on our keys, and fund our account with some test tokens. Complete the following steps to create your account:
- Paste in your public key in the specified input field.
- Keep the Signature and Hash Algorithms set to default.
- Complete the Captcha.
- Click on Create Account.
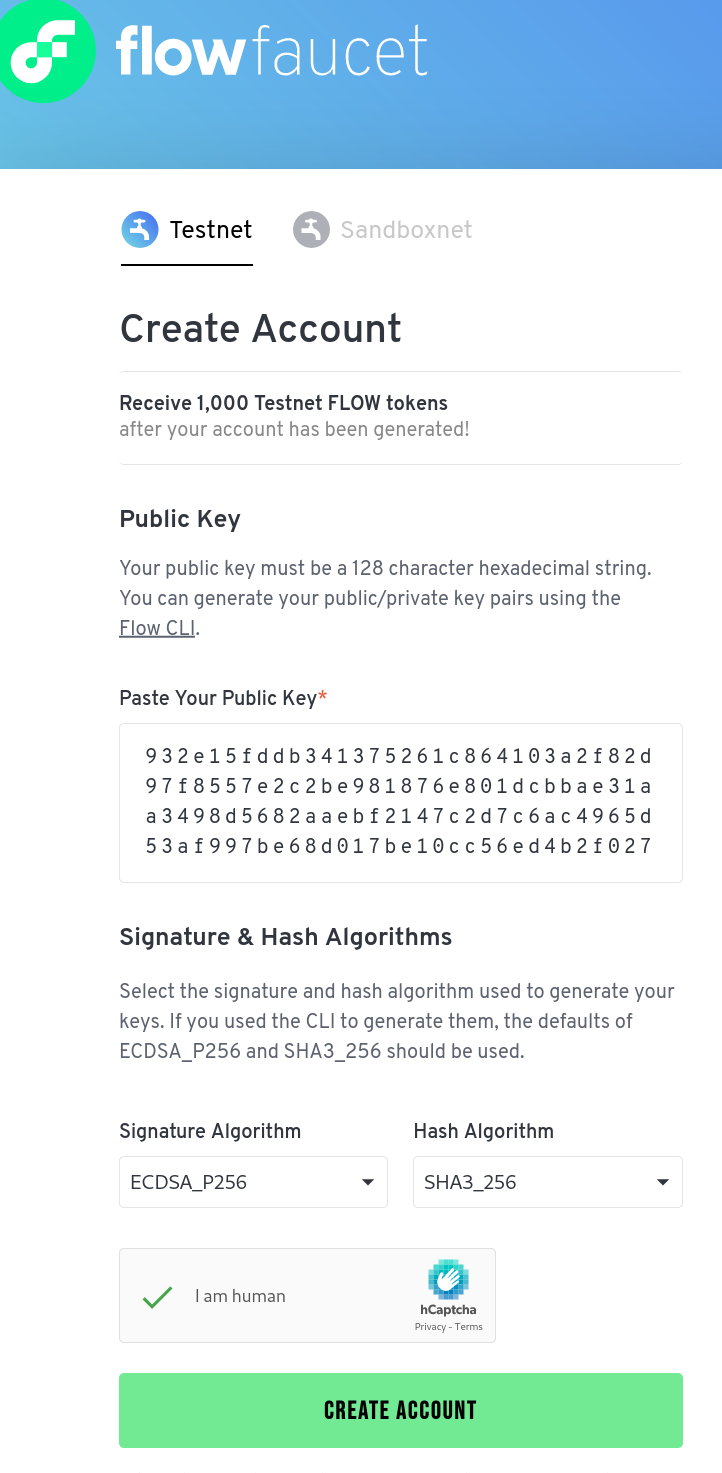
After setting up an account, we receive a dialogue with our new Flow address containing 1,000 test Flow tokens. Copy the address so we can use it going forward.
2. Configure the project.
Now, let’s configure our project. Initially, when we set up the project, it created a flow.json file. This is the configuration file for the Flow CLI and defines the configuration for actions that the Flow CLI can perform for you. Think of this as roughly equivalent to hardhat.config.js on Ethereum.
Now open your code editor and copy and paste the below code into your flow.json file.
{
  "contracts": {
	"Collectibles": "./cadence/contracts/Collectibles.cdc",
"NonFungibleToken": {
		"source": "./cadence/contracts/NonFungibleToken.cdc",
		"aliases": {
			"testnet": "0x631e88ae7f1d7c20"
		}
	}
  },
  "networks": {
	"testnet": "access.devnet.nodes.onflow.org:9000"
  },
  "accounts": {
	"testnet-account": {
		"address": "ENTER YOUR ADDRESS FROM FAUCET HERE",
		"key": "ENTER YOUR GENERATED PRIVATE KEY HERE"
	}
  },
  "deployments": {
	"testnet": {
		"testnet-account": [
			"Collectibles"
		]
	}
  }
}
3. Copy and paste
Paste your generated private key at the place (key: “ENTER YOUR GENERATED PRIVATE KEY HERE”) in the code.
4. Execute
Now execute the code on the testnet. Go to the terminal and run the following code:
flow project deploy --network testnet5. Wait for confirmation
After submitting the transaction, you'll receive a transaction ID. Wait for the transaction to be confirmed on the testnet, indicating that the smart contract has been successfully deployed.

Check your deployed contract here.
Check the full code on GitHub.
Final Thoughts and Congratulations!
Congratulations! You have now built a collectibles portal on the Flow blockchain and deployed it to the testnet. What’s next? Now you can work on building the frontend, which we will cover in part 2 of this series.
Have a really great day!
Published at DZone with permission of John Vester, DZone MVB. See the original article here.
Opinions expressed by DZone contributors are their own.
Comments