Build an OAuth 2.0 Authorization Server With Spring Boot and Spring Security
Check out this tutorial to learn how to build an OAuth 2.0 authorization server with Spring Boot and Spring Security.
Join the DZone community and get the full member experience.
Join For FreeUser management is required for most web applications, but building it isn't always an easy task. Many developers work around the clock to ensure their app is secure by seeking out individual vulnerabilities to patch. Luckily, you can increase your own efficiency by implementing OAuth 2.0 with Spring Security and Spring Boot. The process gets even easier by integrating with Okta on top of Spring Boot.
In this tutorial, you’ll first build an OAuth 2.0 web application and authentication server using Spring Boot and Spring Security.
OAuth 2.0 is an open standard authorization protocol that enables secure and delegated access to resources on the web. It allows users to grant limited access to their resources, such as profiles or data, to third-party applications without sharing their credentials. OAuth 2.0 is widely used for authentication and authorization in modern web and mobile applications.
Spring Boot is a Java-based open-source framework that simplifies the process of building, deploying, and managing production-ready applications. It provides a convention-over-configuration approach, minimizing the need for boilerplate code and configuration, allowing developers to focus on writing business logic. With embedded servers and a variety of built-in tools, Spring Boot makes it easy to create standalone, production-grade Spring-based applications. DZone’s previously covered how to secure a Spring Boot application with Keycloak.
Spring Security is a powerful and customizable authentication and access control framework for Java applications, particularly those built on the Spring framework. It provides comprehensive security services for Java EE-based enterprise software applications. With Spring Security, developers can easily integrate authentication and authorization mechanisms into their applications, protecting resources and ensuring secure interactions. The framework supports various authentication providers, including LDAP, OAuth, and custom implementations, making it adaptable to a variety of security requirements.
Once we've secured our Spring Boot application with Spring Boot and Spring Security, we’ll use Okta to get rid of our self-hosted authentication server and simplify the application even more.
Let’s get started!
Create an OAuth 2.0 Server
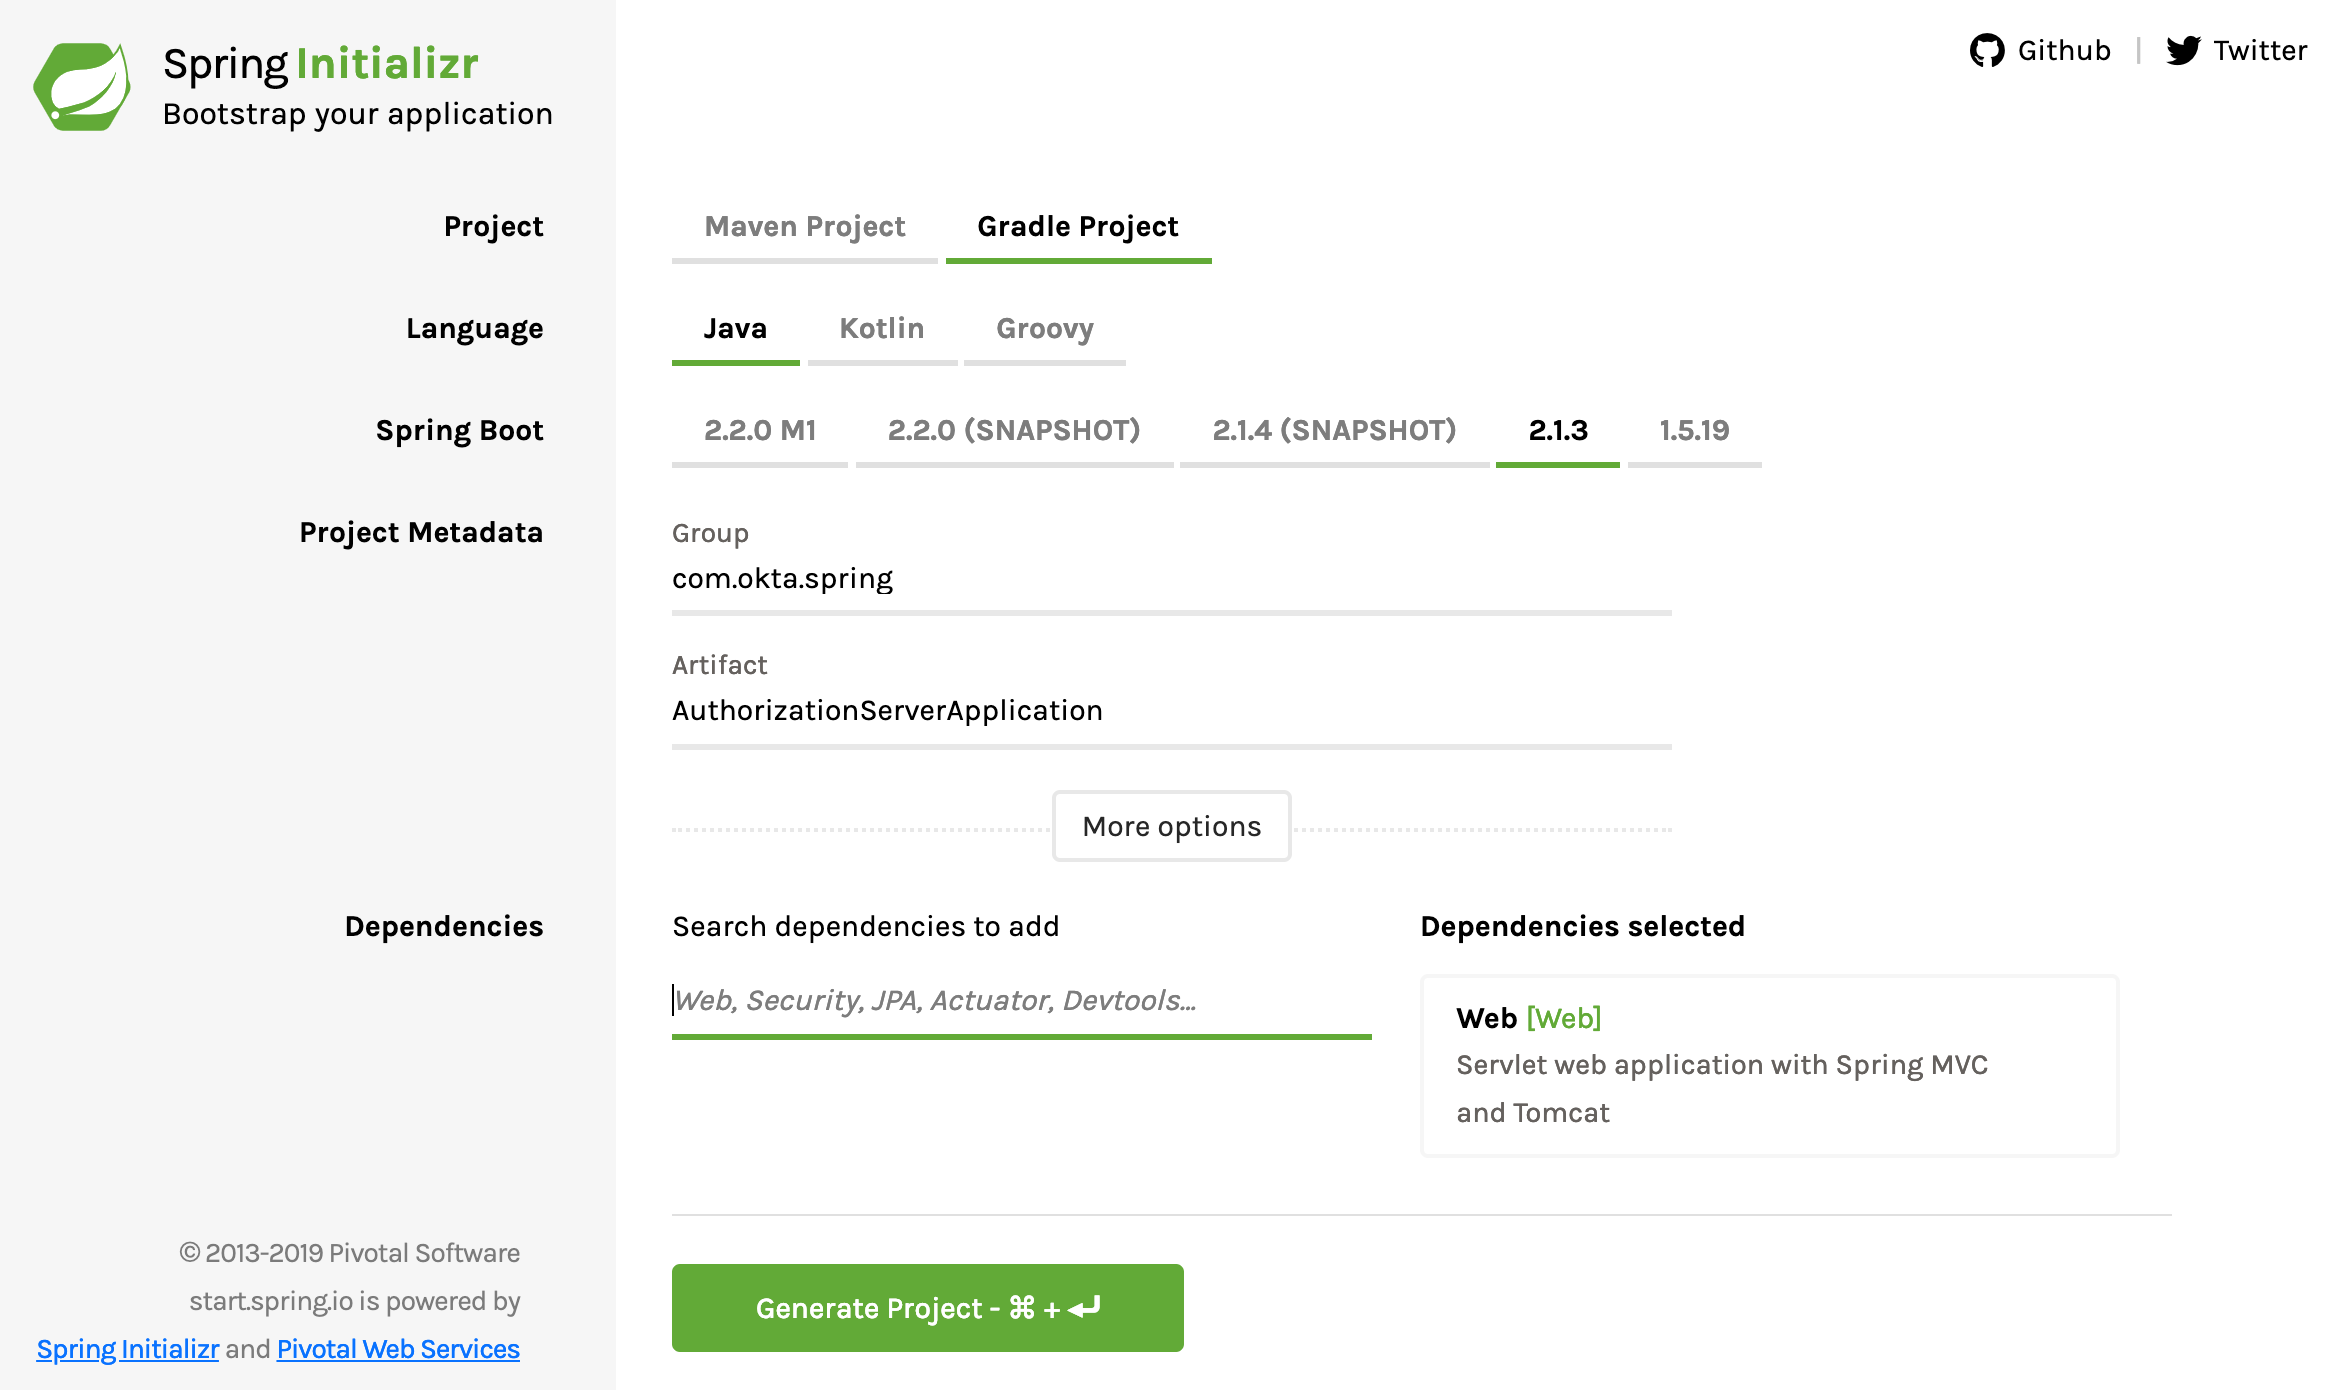
Start by going to the Spring Initializr and creating a new project with the following settings:
- Change project type from Maven to Gradle.
- Change the Group to com.okta.spring.
- Change the Artifact to AuthorizationServerApplication.
- Add one dependency: Web.
Download the project and copy it somewhere that makes sense on your hard drive. In this tutorial, you’re going to create three different projects, so you might want to create a parent directory, something like SpringBootOAuthsomewhere.
You need to add one dependency to the build.gradle file:
implementation 'org.springframework.security.oauth:spring-security-oauth2:2.3.3.RELEASE'This adds in Spring’s OAuth goodness.
Update the src/main/resources/application.properties to match:
server.port=8081
server.servlet.context-path=/auth
user.oauth.clientId=R2dpxQ3vPrtfgF72
user.oauth.clientSecret=fDw7Mpkk5czHNuSRtmhGmAGL42CaxQB9
user.oauth.redirectUris=http://localhost:8082/login/oauth2/code/
user.oauth.user.username=Andrew
user.oauth.user.password=abcd
This sets the server port, servlet context path, and some default values for the in-memory, ad hoc generated tokens the server is going to return to the client, as well as for our user’s username and password. In production, you would need to have a bit more of a sophisticated back-end for a real authentication server without the hard-coded redirect URIs, usernames, and passwords.
Update the AuthorizationServerApplication class to add @EnableResourceServer:
package com.okta.spring.AuthorizationServerApplication;

import org.springframework.boot.SpringApplication;
import org.springframework.boot.autoconfigure.SpringBootApplication;
import org.springframework.security.oauth2.config.annotation.web.configuration.EnableResourceServer;

@SpringBootApplication
@EnableResourceServer
public class AuthorizationServerApplication {

    public static void main(String[] args) {
        SpringApplication.run(AuthorizationServerApplication.class, args);
    }
}
Create a new class AuthServerConfig in the same package as your application class com.okta.spring.AuthorizationServerApplication under src/main/java (from now on please create Java classes in src/main/java/com/okta/spring/AuthorizationServerApplication). This Spring configuration class enables and configures an OAuth authorization server.
package com.okta.spring.AuthorizationServerApplication;

import org.springframework.beans.factory.annotation.Autowired;
import org.springframework.beans.factory.annotation.Value;
import org.springframework.context.annotation.Configuration;
import org.springframework.security.crypto.bcrypt.BCryptPasswordEncoder;
import org.springframework.security.oauth2.config.annotation.configurers.ClientDetailsServiceConfigurer;
import org.springframework.security.oauth2.config.annotation.web.configuration.AuthorizationServerConfigurerAdapter;
import org.springframework.security.oauth2.config.annotation.web.configuration.EnableAuthorizationServer;
import org.springframework.security.oauth2.config.annotation.web.configurers.AuthorizationServerSecurityConfigurer;

@Configuration
@EnableAuthorizationServer
public class AuthServerConfig extends AuthorizationServerConfigurerAdapter {

    @Value("${user.oauth.clientId}")
    private String ClientID;
    @Value("${user.oauth.clientSecret}")
    private String ClientSecret;
    @Value("${user.oauth.redirectUris}")
    private String RedirectURLs;

   private final PasswordEncoder passwordEncoder;

    public AuthServerConfig(PasswordEncoder passwordEncoder) {
        this.passwordEncoder = passwordEncoder;
    }

    @Override
    public void configure(
        AuthorizationServerSecurityConfigurer oauthServer) throws Exception {
        oauthServer.tokenKeyAccess("permitAll()")
            .checkTokenAccess("isAuthenticated()");
    }

    @Override
    public void configure(ClientDetailsServiceConfigurer clients) throws Exception {
        clients.inMemory()
            .withClient(ClientID)
            .secret(passwordEncoder.encode(ClientSecret))
            .authorizedGrantTypes("authorization_code")
            .scopes("user_info")
            .autoApprove(true)
            .redirectUris(RedirectURLs);
    }
}
The AuthServerConfig class is the class that will create and return our JSON web tokens when the client properly authenticates.
Create a SecurityConfiguration class:
package com.okta.spring.AuthorizationServerApplication;

import org.springframework.beans.factory.annotation.Value;
import org.springframework.context.annotation.Bean;
import org.springframework.context.annotation.Configuration;
import org.springframework.core.annotation.Order;
import org.springframework.security.config.annotation.authentication.builders.AuthenticationManagerBuilder;
import org.springframework.security.config.annotation.web.builders.HttpSecurity;
import org.springframework.security.config.annotation.web.configuration.WebSecurityConfigurerAdapter;
import org.springframework.security.crypto.bcrypt.BCryptPasswordEncoder;

@Configuration
@Order(1)
public class SecurityConfiguration extends WebSecurityConfigurerAdapter {

    @Value("${user.oauth.user.username}")
    private String username;
    @Value("${user.oauth.user.password}")
    private String password;

    @Override
    protected void configure(HttpSecurity http) throws Exception {
        http.requestMatchers()
            .antMatchers("/login", "/oauth/authorize")
            .and()
            .authorizeRequests()
            .anyRequest().authenticated()
            .and()
            .formLogin().permitAll();
    }

    @Override
    protected void configure(AuthenticationManagerBuilder auth) throws Exception {
        auth.inMemoryAuthentication()
            .withUser(username)
            .password(passwordEncoder().encode(password))
            .roles("USER");
    }

    @Bean
    public BCryptPasswordEncoder passwordEncoder() {
        return new BCryptPasswordEncoder();
    }
}
The SecurityConfiguration class is the class that actually authenticates requests to your authorization server. Notice near the top where it’s pulling in the username and password from the application.properties file.
Lastly, create a Java class called UserController:
package com.okta.spring.AuthorizationServerApplication;

import org.springframework.web.bind.annotation.GetMapping;
import org.springframework.web.bind.annotation.RestController;

import java.security.Principal;

@RestController
public class UserController {

    @GetMapping("/user/me")
    public Principal user(Principal principal) {
        return principal;
    }
}
This file allows the client apps to find out more about the users who authenticate with the server.
That’s your authorization server! Not too bad. Spring Boot makes it pretty easy. Four files and a few properties. In a little bit, you’ll make it even simpler with Okta, but for the moment, move on to creating a client app you can use to test the auth server.
Start the authorization server:
./gradlew bootRunWait a bit for it to finish running. The terminal should end with something like this:
...
2019-02-23 19:06:49.122  INFO 54333 --- [           main] o.s.b.w.embedded.tomcat.TomcatWebServer  : Tomcat started on port(s): 8081 (http) with context path '/auth  '
2019-02-23 19:06:49.128  INFO 54333 --- [           main] c.o.s.A.AuthorizationServerApplication   : Started AuthorizationServerApplication in 3.502 seconds (JVM running for 3.945)
NOTE: If you get an error about JAXB (java.lang.ClassNotFoundException: javax.xml.bind.JAXBException), it’s because you’re using Java 11. To fix this, add JAXB to your build.gradle.
implementation 'org.glassfish.jaxb:jaxb-runtime'
Build Your Client App
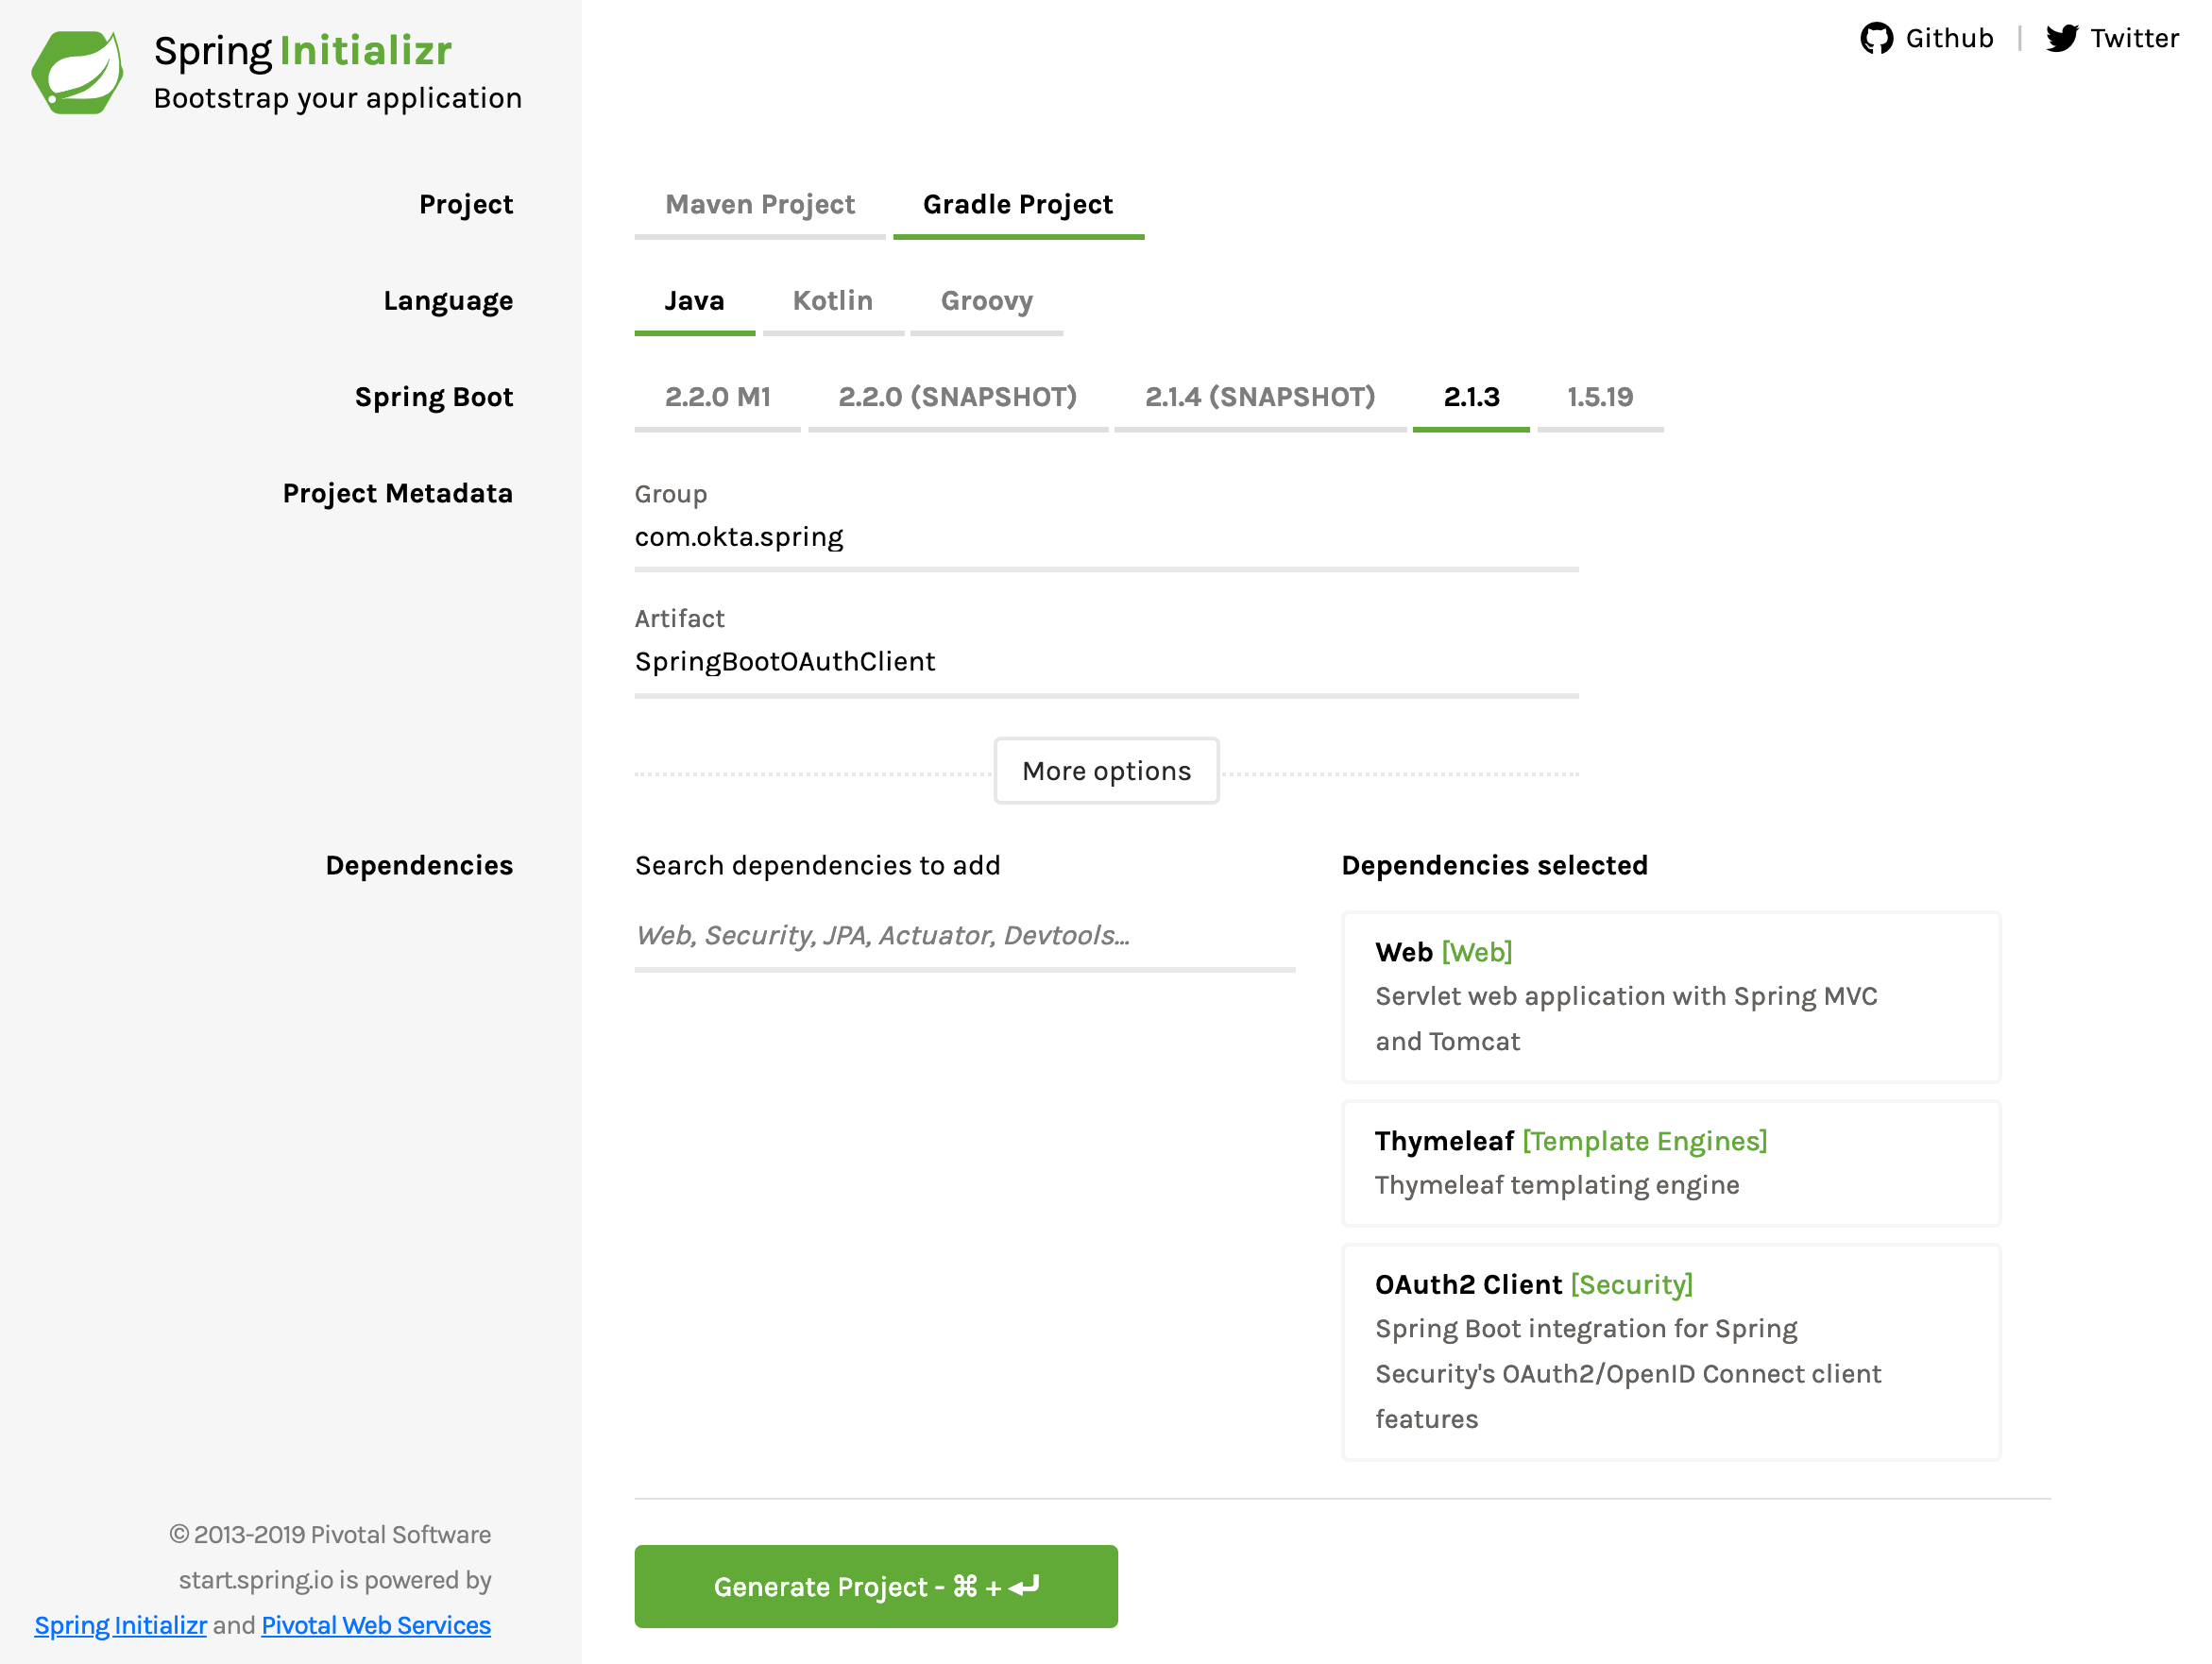
Back to Spring Initializr. Create a new project with the following settings:
- The project type should be Gradle (not Maven).
- Group: com.okta.spring
- Artifact: SpringBootOAuthClient
- Add three dependencies: Web, Thymeleaf, and OAuth2 Client.
Download the project, copy it to its final resting place, and unpack it.
This time you need to add the following dependency to your build.gradle file:
implementation 'org.thymeleaf.extras:thymeleaf-extras-springsecurity5:3.0.4.RELEASE'Rename the src/main/resources/application.properties to application.yml and update it to match the YAML below:
server:
  port: 8082
  session:
    cookie:
      name: UISESSION
spring:
  thymeleaf:
    cache: false
  security:
    oauth2:
      client:
        registration:
          custom-client:
            client-id: R2dpxQ3vPrtfgF72
            client-secret: fDw7Mpkk5czHNuSRtmhGmAGL42CaxQB9
            client-name: Auth Server
            scope: user_info
            provider: custom-provider
            redirect-uri-template: http://localhost:8082/login/oauth2/code/
            client-authentication-method: basic
            authorization-grant-type: authorization_code
        provider:
          custom-provider:
            token-uri: http://localhost:8081/auth/oauth/token
            authorization-uri: http://localhost:8081/auth/oauth/authorize
            user-info-uri: http://localhost:8081/auth/user/me
            user-name-attribute: name
Notice that here, you’re configuring the clientId and clientSecret, as well as various URIs for your authentication server. These need to match the values in the other project.
Update the SpringBootOAuthClientApplication class to match:
package com.okta.spring.SpringBootOAuthClient;

import org.springframework.boot.SpringApplication;
import org.springframework.boot.autoconfigure.SpringBootApplication;

@SpringBootApplication
public class SpringBootOAuthClientApplication {

    public static void main(String[] args) {
        SpringApplication.run(SpringBootOAuthClientApplication.class, args);
    }
}
Create a new Java class called WebController:
package com.okta.spring.SpringBootOAuthClient;

import org.springframework.stereotype.Controller;
import org.springframework.ui.Model;
import org.springframework.web.bind.annotation.RequestMapping;

import java.security.Principal;

@Controller
public class WebController {

    @RequestMapping("/securedPage")
    public String securedPage(Model model, Principal principal) {
        return "securedPage";
    }

    @RequestMapping("/")
    public String index(Model model, Principal principal) {
        return "index";
    }
}
This is the controller that maps incoming requests to your Thymeleaf template files (which you’ll make in a second).
Create another Java class named SecurityConfiguration:
package com.okta.spring.SpringBootOAuthClient;

import org.springframework.context.annotation.Configuration;
import org.springframework.security.config.annotation.web.builders.HttpSecurity;
import org.springframework.security.config.annotation.web.configuration.WebSecurityConfigurerAdapter;

@Configuration
public class SecurityConfiguration extends WebSecurityConfigurerAdapter {
    @Override
    public void configure(HttpSecurity http) throws Exception {
        http.antMatcher("/**").authorizeRequests()
            .antMatchers("/", "/login**").permitAll()
            .anyRequest().authenticated()
            .and()
            .oauth2Login();
    }
}
This class defines the Spring Security configuration for your application: allowing all requests on the home path and requiring authentication for all other routes. It also sets up the Spring Boot OAuth login flow.
The last files you need to add are the two Thymeleaf template files. A full look at Thymeleaf templating is well beyond the scope of this tutorial, but you can take a look at their website for more info.
The templates go into the src/main/resources/templates directory. You’ll notice in the controller above that they’re simply returning strings for the routes. When the Thymeleaf dependencies are included in the build, Spring Boot automatically assumes you’re returning the name of the template file from the controllers, and so, the app will look in src/main/resources/templates for a file name with the returned string plus .html.
Create the home template: src/main/resources/templates/index.html:
<!DOCTYPE html>
<html lang="en">
<head>
    <meta charset="UTF-8">
    <title>Home</title>
</head>
<body>
    <h1>Spring Security SSO</h1>
    <a href="securedPage">Login</a>
</body>
</html>
And the secured template: src/main/resources/templates/securedPage.html:
<!DOCTYPE html>
<html xmlns:th="http://www.thymeleaf.org">
<head>
    <meta charset="UTF-8">
    <title>Secured Page</title>
</head>
<body>
    <h1>Secured Page</h1>
    <span th:text="${#authentication.name}"></span>
</body>
</html>
I’ll just point out this one line:
<span th:text="${#authentication.name}"></span> This is the line that will insert the name of the authenticated user. This line is why you needed the org.thymeleaf.extras:thymeleaf-extras-springsecurity5 dependency in the build.gradle file.
Start the client application:
./gradlew bootRunWait a moment for it to finish. The terminal should end with something like this:
...
2019-02-23 19:29:04.448  INFO 54893 --- [           main] o.s.b.w.embedded.tomcat.TomcatWebServer  : Tomcat started on port(s): 8082 (http) with context path ''
2019-02-23 19:29:04.453  INFO 54893 --- [           main] c.o.s.S.SpringBootOAuthClientApplication : Started SpringBootOAuthClientApplication in 3.911 seconds (JVM running for 4.403)
Test the Resource Server
Navigate in your browser of choice to your client app at http://localhost:8082/.
Click the Login link.
You’ll be directed to the login page:
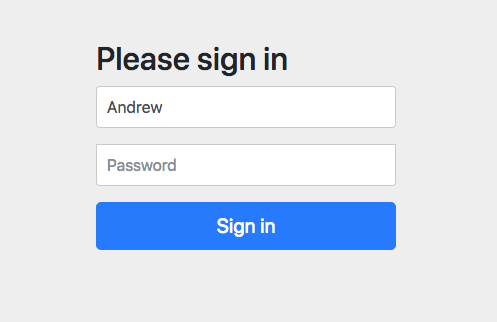
Enter username Andrew and password abcd (from the application.properties file from the authentication server).
Click Sign In and you’ll be taken to the super fancy securedPage.html template that should say “Secured Page” and “Andrew”.
Great! It works. Now you’re gonna make it even simpler.
You can stop both server and client Spring Boot apps. Learn more about how to setup Spring Boot apps with PostgreSQL.
Create an OpenID Connect Application
Okta is a SaaS (software-as-service) authentication and authorization provider. We provide free accounts to developers so they can develop OIDC apps with no fuss. Head over to the Okta Developer page and sign up for an account. After you’ve verified your email, log in and perform the following steps:
- Go to Application > Add Application.
- Select application type Web and click Next.
- Give the app a name. I named mine “Spring Boot OAuth”.
- Under Login redirect URIs change the value to
http://localhost:8080/login/oauth2/code/okta. The rest of the default values will work. - Click Done.
Leave the page open and take note of the Client ID and Client Secret. You’ll need them in a moment.
Create a New Spring Boot App
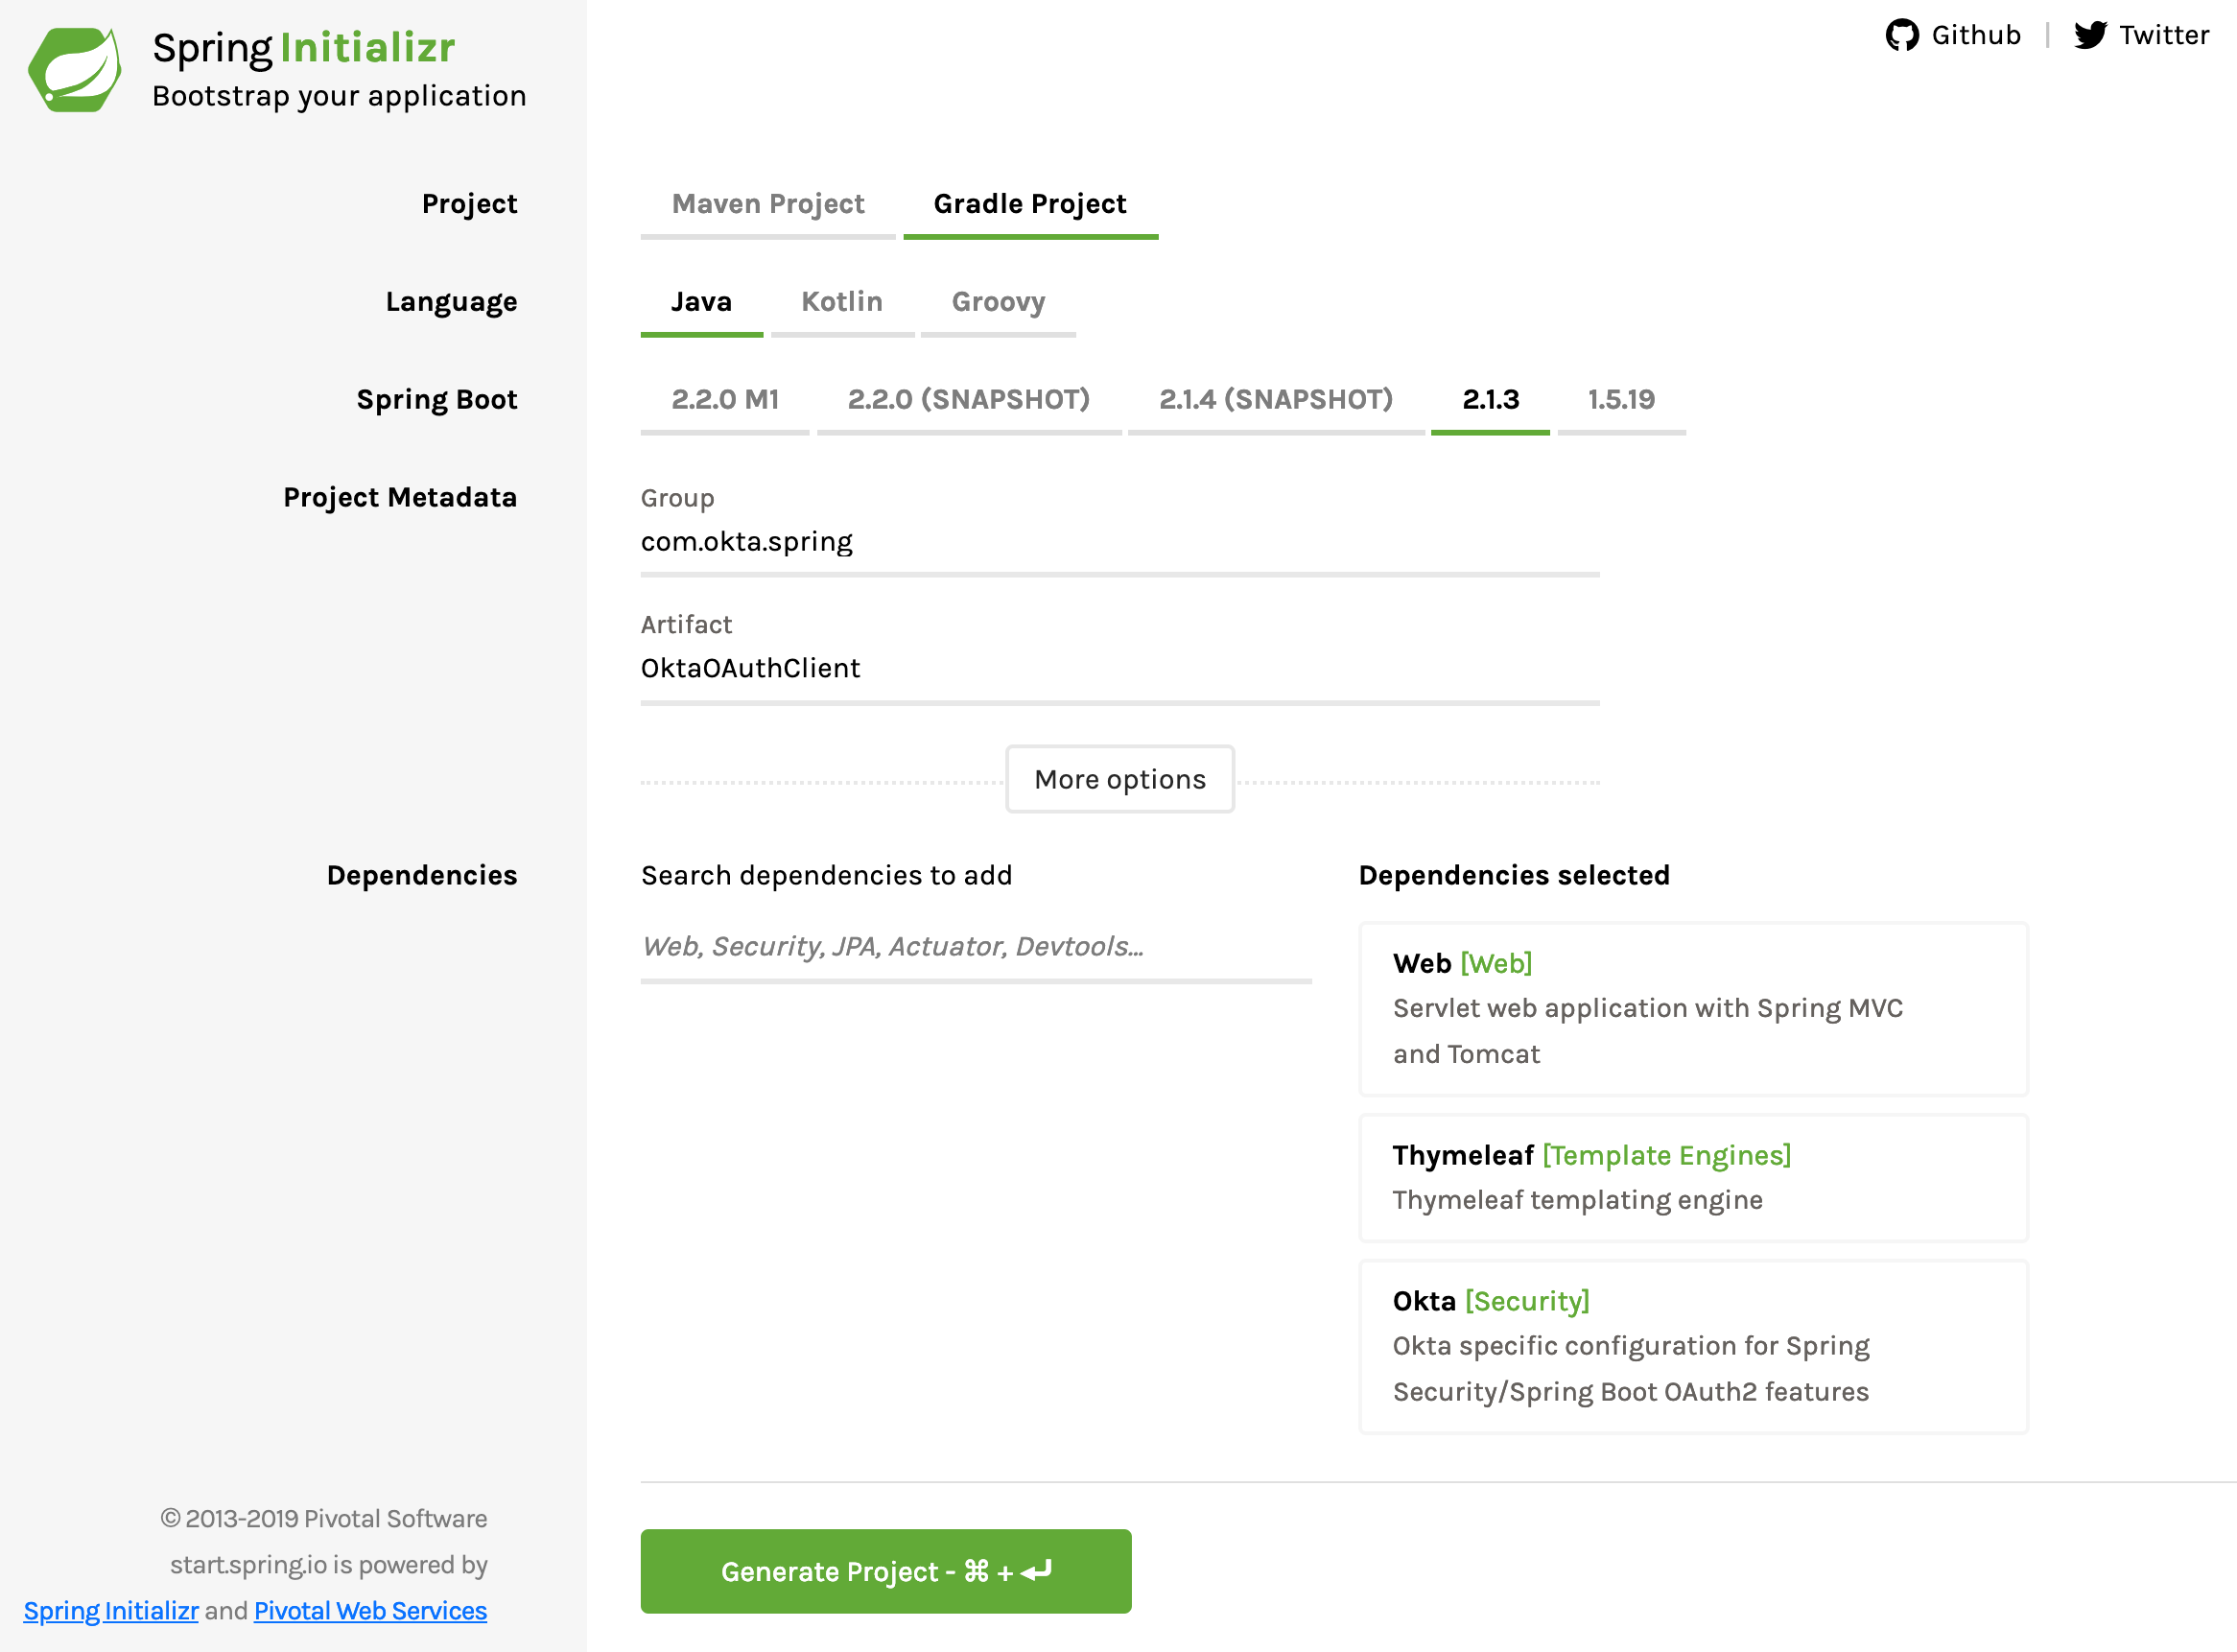
Back to the Spring Initializr one more time. Create a new project with the following settings:
- Change project type from Maven to Gradle.
- Change the Group to com.okta.spring.
- Change the Artifact to OktaOAuthClient.
- Add three dependencies: Web, Thymeleaf, and Okta.
- Click Generate Project.
Copy the project and unpack it somewhere.
In the build.gradle file, add the following dependency:
implementation 'org.thymeleaf.extras:thymeleaf-extras-springsecurity5:3.0.4.RELEASE'
Also while you’re there, notice the dependency com.okta.spring:okta-spring-boot-starter:1.1.0. This is the Okta Spring Boot Starter. It’s a handy project that makes integrating Okta with Spring Boot nice and easy. For more info, take a look at the project’s GitHub.
Change the src/main/resources/application.properties to application.yml and add the following:
server:
  port: 8080
okta:
  oauth2:
    issuer: https://okta.okta.com/oauth2/default
    client-id: {yourClientId}
    client-secret: {yourClientSecret}
spring:
  thymeleaf:
    cache: false
Remember when I said you’ll need your ClientID and Client Secret above? Well, the time has come. You need to fill them into the file, as well as your Okta issuer URL. It’s gonna look something like this: dev-123456.okta.com. You can find it under API > Authorization Servers.
You also need two similar template files in the src/main/resources/templates directory. The index.htmltemplate file is exactly the same, and can be copied over if you like. The securedPage.html template file is slightly different because of the way the authentication information is returned from Okta as compared to the simple authentication server you built earlier.
Create the home template: src/main/resources/templates/index.html:
<!DOCTYPE html>
<html lang="en">
<head>
    <meta charset="UTF-8">
    <title>Home</title>
</head>
<body>
    <h1>Spring Security SSO</h1>
    <a href="securedPage">Login</a>
</body>
</html>
And the secured template: src/main/resources/templates/securedPage.html:
<!DOCTYPE html>
<html xmlns:th="http://www.thymeleaf.org">
<head>
    <meta charset="UTF-8">
    <title>Secured Page</title>
</head>
<body>
    <h1>Secured Page</h1>
    <span th:text="${#authentication.principal.attributes.name}">Joe Coder</span>
</body>
</html>
Create a Java class named WebController in the com.okta.spring.SpringBootOAuth package:
package com.okta.spring.OktaOAuthClient;

import org.springframework.stereotype.Controller;
import org.springframework.ui.Model;
import org.springframework.web.bind.annotation.RequestMapping;

import java.security.Principal;

@Controller
public class WebController {

    @RequestMapping("/securedPage")
    public String securedPage(Model model, Principal principal) {
        return "securedPage";
    }

    @RequestMapping("/")
    public String index(Model model, Principal principal) {
        return "index";
    }
}
This class simply creates two routes, one for the home route and one for the secured route. Again, Spring Boot and Thymeleaf are auto-magicking this to the two template files in src/main/resources/templates.
Finally, create another Java class names SecurityConfiguration:
package com.okta.spring.OktaOAuthClient;

import org.springframework.context.annotation.Configuration;
import org.springframework.security.config.annotation.web.builders.HttpSecurity;
import org.springframework.security.config.annotation.web.configuration.WebSecurityConfigurerAdapter;

@Configuration
public class SecurityConfiguration extends WebSecurityConfigurerAdapter {
    @Override
    public void configure(HttpSecurity http) throws Exception {
        http.antMatcher("/**").authorizeRequests()
            .antMatchers("/").permitAll()
            .anyRequest().authenticated()
            .and()
            .oauth2Login();
    }
}
That’s it! Bam!
Run the Okta-OAuth-powered client:
./gradlew bootRun
You should see a bunch of output that ends with:
...
2019-02-23 20:09:03.465  INFO 55890 --- [           main] o.s.b.w.embedded.tomcat.TomcatWebServer  : Tomcat started on port(s): 8080 (http) with context path ''
2019-02-23 20:09:03.470  INFO 55890 --- [           main] c.o.s.O.OktaOAuthClientApplication       : Started OktaOAuthClientApplication in 3.285 seconds (JVM running for 3.744)
Navigate to http://localhost:8080.
Click the Login button.
This time, you’ll be directed to the Okta login page. You may need to use an incognito browser or log out of your developer.okta.com dashboard here so that you don’t skip the login page and get directed immediately to the secured endpoint.
Log in, and you’ll see the secured page with your name!
Learn More About Spring Boot, Spring Security, and OAuth 2.0
So, that’s that. Super easy. In the previous tutorial, you looked at how to use Spring Boot and Spring Security to implement a very basic authentication server and client app. Next, you used Okta to make an even simpler client app with fully functioning SSO and OAuth authentication.
You can see the completed code for this tutorial on GitHub.
Published at DZone with permission of Andrew Hughes, DZone MVB. See the original article here.
Opinions expressed by DZone contributors are their own.
Comments