DZone
Thanks for visiting DZone today,
Edit Profile
  • Manage Email Subscriptions
  • How to Post to DZone
  • Article Submission Guidelines
Sign Out View Profile
  • Post an Article
  • Manage My Drafts
Over 2 million developers have joined DZone.
Log In / Join
Refcards Trend Reports
Events Video Library
Refcards
Trend Reports

Events

View Events Video Library

Zones

Culture and Methodologies Agile Career Development Methodologies Team Management
Data Engineering AI/ML Big Data Data Databases IoT
Software Design and Architecture Cloud Architecture Containers Integration Microservices Performance Security
Coding Frameworks Java JavaScript Languages Tools
Testing, Deployment, and Maintenance Deployment DevOps and CI/CD Maintenance Monitoring and Observability Testing, Tools, and Frameworks
Culture and Methodologies
Agile Career Development Methodologies Team Management
Data Engineering
AI/ML Big Data Data Databases IoT
Software Design and Architecture
Cloud Architecture Containers Integration Microservices Performance Security
Coding
Frameworks Java JavaScript Languages Tools
Testing, Deployment, and Maintenance
Deployment DevOps and CI/CD Maintenance Monitoring and Observability Testing, Tools, and Frameworks

Enterprise AI Trend Report: Gain insights on ethical AI, MLOps, generative AI, large language models, and much more.

2024 Cloud survey: Share your insights on microservices, containers, K8s, CI/CD, and DevOps (+ enter a $750 raffle!) for our Trend Reports.

PostgreSQL: Learn about the open-source RDBMS' advanced capabilities, core components, common commands and functions, and general DBA tasks.

AI Automation Essentials. Check out the latest Refcard on all things AI automation, including model training, data security, and more.

  1. DZone
  2. Refcards
  3. Getting Started With Docker
refcard cover
Refcard #221

Getting Started With Docker

The De Facto Open-Source Containerization Solution

In what seems like an instant, Docker has become the benchmark for organizations to automate infrastructure, isolate applications, maintain consistency, and improve resource utilizations. In this Refcard, learn how to run a container, explore several useful commands, and discover how to create local Docker machines.

Free PDF for Easy Reference
refcard cover

Written By

author avatar Christopher M. Judd
CTO, Manifest Solutions
Table of Contents
► About Docker ► Docker Architecture ► Getting Started ► Other Helpful Commands ► Docker Machine ► Enterprise Docker
Section 1

About Docker

Almost overnight, Docker has become the de facto standard that developers and system administrators use for packaging, deploying, and running distributed and cloud native applications. It provides tools for simplifying DevOps by enabling developers to create templates called images that can be used to create lightweight virtual machines called containers, which include their applications and all of their applications’ dependencies. These lightweight virtual machines can be promoted through testing and production environments where sysadmins deploy and run them.

Docker makes it easier for organizations to automate infrastructure, isolate applications, maintain consistency, and improve resource utilizations.

Like the popular version control software Git, Docker has a social aspect in that developers and sysadmins can share their images via Docker Hub.

Docker is an open source solution that is available as the free Community Edition or the subscription based Enterprise Edition for multiple platforms. Docker runs natively on Linux since Docker was originally built on Linux containers but it also works on Mac and Windows. Many enterprise tools have also grown up around Docker to make it easier to manage and orchestrate complex distributed and clustered applications architectures.

Section 2

Docker Architecture

Docker utilizes a client-server architecture and a remote API to manage and create Docker containers and images. Docker containers are created from Docker images. The relationship between containers and images are analogous to the relationship between objects and classes in object-oriented programming, where the image describes the container and the container is a running instance of the image.

Image title


Docker Images A recipe or template for creating Docker containers. It includes the steps for installing and running the necessary software
Docker Container Like a tiny virtual machine that is created from the instructions found within the Docker image
Docker Client Command-line utility or other tool that takes advantage of the Docker API (https://docs.docker.com/reference/api/docker_remote_api) to communicate with a Docker daemon
Docker Host A physical or virtual machine that is running a Docker daemon and contains cached images as well as runnable containers created from images
Docker Registry A repository of Docker images that can be used to create Docker containers. Docker Hub (https://hub.docker.com) is the most popular social example of a Docker repository.
Docker Machine A utility for managing multiple Docker hosts, which can run locally in VirtualBox or remotely in a cloud hosting service such as Amazon Web Services, Microsoft Azure, Google Cloud Platform, or Digital Ocean.
Section 3

Getting Started

Installing Docker

For Mac and Windows there are a few different options for installing the Community Edition. The modern way to install Docker is to use Docker for Mac (https://www.docker.com/docker-mac) or Docker for Windows (https://www.docker.com/docker-windows), respectively. The installs include the Docker platform, command-line, compose, and notary tools. An advantage of this approach is that it uses the native platform virtualization for better resource utilization. For Windows, this provides the additional benefit of being able to run Windows containers in addition to Linux containers, but not at the same time.

Note: Docker for Windows requires Windows 10 Professional or Enterprise 64-bit.

The alternative means of installing Docker on Mac and Windows is to use Docker Toolbox (https://www.docker.com/products/docker-toolbox). It includes the Docker platform, command-line (including Docker Machine), compose, Kitematic, and VirtualBox. The advantage of Docker Toolbox is that it runs on older versions of Windows and makes simulating some clustered scenarios easier. A downside is that it runs a Linux virtual machine in Virtual Box, which uses additional resources and means each virtual machine must be referenced using a distinct IP address instead of localhost.

For Linux, each distribution has a unique way of installing Docker, so it is recommended you visit https://docs.docker.com/engine/installation/ for specific installation instructions.

Optionally on Linux you can install Docker-Machine as root; to do so, execute the following:

curl -L https://github.com/docker/machine/releases/download/v0.12.2/docker-machine-`uname -s`-`uname -m` >/tmp/docker-machine && chmod +x /tmp/docker-machine && sudo cp /tmp/docker-machine /usr/local/bin/docker-machine

Running a Container

With Docker installed, you can begin running containers from the command-line. If you don’t already have the image you want to run, Docker will automatically pull or download the image necessary to build the container from Docker Hub and run it.

To run the simple hello-world container to make sure everything is configured properly, run the following commands:

docker run --rm hello-world

After downloading the images and running the container, this command prints a “Hello from Docker!” message to standard output explaining all the steps that took place to display the message. Using the --rm option will also automatically remove the container and reclaim the disk space.

Typical Local Workflow

Docker has a typical workflow that enables you to create images, pull images, publish images, and run containers.

Image title

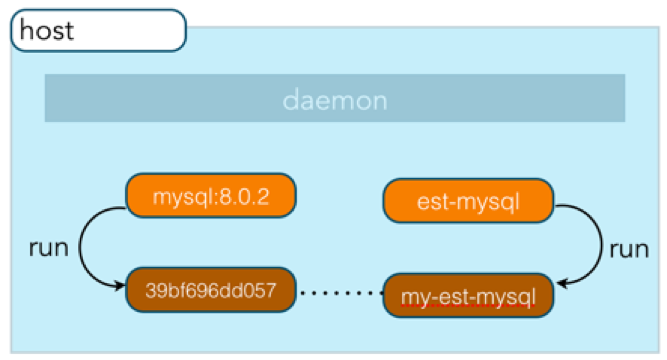
The typical Docker workflow involves building an image from a Dockerfile, which has instructions on how to configure a container or pull an image from a Docker Registry such as Docker Hub. With the image in your Docker environment, you can run the image, which creates a container as a runtime environment with the operating systems, software, and configurations described by the image. For example, your result could be a container on the Debian operating system running a version of MySQL 5.5, which creates a specific database with users and tables required by your web application. These runnable containers can be started and stopped like starting and stopping a virtual machine or computer. If manual configurations or software installations are made, a container can then be committed to make a new image that can be later used to create containers from it. Finally, when you want to share an image with your team or the world, you can push your images to a Docker registry.

Pull Image From Docker Registry

The easiest way to get an image is to visit https://hub.docker.com and find an already prepared image to build a container from. There are many certified official accounts for common software such as MySQL, Node.js, Java, Nginx, or WordPress, but there are also hundreds of thousands of images created by ordinary people as well. If you find an image you want, such as mysql, execute the pull command to download the image.

docker pull mysql

If you don’t already have the image locally, Docker will download the most current version of that image from Docker Hub and cache the image locally. If you don’t want the current image and instead want a specific version, you can also use a tag to identified the desired version.

docker pull mysql:8.0.2

If you know you will want to run the image immediately after pulling it, you can save a step by just using the run command and it will automatically pull it in the background.

Building Image From a Dockerfile

If you can’t find what you need or don’t trust the source of an image you find on Docker Hub, you can always create your own images by creating a Dockerfile. Dockerfiles contain instructions for inheriting from an existing image, where you can then add software or customize configurations.

The following is a simple example of what you might find in a file named Dockerfile:

FROM mysql:5.5.45
RUN echo America/New_York | tee /etc/timezone && dpkg-reconfigure --frontend noninteractive tzdata

This Dockerfile example shows that the image created will inherit from the certified mysql repository (specifically the 5.5.45 version of MySQL). It then runs a Linux command to update the time zone to Eastern Time.

More details on creating a Dockerfile will be provided later.

To build this image from the directory containing the Dockerfile, run the following command:

docker build .

This command will create an unnamed image. You can see it by running the command to list images.

docker images

This displays all the locally cached images, including the ones created using the build command.

REPOSITORY TAG IMAGE ID VIRTUAL SIZE
<none> <none> 4b9b8b27fb42 214.4 MB
mysql 8.0.2 0da0b10c6fd8 213.5 MB

As you can see, the build command created an image with a repository name and tag name of <none>. This tends not to be very helpful, so you can use a –t option to name the image for easier usage:

docker build –t est-mysql .

Listing the images again you can see the image is much clearer.

REPOSITORY TAG IMAGE ID VIRTUAL SIZE
est-mysql latest 4b9b8b27fb42 214.4 MB
mysql 8.0.2 0da0b10c6fd8 213.5 MB

There is an alternative option to creating a custom image besides writing a Dockerfile. You can run an existing image with bash access, then customize the image manually by installing software or changing configurations. When complete, you can run the docker commit command to create an image of the running container. This is not considered a best practice since it is not repeatable or self-documenting, unlike the Dockerfile method.

Running an Image

To run a Docker image, you just need to use the docker run command followed by a local image name or one found in Docker Hub. Usually, a Docker image will require some additional configurations. This is commonly done using environment variables, which can be specified with the -e option. For long running process like daemons you also need to use a –d option. To start the est-mysql image, you would run the following command to configure the MySQL root user’s password and a new database, as documented in the Docker Hub mysql repository documentation:

docker run -d -e MYSQL_ROOT_PASSWORD=root+1 -e MYSQL_DATABASE=mydb est-mysql

To see the running container, you can use the Docker ps command:

docker ps

The ps command lists all the running processes, the image name they were created from, the command that was run, any ports that software are listening on, and the name of the container.

CONTAINER ID IMAGE COMMAND PORTS NAMES
30645f307114 est-mysql "/entrypoint.sh mysql" 3306/tcp serene_brahmagupta

As you can see from the running processes above, the name of the container is serene_brahmagupta. This is an auto-generated name and may be challenging to maintain. So, it is considered a best practice to explicitly name the container using the --name option to provide your name at container start up:

docker run --name my-est-mysql -d -e MYSQL_ROOT_PASSWORD=root+1 -e MYSQL_DATABASE=mydb est-mysql

You will notice from the ps output that the container is listening to port 3306, but that does not mean you can use the mysql command line or MySQL Workbench locally to interact with the database, as that port is only accessible in the secure Docker environment in which it was launched. To make it available outside that environment, you must map ports using the –p option.

docker run --name my-est-mysql -d -e MYSQL_ROOT_PASSWORD=root+1 -e MYSQL_DATABASE=mydb -p 3306:3306 -d est-mysql

Now mysql is listening on a port that you can connect to. But you still must know what the IP address is to connect. If you are using Docker for Mac or Windows or Linux it is just localhost. To determine the IP address for Docker Toolbox, you can use the docker-machine ip command to figure it out.

docker-machine ip default

Using default as the machine name, which is the default machine installed with the Docker Toolbox, you will receive the IP address of the machine hosting your docker container.

With the IP address, you can now connect to mysql using your local mysql command line.

mysql -h 192.168.99.100 -u root -proot+1

Stopping and Starting Containers

Now that you have a Docker container running, you can stop it by using the Docker stop command and the container name:

docker stop my-est-mysql

The entire state of the container is written to disk, so if you want to run it again in the state it was in when you shut it down, you can use the start command:

docker start my-est-mysql

Networking Containers

A common use case is having applications in one container talking to services in another container, such as a web application talking to a database. You can simulate this by using the mysql command-line in one container talking to a MySQL database in another container represented in the figure below.

Image title

Docker by default automatically creates 3 networks for you. You can see these and any other user-defined networks you create by using the following command:

docker network ls

To enable the containers to talk to each other, you will want to create a new custom network. This will also include an internal DNS server so the IP addresses can be resolved to their container names. To create a new network named mysql-network use the following command:

docker network create mysql-network

If you want to add containers to that network like the already running my-est-mysql container you can connect them to the network by running the following network connect command:

docker network connect mysql-network my-est-mysql

Or when you start up a container, you can pass the network name with the --network option like:

docker run --rm --network mysql-network -it mysql:8.0.2 bash

In the example above, you start a new MySQL container that is automatically removed and using the it option it will start an interactive terminal in the container. The network option adds it to the mysql-network. bash is the application that runs when this container starts up and overrides the default start up behavior.

Now within the newly started container, you can connect to the MySQL database running in my-est-mysql container by simply running the following command, where -h is the host using the name of the container.

mysql -h my-est-mysql -u root -p

Mapping Volumes

Another common use case is to share a directory or directories between the running container and the host machine. This is commonly done when the container contains a database and the data files want to be persisted and backed up from the host machine or during development when a developer wants to use their IDE on the host machine but run their code in a fully configured container. This is accomplished by using the v option to map the host directory to the internal directory.

docker run --name my-est-mysql -d -v /my/host/datadir:/var/lib/msyql -e MYSQL_ROOT_PASSWORD=root+1 -e MYSQL_DATABASE=mydb -p 3306:3306 -d est-mysql

Tagging an Image

Now that you have an image that you have run and validated, it is a good idea to tag it with a username, image name, and version number before pushing it to a repository. You can accomplish this by using the Docker tag command:

docker tag est-mysql javajudd/est-mysql:1.0

Push Image to Repository

Finally, you are ready to push your image to Docker Hub for the world to use or your team to use via a private repository. First, if you haven’t done so already, you will need to go to https://hub.docker.com/ to create a free account. Next you need to login using the docker login command.

docker login

When prompted, input the username, password, and email address you registered with.

Now push your image using the push command, specifying your username, image name, and version number.

docker push javajudd/est-mysql:1.0

After some time, you will receive a message that the repository has been successfully pushed. If you log back into your Docker Hub account, you will see the new repository.

Image title

Section 4

Other Helpful Commands

List Containers

You have already seen how the docker ps command can list the running containers, but what about all the containers, regardless of their state? By adding the –a option, you can see them all.

docker ps -a

With a listing of all containers, you can decide which ones to start or remove.

Remove Containers

When you are done using a container, rather than having it lie around, you will want to remove it to reclaim disk space. To remove a container, you can use the rm command:

docker rm my-est-mysql

Remove Images

You have already seen how the images command can list all the locally cached images. These images can take significant amounts of space, ranging from a megabyte to several hundred megabytes, so you will want to purge unwanted images using the rmi command:

docker rmi est-mysql

During the debugging cycle of creating a new image, you may generate a large amount of unwanted and unnamed images, which are denoted with a name of <none>. You can easily remove all the dangling images using the following command:

docker rmi $(docker images -q -f dangling=true)

List Ports

It’s often helpful to know what ports are exposed by a container, such as port 3306 for accessing a MySQL database or port 80 for accessing a web server. The port command can be used to display the exposed ports.

docker port my-est-mysql

List Processes

If you need to see the processes running in a container, you can use the top command (similar to running the Linux top command):

docker top my-est-mysql

Execute Commands

You can execute commands in a running container using the exec command. To list the contents of the root of the hard drive you can, for example, do the following:

docker exec my-est-mysql ls

If you want to ssh as root into the container, there is an equivalent exec command you can run to gain access to a bash shell, and since all the communications between the Docker client and the Docker daemon are already encrypted, it is secure.

docker exec -it my-est-mysql bash

Run Container

The run command is the most complicated and featured of all the Docker commands. It can be used to do things such as manage networking settings; manage system resources such as memory, CPU, and filesystems; and configure security. Visit https://docs.docker.com/reference/run/ to see all options available.

Dockerfile

As you have already seen, the Dockerfile is the primary way of creating a Docker image. It contains instructions such as Linux commands for installing and configuring software. The build command can refer to a Dockerfile on your PATH or to a URL, such as a GitHub repository. Along with the Dockerfile, any files in the same directory or its subdirectories will also be included as part of the build process. This is helpful if you want the build to include scripts to execute or other necessary files for deployment.

If you wish to exclude any files or directories from being included, you have the option of using a .dockerignore file for this purpose.

Instructions

Instructions are executed in the order in which they are found in the Dockerfile. The Docker file can also contain line comments starting with the # character.

This table contains the list of commands available.

Instruction Description
FROM This must be the first instruction in the Dockerfile and identifies the image to inherit from.
MAINTAINER Provides visibility and credit to the author of the image
RUN Executes a Linux command for configuring and installing
ENTRYPOINT The final script or application used  to bootstrap the container, making it an executable application
CMD Provide default arguments to the ENTRYPOINT using a JSON array format
LABEL Name/value metadata about the image
ENV Sets environment variables
COPY Copies files into the container
ADD Alternative to copy
WORKDIR Sets working directory for RUN, CMD, ENTRYPOINT, COPY, and/or ADD instructions
EXPOSE Ports the container will listen on
VOLUME Creates a mount point
USER User to run RUN, CMD, and/or ENTRYPOINT instructions

Dockerfile Example

This an example of the official MySQL 5.5 Dockerfile found at https://github.com/docker-library/mysql/blob/5836bc9af9deb67b68c32bebad09a0f7513da36e/5.5/Dockerfile, which uses many of the available instructions.

FROM debian:jessie
RUN groupadd -r mysql && useradd -r -g mysql mysql
RUN mkdir /docker-entrypoint-initdb.d
RUN apt-get update && apt-get install -y perl --no-install-recommends && rm -rf /var/lib/apt/lists/*
RUN apt-get update && apt-get install -y libaio1 && rm -rf /var/lib/apt/lists/*
RUN gpg --keyserver ha.pool.sks-keyservers.net --recv-keys A4A9406876FCBD3C456770C88C718D3B5072E1F5
ENV MYSQL_MAJOR 5.5
ENV MYSQL_VERSION 5.5.45
RUN apt-get update && apt-get install -y curl --no-install-recommends && rm -rf /var/lib/apt/lists/* \
         && curl -SL "http://dev.mysql.com/get/Downloads/MySQL-$MYSQL_MAJOR/mysql-$MYSQL_VERSION-linux2.6-x86_64.tar.gz" -o mysql.tar.gz \
         && curl -SL "http://mysql.he.net/Downloads/MySQL-$MYSQL_MAJOR/mysql-$MYSQL_VERSION-linux2.6-x86_64.tar.gz.asc" -o mysql.tar.gz.asc \
         && apt-get purge -y --auto-remove curl \
         && gpg --verify mysql.tar.gz.asc \
         && mkdir /usr/local/mysql \
         && tar -xzf mysql.tar.gz -C /usr/local/mysql \
         && rm mysql.tar.gz* \
         && rm -rf /usr/local/mysql/mysql-test /usr/local/mysql/sql-bench \
         && rm -rf /usr/local/mysql/bin/*-debug /usr/local/mysql/bin/*_embedded \
         && find /usr/local/mysql -type f -name "*.a" -delete \
         && apt-get update && apt-get install -y binutils && rm -rf /var/lib/apt/lists/* \
         && { find /usr/local/mysql -type f -executable -exec strip --strip-all '{}' + || true; } \
         && apt-get purge -y --auto-remove binutils
ENV PATH $PATH:/usr/local/mysql/bin:/usr/local/mysql/scripts
RUN mkdir -p /etc/mysql/conf.d \
         && { \
                  echo '[mysqld]'; \
                  echo 'skip-host-cache'; \
                  echo 'skip-name-resolve'; \
                  echo 'user = mysql'; \
                  echo 'datadir = /var/lib/mysql'; \
                  echo '!includedir /etc/mysql/conf.d/'; \
         } > /etc/mysql/my.cnf
VOLUME /var/lib/mysql
COPY docker-entrypoint.sh /entrypoint.sh
ENTRYPOINT ["/entrypoint.sh"]
EXPOSE 3306
CMD ["mysqld"]

This example Dockerfile performs the following actions:

  • Extends from an existing Debian image called “debian:jessie”
  • Uses the RUN instruction to configure the image by adding some groups, making a directory, and installing required software using the Debian apt-get package manager
  • Runs gpg to setup some encryption with PGP
  • Uses the ENV instruction to define the major and minor versions of MySQL represented in this image
  • Runs a long line of commands to install and configure the system followed by another environment variable to set up the system PATH
  • Uses the RUN command to create a configuration file
  • Uses the VOLUME command to map a file system
  • Uses the COPY command to copy and rename the script it will execute when the container starts up, followed by the ENTRYPOINT which specifies the same script to execute
  • Uses EXPOSE to declare port 3306 as the standard MySQL port to be exposed
  • Uses CMD to specify that the command-line argument passed to the ENTRYPOINT at container startup time is the string “mysqld”
Section 5

Docker Machine

Docker Machine is another command-line utility used for managing one or more local or remote machines. Local machines are often run in separate VirtualBox instances. Remote machines may be hosted on cloud providers such as Amazon Web Services (AWS), Digital Ocean, or Microsoft Azure.

Create Local Machines

When installing the Docker Toolbox, you will be given a default Docker Machine named “default.” This is easy to use to get started, but at some point, you may need multiple machines to segment the different containers you are running. You can use the docker-machine create command to do this:

docker-machine create -d virtualbox qa

This creates a new local machine using a VirtualBox image named “qa.”

List Machines

If you need to see what machines you have configured, you can run the docker-machine ls command:

docker-machine ls

Start and Stop Machines

Docker Machines can be started using the docker-machine start command.

docker-machine start qa

Once the machine is started, you have to configure the Docker command line to determine which Docker Daemon it should be interacting with. You can do this using the docker-machine env command and evaluating it with eval.

docker-machine env qa
eval “$(docker-machine env qa)”

To stop a machine, use the docker-machine stop command.

docker-machine stop qa

The docker-machine start and stop commands literally start and stop VirtualBox VMs. If you have the VirtualBox Manager open, you can watch the state of the VM change as you run the commands.

Section 6

Enterprise Docker

For larger scale deployments that require orchestration, high availability, fault tolerant or are just plain complex, there are several tools that have grown up to simplify using Docker.

Docker Compose (https://docs.docker.com/compose/) A tool for defining and running multi-container Docker applications.
Docker Swarmkit (https://github.com/docker/swarmkit) A toolkit for orchestrating distributed Docker systems at scale.
Kubernetes (https://kubernetes.io/) A tool production-grade container orchestration providing automated deployment, scaling, and management.

Like This Refcard? Read More From DZone

related article thumbnail

DZone Article

Docker Explained – An Introductory Guide to Docker
related article thumbnail

DZone Article

CI/CD Pipelines to Run Unit Testing in Docker [Video]
related article thumbnail

DZone Article

Maximize Kubernetes Security: Automate TLS Certificate Management With Cert-Manager on KIND Clusters
related article thumbnail

DZone Article

Combatting the 3 AM Ransomware Menace
related refcard thumbnail

Free DZone Refcard

Threat Detection
related refcard thumbnail

Free DZone Refcard

The Essentials of GitOps
related refcard thumbnail

Free DZone Refcard

Continuous Integration Patterns and Anti-Patterns
related refcard thumbnail

Free DZone Refcard

Getting Started With CI/CD Pipeline Security

ABOUT US

  • About DZone
  • Send feedback
  • Community research
  • Sitemap

ADVERTISE

  • Advertise with DZone

CONTRIBUTE ON DZONE

  • Article Submission Guidelines
  • Become a Contributor
  • Core Program
  • Visit the Writers' Zone

LEGAL

  • Terms of Service
  • Privacy Policy

CONTACT US

  • 3343 Perimeter Hill Drive
  • Suite 100
  • Nashville, TN 37211
  • support@dzone.com

Let's be friends:

{{ parent.title || parent.header.title}}

{{ parent.tldr }}

{{ parent.linkDescription }}

{{ parent.urlSource.name }}
by
DZone Core CORE
· {{ parent.articleDate | date:'MMM. dd, yyyy' }} {{ parent.linkDate | date:'MMM. dd, yyyy' }}
Tweet
{{ parent.views }} ViewsClicks
  • Edit
  • Delete
  • {{ parent.isLocked ? 'Enable' : 'Disable' }} comments
  • {{ parent.isLimited ? 'Remove comment limits' : 'Enable moderated comments' }}