DZone
Thanks for visiting DZone today,
Edit Profile
  • Manage Email Subscriptions
  • How to Post to DZone
  • Article Submission Guidelines
Sign Out View Profile
  • Post an Article
  • Manage My Drafts
Over 2 million developers have joined DZone.
Log In / Join
Refcards Trend Reports
Events Video Library
Refcards
Trend Reports

Events

View Events Video Library

Zones

Culture and Methodologies Agile Career Development Methodologies Team Management
Data Engineering AI/ML Big Data Data Databases IoT
Software Design and Architecture Cloud Architecture Containers Integration Microservices Performance Security
Coding Frameworks Java JavaScript Languages Tools
Testing, Deployment, and Maintenance Deployment DevOps and CI/CD Maintenance Monitoring and Observability Testing, Tools, and Frameworks
Culture and Methodologies
Agile Career Development Methodologies Team Management
Data Engineering
AI/ML Big Data Data Databases IoT
Software Design and Architecture
Cloud Architecture Containers Integration Microservices Performance Security
Coding
Frameworks Java JavaScript Languages Tools
Testing, Deployment, and Maintenance
Deployment DevOps and CI/CD Maintenance Monitoring and Observability Testing, Tools, and Frameworks

Enterprise AI Trend Report: Gain insights on ethical AI, MLOps, generative AI, large language models, and much more.

2024 Cloud survey: Share your insights on microservices, containers, K8s, CI/CD, and DevOps (+ enter a $750 raffle!) for our Trend Reports.

PostgreSQL: Learn about the open-source RDBMS' advanced capabilities, core components, common commands and functions, and general DBA tasks.

AI Automation Essentials. Check out the latest Refcard on all things AI automation, including model training, data security, and more.

  1. DZone
  2. Refcards
  3. Getting Started With GitHub Actions
refcard cover
Refcard #373

Getting Started With GitHub Actions

Continuous integration and continuous delivery are crucial to the advancement of software development, and users can further reap both the business and practical benefits by integrating these concepts into their repositories. By far, the most prominent option available today is GitHub. In this Refcard, readers will learn the key concepts of GitHub Actions, as well as how to create automated workflows, or CI/CD pipelines, using text-based configurations that are stored directly within their GitHub repository.

Free PDF for Easy Reference
refcard cover

Written By

author avatar Justin Albano
Software Engineer, IBM
Table of Contents
► Introduction ► CI/CD Overview ► GitHub Actions Key Concepts ► Deploying With GitHub Actions ► Conclusion
Section 1

Introduction

Pipelines are an integral part of automated software testing and deployment, but prior to 2019, third-party tools were needed to create them for GitHub repositories. With the inception of GitHub Actions, we can now create sophisticated pipelines using text-based configurations that are stored directly within our GitHub repository. In this Refcard, we will explore the fundamentals of Continuous Integration and Continuous Delivery (CI/CD), delve into the basics of GitHub Action workflows, and examine how we can automatically deploy our application using Azure.

While these concepts appear simple on the surface, they are crucial in order to understand how to create powerful workflows that meet our needs on complex and large-scale projects.

Section 2

CI/CD Overview

The value of our software is not only found in the code we write, but also in how we package and deliver that code. Beyond the code we write, we must also do the following to meet the needs of our customers and drive revenue:

  • Create executables
  • Test that the executables meet their specifications
  • Deliver the executables

Since the inception of software development, this has typically been a manual process in which engineers create executables, the Quality Assurance (QA) team manually runs through a suite of tests and signs off on them, and operations staff manually deploy the certified executables into a production environment. In the last two decades though, operations and release engineering has progressed to the point where nearly all steps in the delivery process can be automated.

The series of steps that brings software from code to its execution in production is inherently driven by business needs. For example, some applications may require that acceptance and performance tests be run before the application can be deployed, while other applications may only require unit and integration tests. Likewise, some applications may be deployed to a single production environment, while others may package up an executable that can be downloaded by countless customers. Although the specific steps will vary by our business needs, the general principle remains the same: executing steps in series and in parallel.

When executed manually, this is an arduous, costly process and becomes increasingly burdensome as more steps are added. 

Continuous Integration

The first step in the march toward automation was Continuous Integration (CI). Prior to CI, developers would work on separate pieces of an application and test them in isolation. Once enough code was ready, the development team would combine their parts and test them together in a process that came to be known as Big Bang Integration. In most cases, integration never worked as expected and would take days or weeks to resolve any problems that occurred. This costly process would repeat every few weeks until all the desired features were ready, and when done at the last minute, it could prove disastrous.

To improve this process, developers started automating their unit and integration tests, running them at least once a day or, if possible, after each check-in to the repository. This approach ensured that integration was done dozens or even hundreds of times a day and that tiny segments of the application — rather than large, monolithic chunks — were integrated. This CI process drastically improved both turnaround time and application quality, setting the groundwork for the next logical step in the automation process: Continuous Delivery (CD).

Continuous Delivery

While CI focuses on the integration of code, CD automates the entire delivery process, from check-in to deployment. The core concept of CD is a pipeline, which represents a set of ordered stages — some are executed in series and others are executed in parallel. An example pipeline is illustrated below:

In this case, the CD pipeline starts with a commit to the repository, which then initiates a build. Once the build is complete and an executable is created, the executable is unit tested. If all unit tests pass, the executable is integration tested; if all integration tests pass, the acceptance tests are run. And once all acceptance tests pass, the pipeline runs three stages in parallel within a production environment:

  1. User Acceptance Testing (UAT) – a set of manual tests, such as UI tests or other acceptance tests, that require human judgment to determine if they pass. Since completion of this stage requires manual sign-off, the progression of the pipeline is said to be gated until this stage is complete.
  2. Capacity Testing – performance tests that exercise if the application meets its timing and capacity specifications in a production environment.
  3. Staging – the executables and its accompanying configuration are staged and prepared for deployment.

If all three of these stages pass — in the case of the manual UATs, when a tester signs off that the tests have passed — the staged executables and configuration are deployed to the production environment (or moved to a public-facing server so that customers can download the application). While some stages can be completed manually by pressing a button in the pipeline, it is best to automate as many, if not all, stages as possible. A fully automated pipeline allows developers to check in code to a repository and, if all tests pass, ensure that their changes are pushed to production in a consistent and repeatable manner without any human interaction.

The concepts of CI/CD are crucial to the advancement of software development, and their business and practical benefits are reaped when we integrate them into our repositories. While there are countless repositories to choose from, one has become the most popular option by far: GitHub.

Section 3

GitHub Actions Key Concepts

GitHub hosts more than 200 million repositories, and for 11 years since its inception, developers were only able to create CI/CD pipelines using third-party tools, such as Travis CI and CircleCI. This external process changed in November of 2019, when GitHub announced the launch of GitHub Actions. GitHub Actions is a CI/CD tool that is incorporated directly into every GitHub repository, utilizing text-based configuration files that reside directly within the repository.

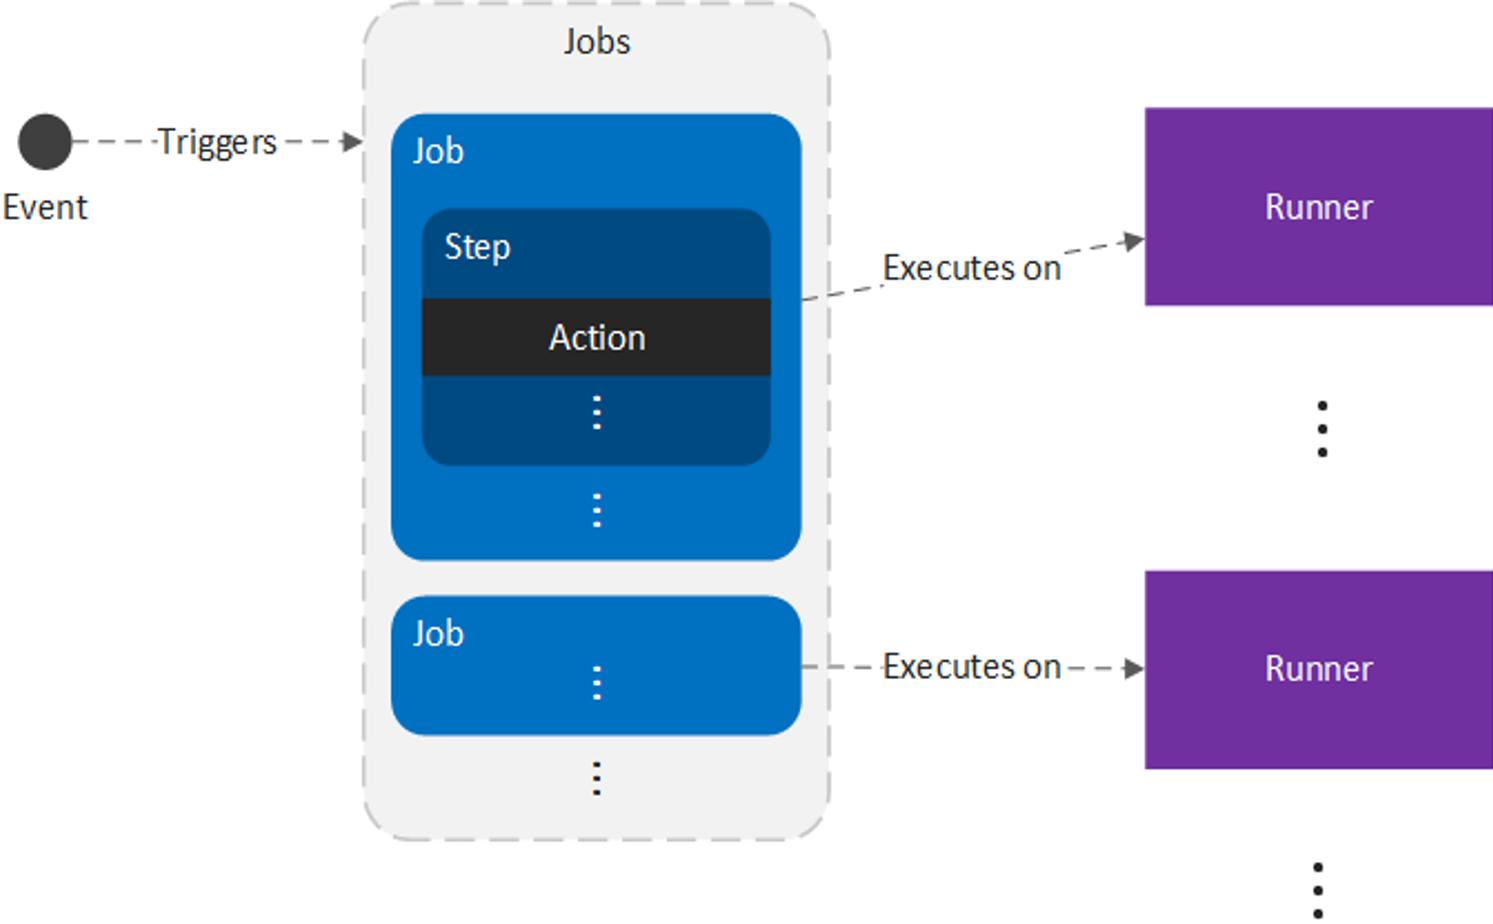
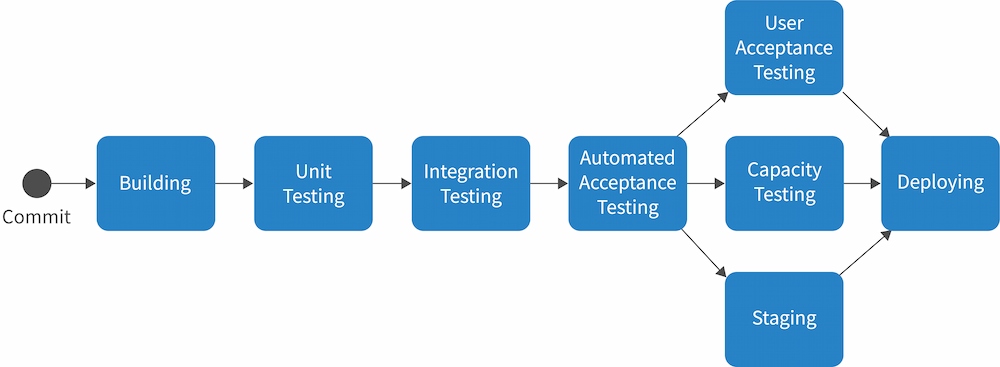
The root concept in GitHub Actions is a workflow, or a series of automated procedures. In practice, a workflow is similar to a pipeline and allows developers to configure a series of stages that can be executed each time a specific event is triggered. Every repository can have any number of workflows, and each workflow is composed of the following components:

Component Description
Job

A set of steps that are executed on the same runner

By default, if a workflow has more than one job, the jobs are executed in parallel, but jobs can be configured to run in series by declaring that one job depends on another. If job B depends on job A, job B will only execute if job A completes successfully.
Step

A task that is composed of one or more shell commands or actions

All steps from a job are executed on the same runner, and therefore, can share data with one another.
Action

A prepackaged set of procedures that can be executed within a step

There are numerous actions already available through the GitHub community that perform common tasks, such as checking out code or uploading artifacts.
Event

A stimulus that triggers the execution of a workflow

One of the most common events is a user checking in code to a repository.
Runner

A server that executes jobs on a specific Operating System (OS) or platform

Runners can either be hosted by GitHub or on standalone servers.

The relationship between these components is illustrated below:

In practice, workflows are more generalized than a CD pipeline, but they are closely related:

  • Workflows = pipelines
  • Jobs = stages
  • Steps = the series of procedures that make up a stage 

Example Workflow

To demonstrate a workflow, we can create a small project with several tests. For this example, we will use the dzone-github-actions-refcard-example project. This project runs a Representational State Transfer (REST) Application Programming Interface (API) application that responds with a "Hello, world!" message from the /hello endpoint and has a single test to ensure that the response body of the endpoint is correct. To clone the repository, execute the following commands:

Shell
 
git clone git@github.com:albanoj2/dzone-github-actions-refcard-example.git
git checkout code

Once the project is ready, we can build a new workflow by creating a .yml file in the .github/workflows/ directory of our GitHub repository — for instance, .github/workflows/example.yml. We can then configure our workflow to check out our repository and run our tests using the mvn test command by adding the following to our example.yml file:

YAML
 
name: dzone-github-actions-example

on: [push]

jobs:
  build:
    runs-on: ubuntu-latest
    steps:
      - uses: actions/checkout@v2
      - run: mvn package -DskipTests
      - name: Upload Artifacts
        uses: actions/upload-artifact@v2
        with:
          name: jar-file
          path: target/github-actions-example-1.0.0.jar

  unit-test:
    needs: build
    runs-on: ubuntu-latest
    steps:
      - uses: actions/checkout@v2
      - run: mvn test

This configuration is broken up into three main parts:

  1. name – an optional name of the workflow.
  2. on – the trigger that executes the workflow — in this case, when a commit is pushed to the repository, denoted by push. The full syntax for the on field is documented in the Workflow syntax for GitHub Actions page.
  3. jobs – the jobs that make up the workflow.

The jobs field contains two jobs: build and unit-test.

build is the job used to build our project. Note that the name build does not have any special significance and any name can be used. The runs-on field signifies the OS and environment that the job will execute on, such as the latest version of Ubuntu (denoted by ubuntu-latest). The stepsfield denotes the steps of the job. In this case, there are three steps:

1. Checking out the repository – checks out the code in the repository using the Checkout action. Since we do not know the state of the runner that will execute each job, we first have to check out our repository before we can access our code. We can select any of the available actions to run with the uses field. See the Workflow Syntax page for more information.

2. Building the repository – we execute a shell command — in this case, mvn package -DskipTests — using the run field. This command packages our application into a Jar file without running the tests (which will be executed in a subsequent job). If needed, we can also run multiple shell commands using the pipe character. For example, we can echo Running a build and then execute the build as follows:

Shell
 
- run: | 
    echo "Running a build"
    mvn package -DskipTests

3. Upload artifacts – As we will see later, we will need access to the JAR file (our executable) created in this job. To store it for later, we upload the JAR artifact using the upload-artifact action, assigning the name of the uploaded artifact (so we can reference it later) using the name field and specifying the path of the artifact using the path field. See the upload artifacts documentation for more information.

unit-test is the job used to run our unit tests. This job is similar to our build job, but instead of running the mvn package -DskipTests command, we run the mvn test command. In addition, we also add the needs field, whose value is simply the name of the job that our unit-test depends on. In our case, we specify that our unit-test job depends on our build job using needs: build. With this relationship configured, our unit-test job will only execute once the build job successfully completes. See the Workflow Syntax page for more information.

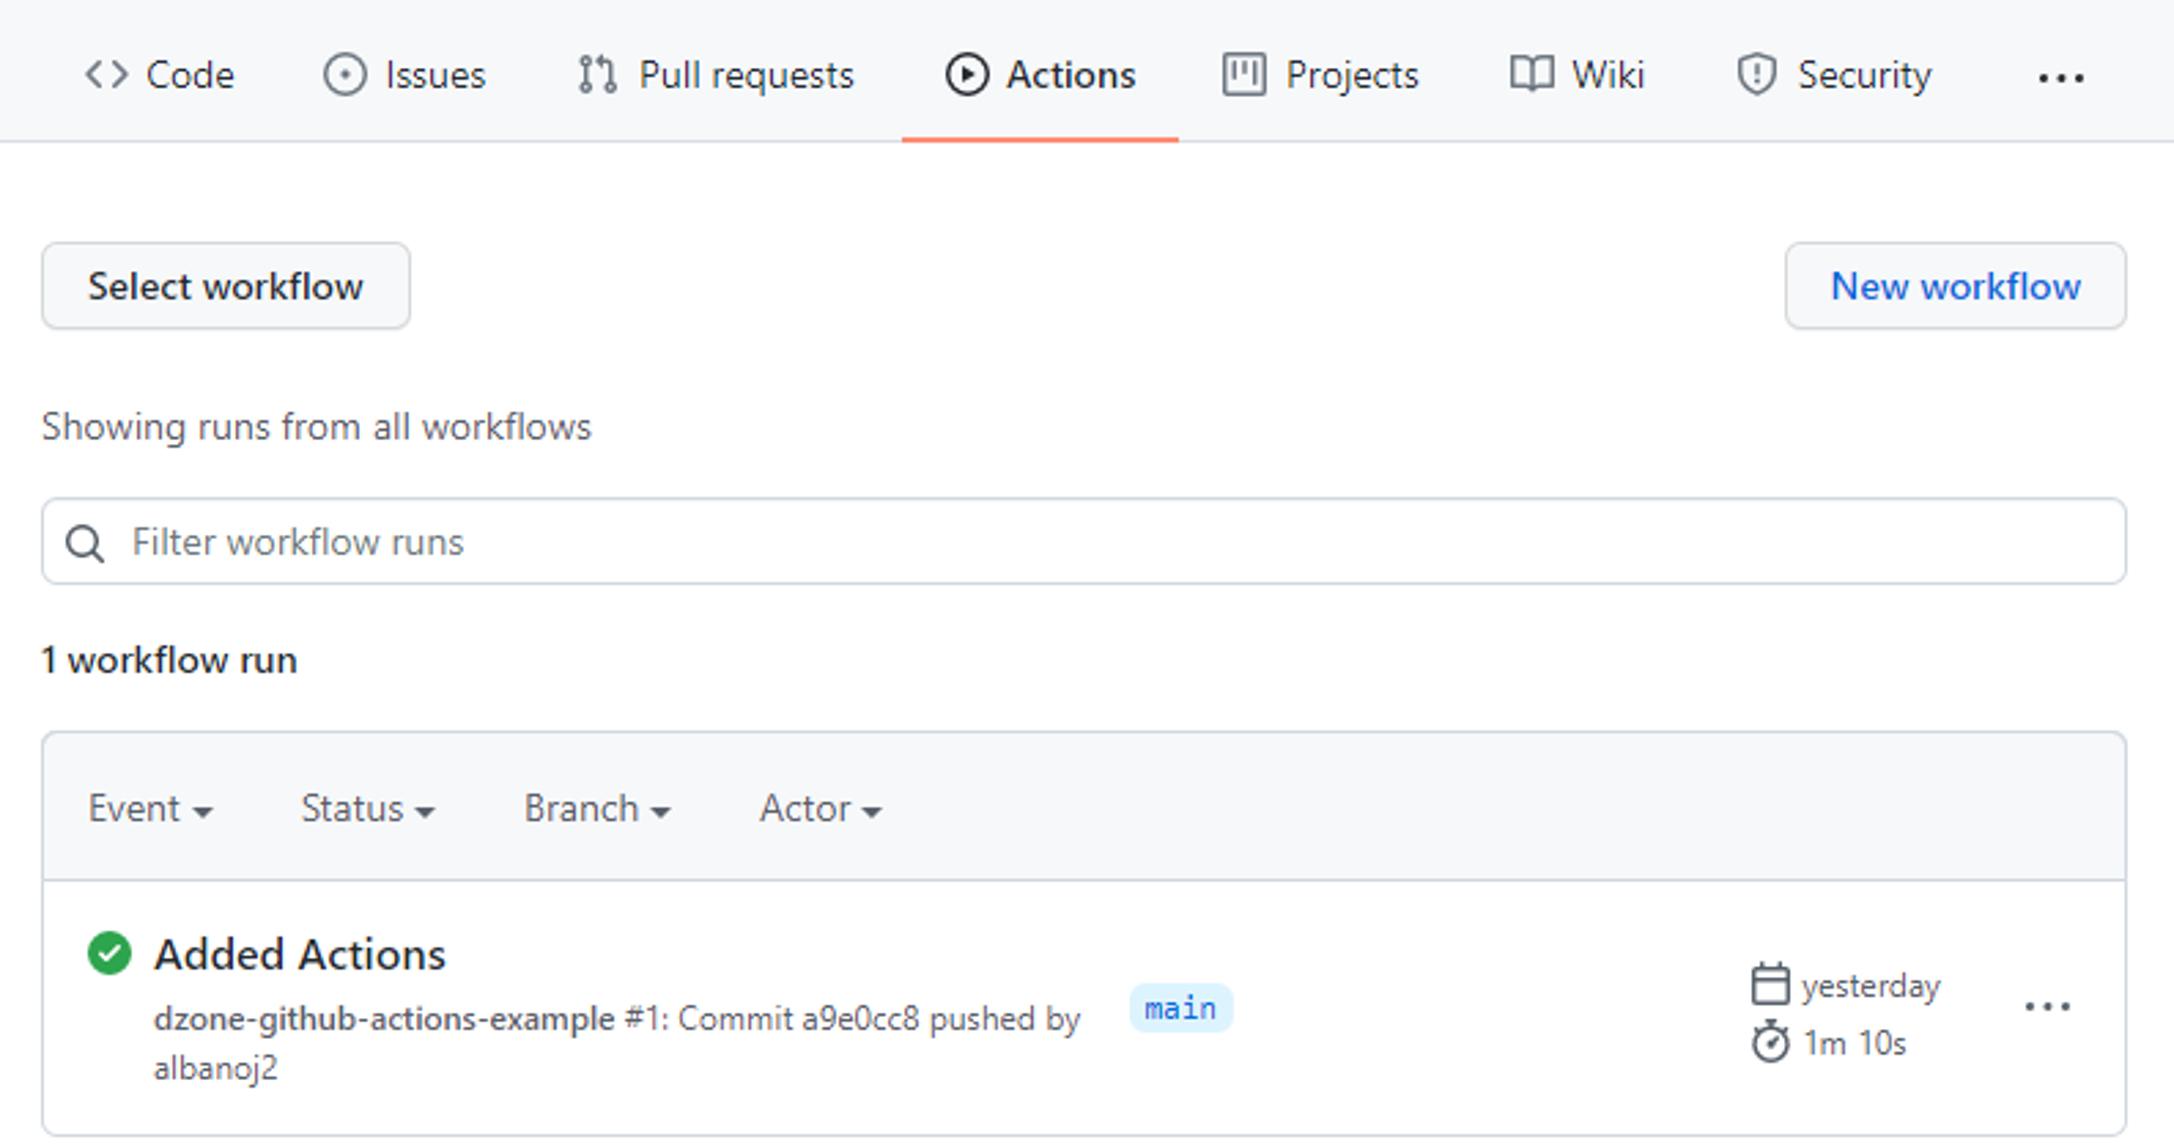
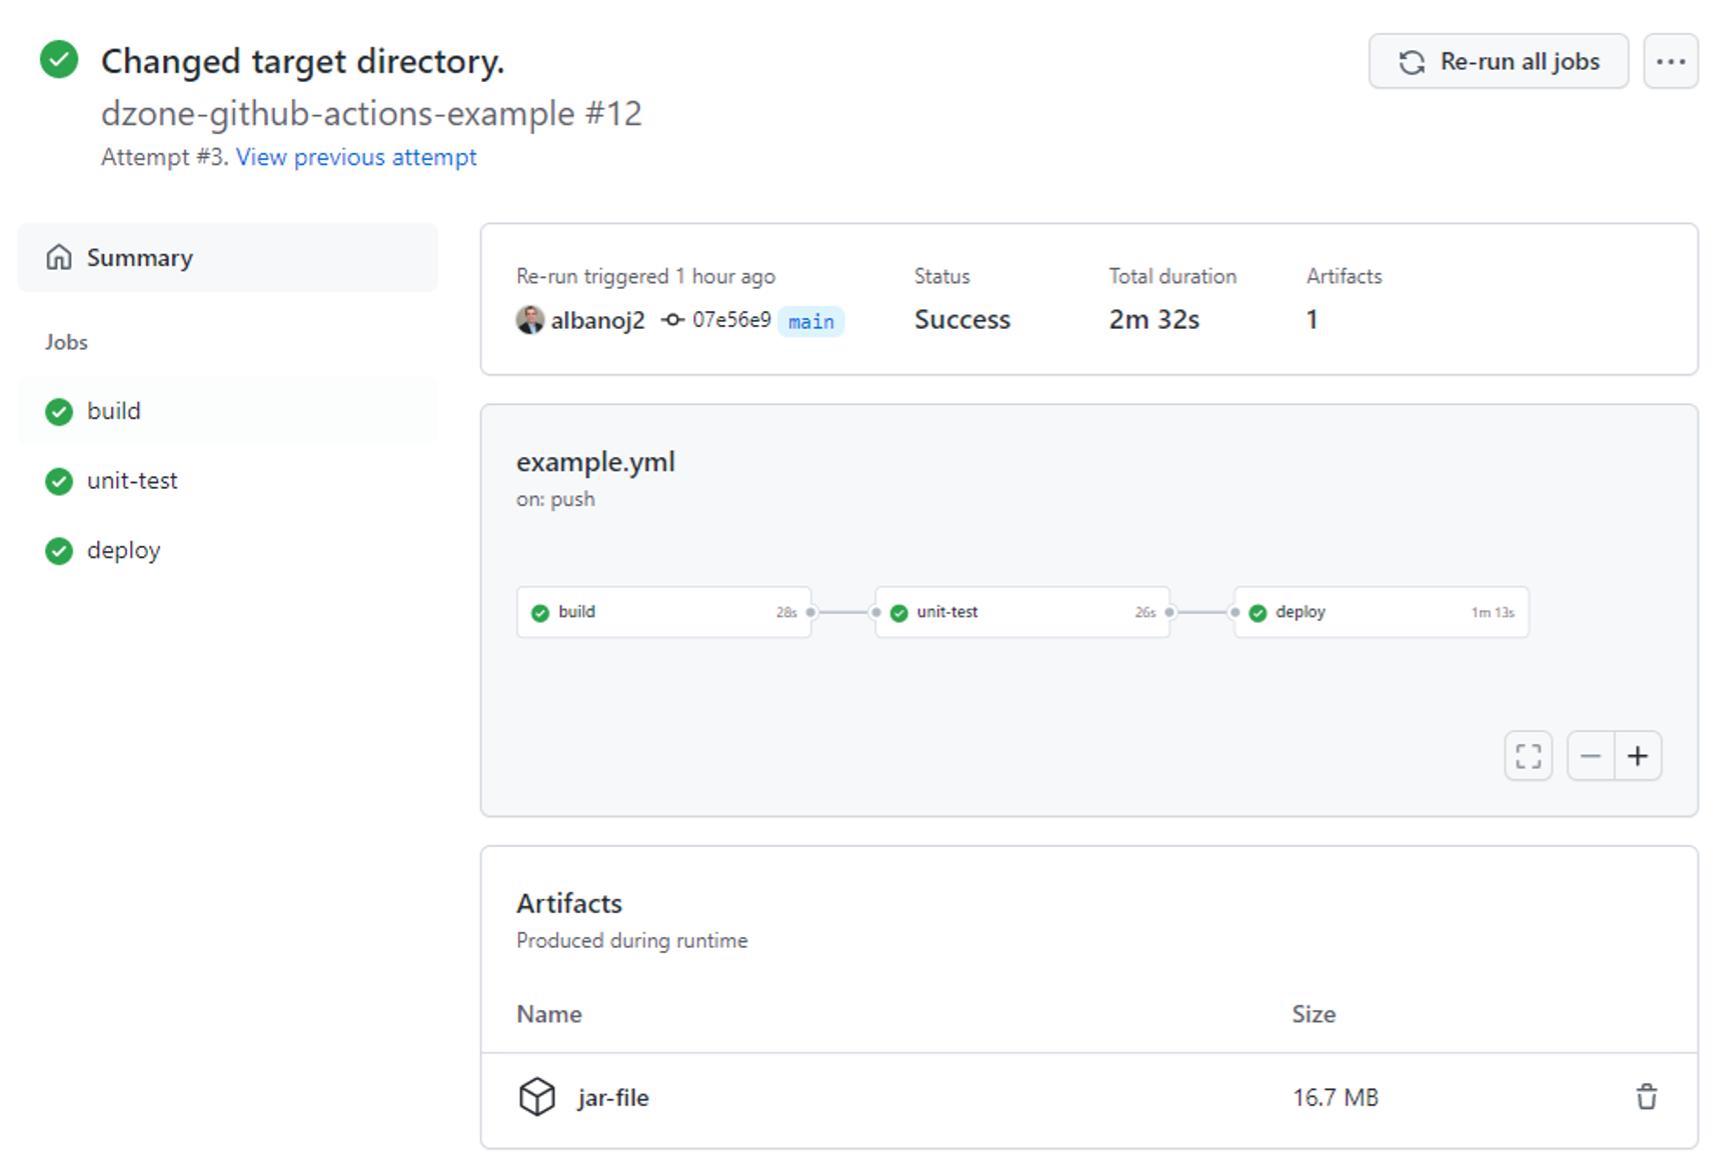
When we commit this example.yml file, GitHub recognizes that a workflow has been configured and executes our workflow. If we click the Actions tab in our GitHub repository, we can see all workflow runs that correspond to our commits:

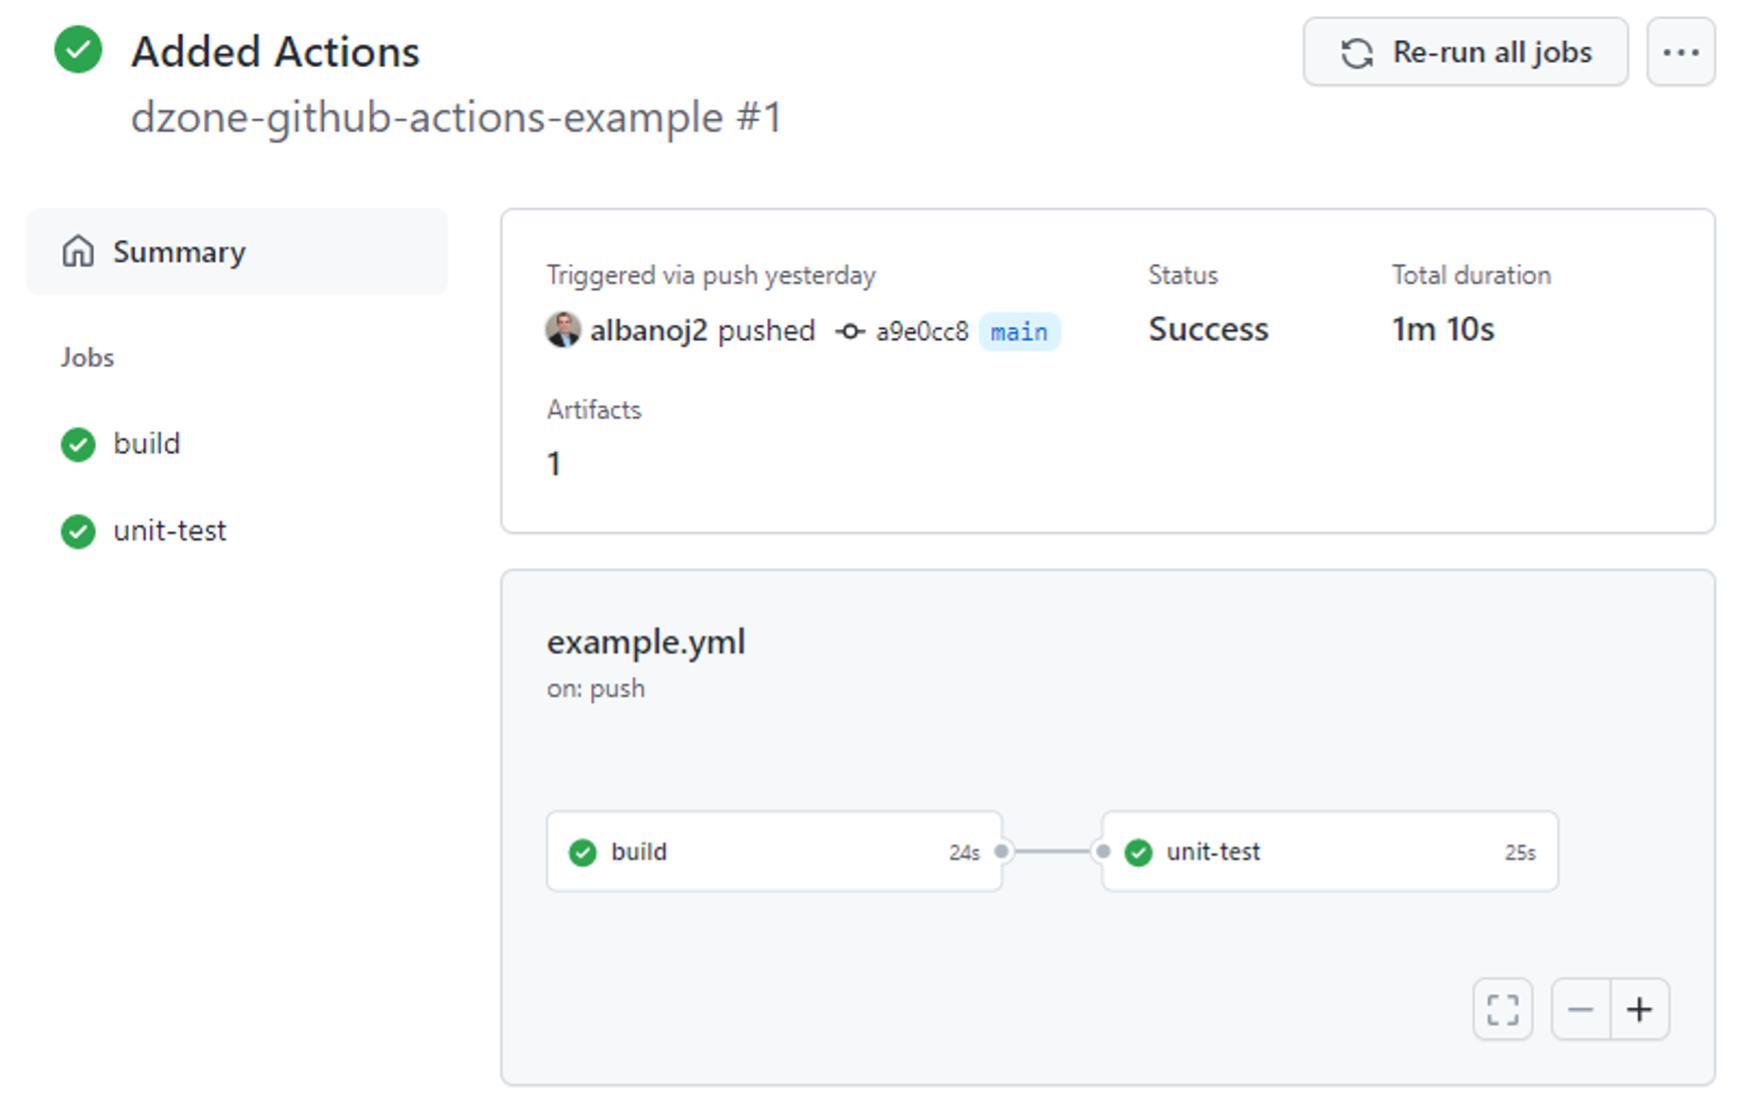
If we click on a workflow run — here, Added Actions — we can see the status of our pipeline for that run along with status and duration information:

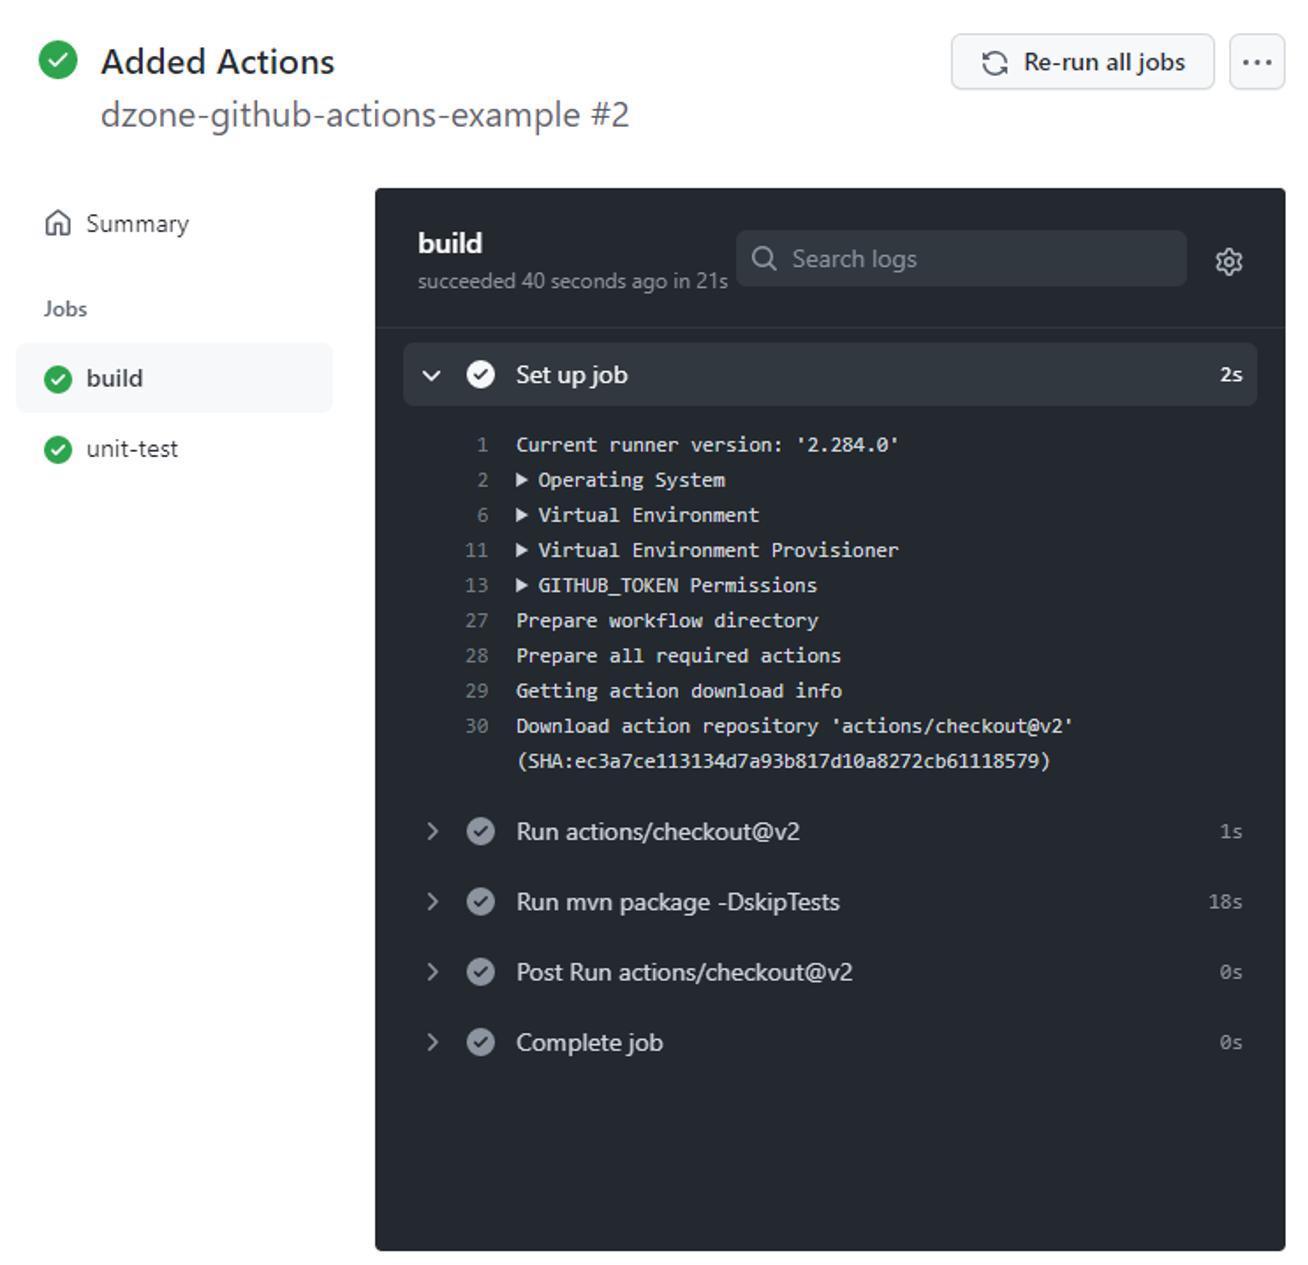
Lastly, if we click on the build job, we can see the log output that corresponds to the execution of our build job in our Added Actions commit:

Although the syntax for a GitHub Actions workflow is simple, it provides the mechanisms necessary to create sophisticated pipelines and execute nearly any procedures that we need to satisfy our business objectives.

Section 4

Deploying With GitHub Actions

Editor's Note: This section demonstrates how to use GitHub Actions for deployment to Azure — users subscribed to Azure services (paid) are able to follow along with their existing account.


With our application built and tested, we can now deploy it. There are numerous cloud providers to choose from — each with their advantages and disadvantages — and for this section, we will use Azure. To deploy to Azure, we must create a Dockerfile at the root of our project with the following contents:

Dockerfile
 
FROM openjdk:11

COPY target/*.jar app.jar

EXPOSE 8080

ENTRYPOINT ["java", "-jar", "/app.jar"]

To set up our Azure environment, we must complete the following steps:

1. Navigate to your Azure services portal.

2. Create a new subscription. We will reference the ID of this new subscription as <subscription_id>.

3. Create a new container registry. We will reference the container registry URL as <login_server>. In this case, we will use albanoj2.azurecr.io.

4. Create a new App Service:

  1. Set Name to a unique name (must be unique across all of Azure). In this case, we will use dzone-github-actions-example.
  2. Set Publish to Docker Container.
  3. Set Operating System to Linux.

5. Install the Azure CLI locally:

Shell
 
curl -sL https://aka.ms/InstallAzureCLIDeb \
   | sudo bash

6. Log in using the Azure CLI:

Shell
 
az login

7. Create a new service principal:

Shell
 
az ad sp create-for-rbac \
   --role contributor \
   --scopes \
      /subscriptions/<subscription_id> \
   --sdk-auth

This command will output the following:

Shell
 
{
   "clientId": <client_id>,
   "clientSecret": <client_secret>,
   "subscriptionId": <subscription_id>,
   "tenantId": <tenent_id>,
   "activeDirectoryEndpointUrl": "https://login.microsoftonline.com",
   "resourceManagerEndpointUrl": "https://management.azure.com/",
   "activeDirectoryGraphResourceId": "https://graph.windows.net/",
   "sqlManagementEndpointUrl": "https://management.core.windows.net:8443/",
   "galleryEndpointUrl": "https://gallery.azure.com/",
   "managementEndpointUrl": "https://management.core.windows.net/"
}

8. Add a new secret, AZURE_CREDENTIALS, to our GitHub repository, under Settings > Secrets, as shown below:

9. Create the secrets for authenticating the container registry with our service principal:
  1. Create a new secret, REGISTRY_USERNAME, with the value <client_id>.
  2. Create a new secret, REGISTRY_PASSWORD, with the value <client_secret>.

With our Azure and GitHub environment configured, we can update our workflow to include a new job, deploy, that will be responsible for building our Docker image and deploying it to our Azure environment:

Shell
 
deploy:
   needs: unit-test
   runs-on: ubuntu-latest
   steps:
   - uses: actions/checkout@v2
   - name: Download JAR file
     uses: actions/download-artifact@v2
     with:
       name: jar-file
       path: target/
   - name: Login to Azure
     uses: azure/login@v1
     with:
       creds: ${{ secrets.AZURE_CREDENTIALS }}
   - uses: azure/docker-login@v1
     with:
       login-server: albanoj2.azurecr.io
       username: ${{ secrets.REGISTRY_USERNAME }}
       password: ${{ secrets.REGISTRY_PASSWORD }}
   - run: |
       docker build -t albanoj2.azurecr.io/dzone-github-actions-example:${{ github.sha }} .
       docker push albanoj2.azurecr.io/dzone-github-actions-example:${{ github.sha }}     
   - uses: azure/webapps-deploy@v2
     with:
       app-name: dzone-github-actions-example
       images: albanoj2.azurecr.io/dzone-github-actions-example:${{ github.sha }}
   - name: Azure logout
     run: |
       az logout

Similar to our previous jobs, the deploy job runs after the unit-test job, executes using the latest Ubuntu image, and checks out the latest code from our repository, but there are also new steps:

  1. Download the JAR artifact – Since each job is executed independently, a build has not been run in our deploy job. Therefore, we must download the artifacts that we uploaded in the build job to access our JAR artifact. We use the path field to specify that the JAR should be downloaded to target/, the same directory that would contain the JAR file had we run a build.
  2. Log in to Azure – We authenticate with Azure to run privileged commands later in the job. Note that the login-server value (albanoj2.azurecr.io) will be different for each user, depending on the value of <login_server> when setting up our Azure environment. See the Azure Docker Login action documentation for more information.
  3. Build a Docker image – Our application will be deployed to Azure as a Docker container, so we must first build our Docker image. Once this image is built using our Dockerfile, we simply push it to our container registry — in this case, located at albanoj2.azurecr.io.
  4. Deploy the Docker image to Azure – Lastly, we deploy the image we created in the prior step to our Azure deployment. Note that the app-name corresponds to the name of the App Service we created when we set up our Azure environment (i.e., dzone-github-actions-example). See the Azure WebApps Deploy action documentation for more information.

When we execute this workflow, we see that our deploy job completes successfully:

Section 5

Conclusion

With our application deployed, we have now seen how to build an automated workflow that can build, test, and deploy applications each time we commit to our GitHub repositories. With GitHub Actions, we can create arbitrary workflows (CI/CD pipelines) that can automate our business needs. While the workflow we created is relatively simple, we can compose these fundamental concepts to create powerful pipelines that meet the needs of our large-scale production applications.

More Information

  • Understanding GitHub Actions
  • Workflow syntax for GitHub Actions
  • GitHub Actions Marketplace
  • What Is GitHub Actions for Azure
  • Implement CI with Azure Pipelines and GitHub Actions
  • Deploy to App Service using GitHub Actions

Like This Refcard? Read More From DZone

related article thumbnail

DZone Article

Automate Your Development Workflow With Github Actions
related article thumbnail

DZone Article

Learn How to Leverage Jenkins Pipelines for Mainframe DevOps on GitHub
related article thumbnail

DZone Article

Building a Continuous Delivery Pipeline Using Jenkins
related article thumbnail

DZone Article

Maximize Kubernetes Security: Automate TLS Certificate Management With Cert-Manager on KIND Clusters
related refcard thumbnail

Free DZone Refcard

Threat Detection
related refcard thumbnail

Free DZone Refcard

The Essentials of GitOps
related refcard thumbnail

Free DZone Refcard

Continuous Integration Patterns and Anti-Patterns
related refcard thumbnail

Free DZone Refcard

Getting Started With CI/CD Pipeline Security

ABOUT US

  • About DZone
  • Send feedback
  • Community research
  • Sitemap

ADVERTISE

  • Advertise with DZone

CONTRIBUTE ON DZONE

  • Article Submission Guidelines
  • Become a Contributor
  • Core Program
  • Visit the Writers' Zone

LEGAL

  • Terms of Service
  • Privacy Policy

CONTACT US

  • 3343 Perimeter Hill Drive
  • Suite 100
  • Nashville, TN 37211
  • support@dzone.com

Let's be friends:

{{ parent.title || parent.header.title}}

{{ parent.tldr }}

{{ parent.linkDescription }}

{{ parent.urlSource.name }}
by
DZone Core CORE
· {{ parent.articleDate | date:'MMM. dd, yyyy' }} {{ parent.linkDate | date:'MMM. dd, yyyy' }}
Tweet
{{ parent.views }} ViewsClicks
  • Edit
  • Delete
  • {{ parent.isLocked ? 'Enable' : 'Disable' }} comments
  • {{ parent.isLimited ? 'Remove comment limits' : 'Enable moderated comments' }}