Orange Pi Cluster With Docker Swarm and MariaDB
In this article, I’ll show you how to build a (surprisingly cheap) 4-node cluster packed with 16 cores and 4GB RAM to deploy a MariaDB replicated topology.
Join the DZone community and get the full member experience.
Join For FreeBuilding a cluster of single-board mini-computers is an excellent way to explore and learn about distributed computing. With the scarcity of Raspberry Pi boards, and the prices starting to get prohibitive for some projects, alternatives such as Orange Pi have gained popularity.
In this article, I’ll show you how to build a (surprisingly cheap) 4-node cluster packed with 16 cores and 4GB RAM to deploy a MariaDB replicated topology that includes three database servers and a database proxy, all running on a Docker Swarm cluster and automated with Ansible.
This article was inspired by a member of the audience who asked my opinion about Orange Pi during a talk I gave in Colombia. I hope this completes the answer I gave you.
What Is a Cluster?
A cluster is a group of computers that work together to achieve a common goal. In the context of distributed computing, a cluster typically refers to a group of computers that are connected to each other and work together to perform computation tasks.
Building a cluster allows you to harness the power of multiple computers to solve problems that a single computer cannot handle. For example, a database can be replicated in multiple nodes to achieve high availability—if one node fails, other nodes can take over. It can also be used to implement read/write splitting to make one node handle writes, and another reads in order to achieve horizontal scalability.
What Is Orange Pi Zero2?
The Orange Pi Zero2 is a small single-board computer that runs on the ARM Cortex-A53 quad-core processor. It has 512MB or 1GB of DDR3 RAM, 100Mbps Ethernet, Wi-Fi, and Bluetooth connectivity. The Orange Pi Zero2 is an excellent choice for building a cluster due to its low cost, small size, and good performance.
The only downside I found was that the Wi-Fi connection didn’t seem to perform as well as with other single-board computers. From time to time, the boards disconnect from the network, so I had to place them close to a Wi-Fi repeater. This could be a problem with my setup or with the boards. I’m not entirely sure. Having said that, this is not a production environment, so it worked pretty well for my purposes.
What You Need
Here are the ingredients:
- Orange Pi Zero2: I recommend the 1GB RAM variant and try to get at least 4 of them. I recently bought 4 of them for €30 each. Not bad at all! Give it a try!
- MicroSD cards: One per board. Try to use fast ones — it will make quite a difference in performance! I recommend at least 16GB. For reference, I used SanDisk Extreme Pro Micro/SDXC with 32GB, which offers a write speed of 90 MB/s and reads at 170 MB/s.
- A USB power hub: To power the devices, I recommend a dedicated USB power supply. You could also just use individual chargers, but the setup will be messier and require a power strip with as many outlets as devices as you have. It’s better to use a USB multi-port power supply. I used an Anker PowerPort 6, but there are also good and cheaper alternatives. You’ll have to Google this too. Check that each port can supply 5V and at least 2.4A.
- USB cables: Each board needs to be powered via a USB-C port. You need a cable with one end of type USB-C and the other of the type your power hub accepts.
- Bolts and nuts: To stack up the boards.
- Heat sinks (optional): These boards can get hot. I recommend getting heat sinks to help with heat dissipation.
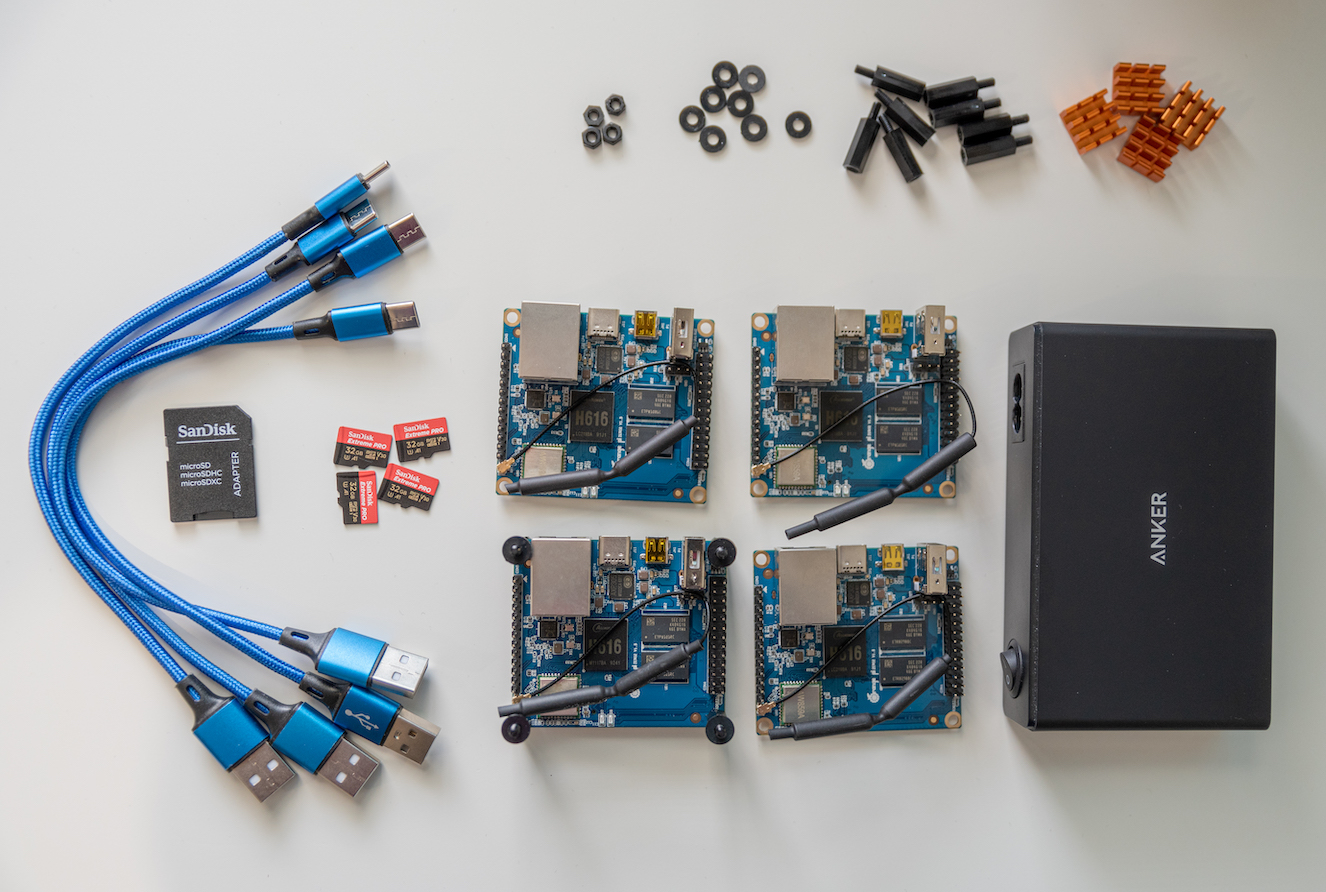
Materials needed for building an Orange Pi Zero2 cluster
Assembling the Cluster
One of the fun parts of building this cluster is the physical assembly of the boards on a case or some kind of structure that makes them look like a single manageable unit. Since my objective here is to keep the budget as low as possible, I used cheap bolts and nuts to stack the boards one on top of the other. I didn’t find any ready-to-use cluster cases for the Orange Pi Zero2. One alternative is to 3D-print your own case.
When stacking the boards together, keep an eye on the antenna placement. Avoid crushing the cable, especially if you installed heat sinks.
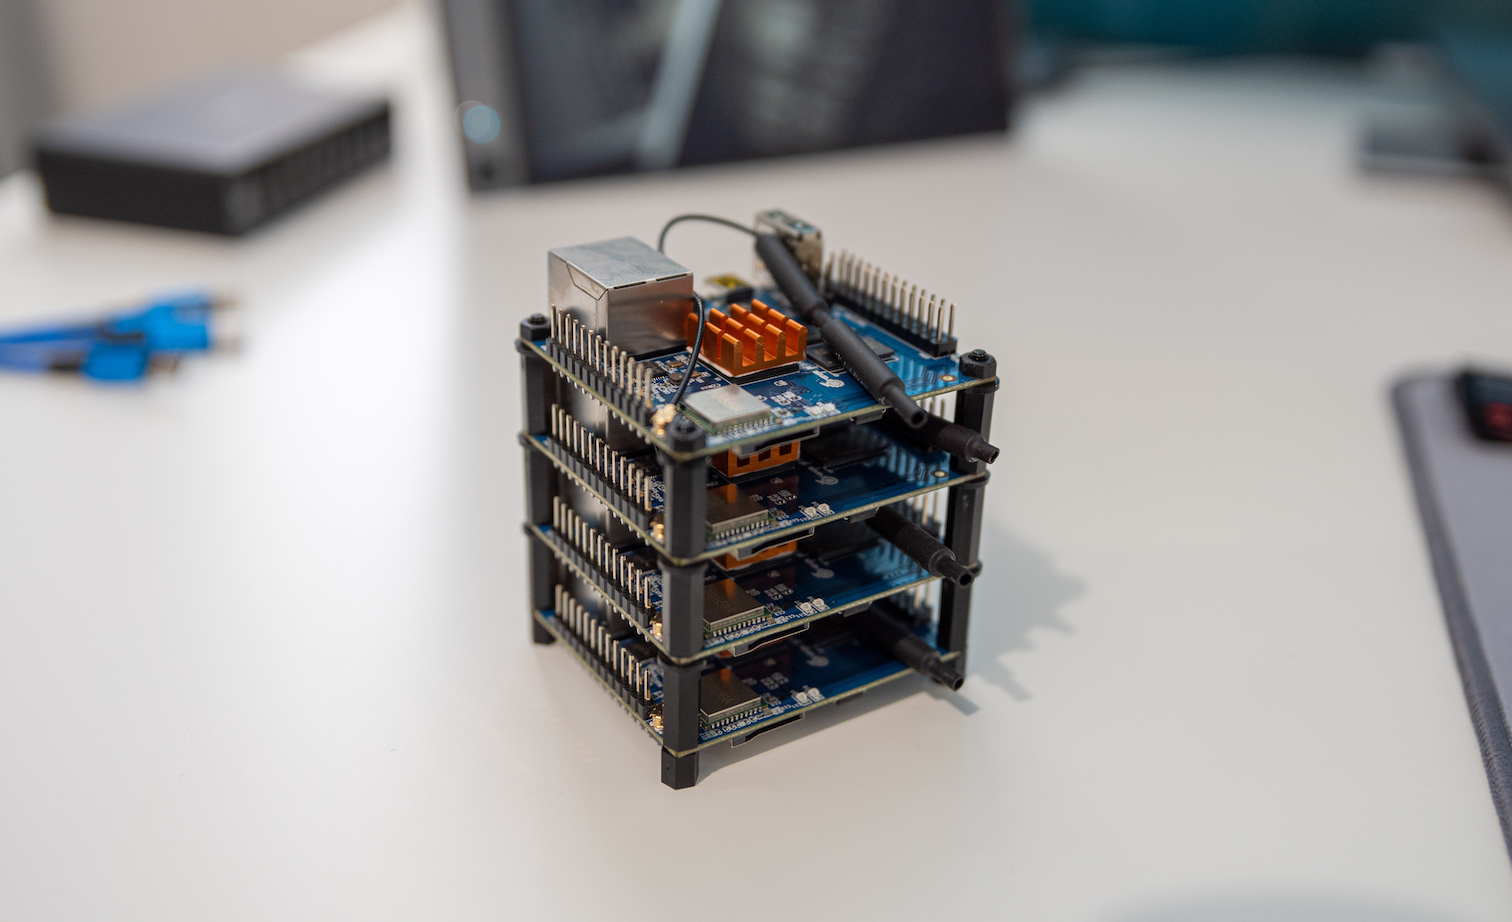
An assembled Orange Pi Zero2 cluster with 4 nodes
Installing the Operating System
The second step is to install the operating system on each microSD card. I used Armbian bullseye legacy 4.9.318. Download the file and use a tool like balenaEtcher to make bootable microSD cards. Download and install this tool on your computer. Select the Armbian image file and the drive that corresponds to the micro SD card. Flash the image and repeat the process for each micro SD card.
Configuring Orange Pi WiFi Connection (Headless)
To configure the Wi-Fi connection, Armbian includes the /boot/armbian_first_run.txt.template file which allows you to configure the operating system when it runs for the first time. The template includes instructions, so it’s worth checking. You have to rename this file to armbian_first_run.txt. Here’s what I used:
FR_general_delete_this_file_after_completion=1
FR_net_change_defaults=1
FR_net_ethernet_enabled=0
FR_net_wifi_enabled=1
FR_net_wifi_ssid='my_connection_id>'
FR_net_wifi_key='my_password'
FR_net_wifi_countrycode='FI'
FR_net_use_static=1
FR_net_static_gateway='192.168.1.1'
FR_net_static_mask='255.255.255.0'
FR_net_static_dns='192.168.1.1 8.8.8.8'
FR_net_static_ip='192.168.1.181'
Use your own Wi-Fi details, including connection name, password, country code, gateway, mask, and DNS.
I wasn’t able to read the SD card from macOS. I had to use another laptop with Linux on it to make the changes to the configuration file on each SD card. To mount the SD card on Linux, run the following command before and after inserting the SD card and see what changes:
sudo fdisk -lI created a Bash script to automate the process. The script accepts as a parameter the IP to set. For example:
sudo ./armbian-setup.sh 192.168.1.181I run this command on each of the four SD cards changing the IP address from 192.168.1.181 to 192.168.1.184.
Connecting Through SSH
Insert the flashed and configured micro SD cards on each board and turn the power supply on. Be patient! Give the small devices time to boot. It can take several minutes the first time you boot them.

An Orange Pi cluster running Armbian
Use the ping command to check whether the devices are ready and connected to the network:
ping 192.168.1.181Once they respond, connect to the mini-computers through SSH using the root user and the IP address that you configured. For example:
ssh root@192.168.1.181The default password is:
1234You’ll be presented with a wizard-like tool to complete the installation. Follow the steps to finish the configuration and repeat the process for each board.
Installing Ansible
Imagine you want to update the operating system on each machine. You’ll have to log into a machine and run the update command and end the remote session. Then repeat for each machine in the cluster. A tedious job even if you have only 4 nodes. Ansible is an automation tool that allows you to run a command on multiple machines using a single call. You can also create a playbook, a file that contains commands to be executed in a set of machines defined in an inventory.
Install Ansible on your working computer and generate a configuration file:
sudo su
ansible-config init --disabled -t all > /etc/ansible/ansible.cfg
exit
In the /etc/ansible/ansible.cfg file, set the following properties (enable them by removing the semicolon):
host_key_checking=False
become_allow_same_user=True
ask_pass=True
This will make the whole process easier. Never do this in a production environment!
You also need an inventory. Edit the /etc/ansible/hosts file and add the Orange Pi nodes as follows:
##############################################################################
# 4-node Orange Pi Zero 2 cluster
##############################################################################

[opiesz]
192.168.1.181        ansible_user=orangepi        hostname=opiz01
192.168.1.182        ansible_user=orangepi        hostname=opiz02
192.168.1.183        ansible_user=orangepi        hostname=opiz03
192.168.1.184        ansible_user=orangepi        hostname=opiz04

[opiesz_manager]
opiz01.local        ansible_user=orangepi

[opiesz_workers]
opiz[02:04].local    ansible_user=orangepi
In the ansible_user variable, specify the username that you created during the installation of Armbian. Also, change the IP addresses if you used something different.
Setting up a Cluster With Ansible Playbooks
A key feature of a computer cluster is that the nodes should be somehow logically interconnected. Docker Swarm is a container orchestration tool that will convert your arrangement of Orange Pi devices into a real cluster. You can later deploy any kind of server software. Docker Swarm will automatically pick one of the machines to host the software.
To make the process easier, I have created a set of Ansible playbooks to further configure the boards, update the packages, reboot or power off the machines, install Docker, set up Docker Swarm, and even install a MariaDB database with replication and a database cluster.
Clone or download this GitHub repository:
git clone https://github.com/alejandro-du/orange-pi-zero-cluster-ansible-playbooks.gitLet’s start by upgrading the Linux packages on all the boards:
ansible-playbook upgrade.yml --ask-become-passNow configure the nodes to have an easy-to-remember hostname with the help of Avahi, and configure the LED activity (red LED activates on SD card activity):
ansible-playbook configure-hosts.yml --ask-become-passReboot all the boards:
ansible-playbook reboot.yml --ask-become-passInstall Docker:
ansible-playbook docker.yml --ask-become-passSet up Docker Swarm:
ansible-playbook docker-swarm.yml --ask-become-passDone! You have an Orange Pi cluster ready for fun!
Deploying MariaDB on Docker Swarm
I have to warn you here. I don’t recommend running a database on container orchestration software. That’s Docker Swarm, Kubernetes, and others. Unless you are willing to put a lot of effort into it. This article is a lab. A learning exercise. Don’t do this in production! Now let’s get back to the fun…
Run the following to deploy one MariaDB primary server, two MariaDB replica servers, and one MaxScale proxy:
ansible-playbook mariadb-stack.yml --ask-become-passThe first time you do this, it will take some time. Be patient.
SSH into the manager node:
ssh orangepi@opiz01.localInspect the nodes in the Docker Swarm cluster:
docker node lsInspect the MariaDB stack:
docker stack ps mariadbA cooler way to inspect the containers in the cluster is by using the Docker Swarm Visualizer. Deploy it as follows:
docker service create
  --name=viz
  --publish=9000:8080
  --constraint=node.role==manager
  --mount=type=bind,src=/var/run/docker.sock,dst=/var/run/docker.sock
  alexellis2/visualizer-arm:latest
On your working computer, open a web browser and go to this URL. You should see all the nodes in the cluster and the deployed containers.
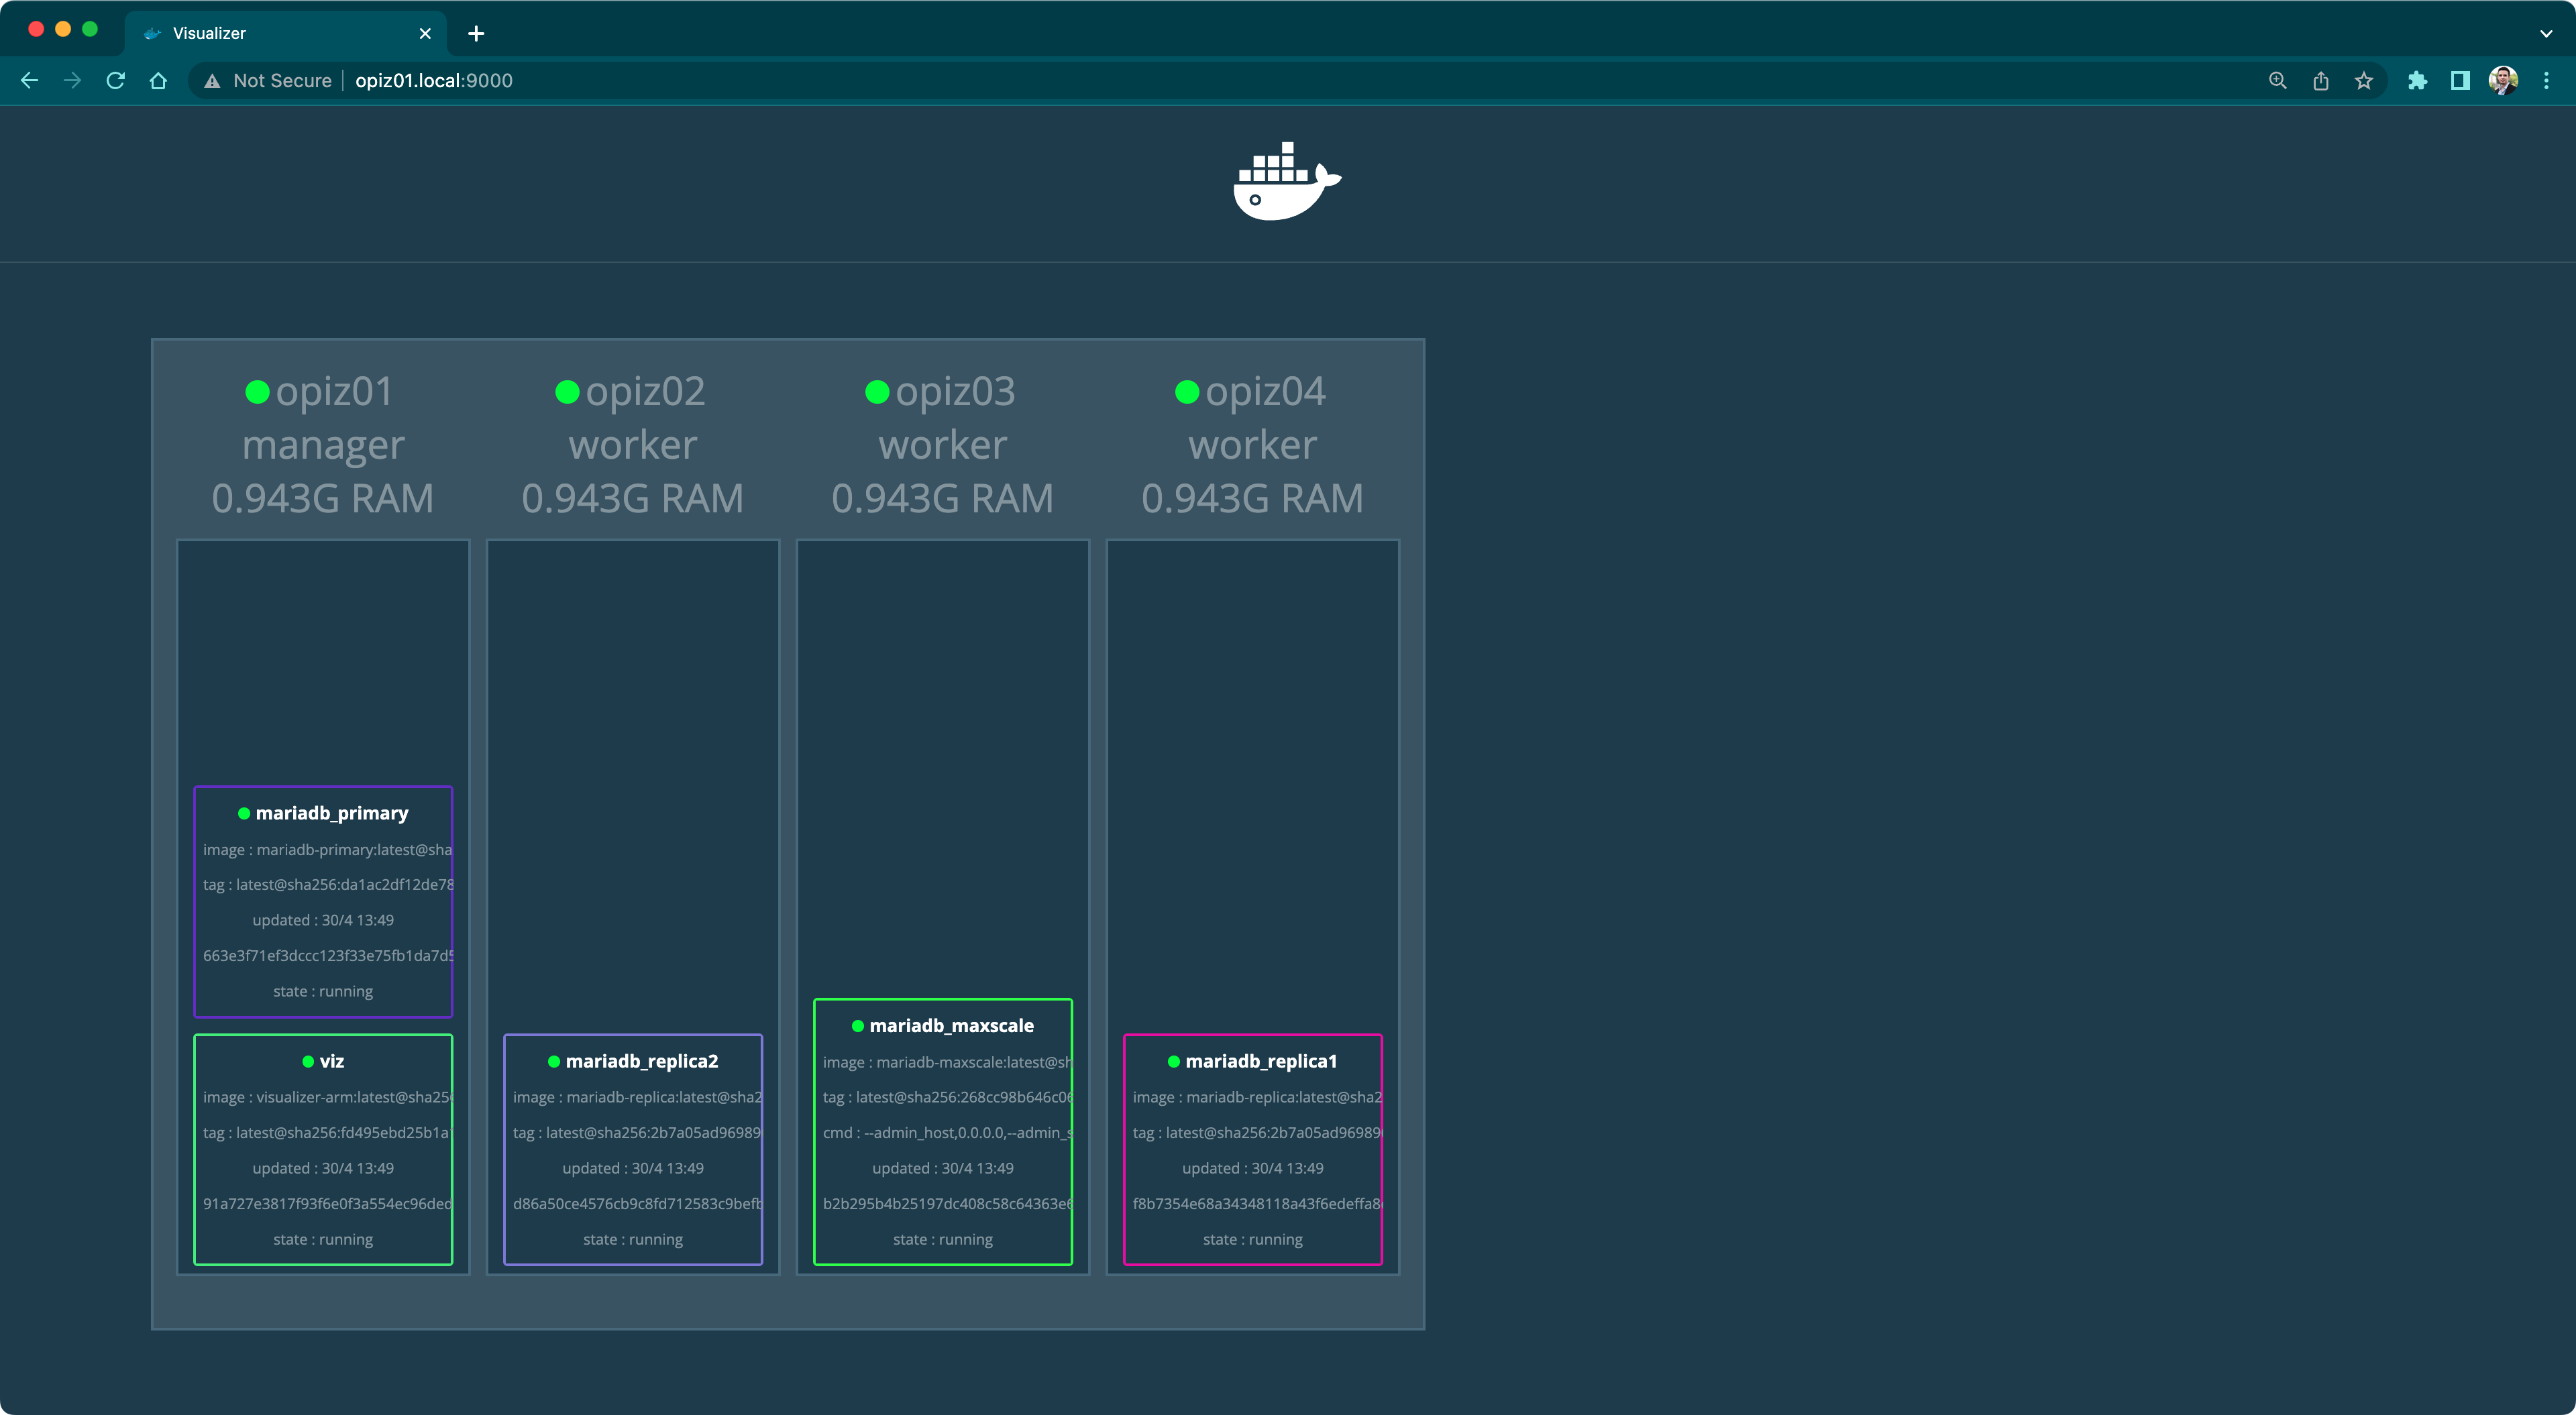
Docker Swarm Visualizer showing MariaDB deployed
MaxScale is an intelligent database proxy with tons of features. For now, let’s see how to connect to the MariaDB cluster through this proxy. Use a tool like DBeaver, DbGate, or even a database extension for your favorite IDE. Create a new database connection using the following connection details:
- Host: opiz01.local
- Port: 4000
- Username: user
- Password: password
Create a new table:
USE demo;
CREATE TABLE messages(
    id INT PRIMARY KEY AUTO_INCREMENT,
    content TEXT NOT NULL
);
Insert some data:
INSERT INTO messages(content)
VALUES ("It works!"),
    ("Hello, MariaDB"),
    ("Hello, Orange Pi");
When you execute this command, MaxScale sends it to the primary server. Now read the data:
SELECT * FROM messages;When you execute this command, MaxScale sends it to one of the replicas. This division of reads and writes is called read-write splitting.

The MaxScale UI showing a MariaDB cluster with replication and read-write splitting
You can also access the MaxScale UI. Use the following credentials:
- Username: admin
- Password: mariadb
Watch the following video if you want to learn more about MaxScale and its features. You won’t regret it!
Opinions expressed by DZone contributors are their own.
Comments