TDD With FastAPI Is Easy
In this article, I’d like to share my experience of using TDD. I will explain how you can simply add an endpoint to a FastAPI application and write a simple test for it.
Join the DZone community and get the full member experience.
Join For FreeWorking more than 15 years in IT, I rarely met programmers who enjoy writing tests and only a few people who use something like TDD. Is this really such an uninteresting part of the software development process?
In this article, I’d like to share my experience of using TDD.
In most of the teams I worked with, programmers wrote code. Often, they didn't write tests at all or added them symbolically. The only mention of the TDD abbreviation made programmers panic. The main reason is that many people misunderstand the meaning of TDD and try to avoid writing tests.
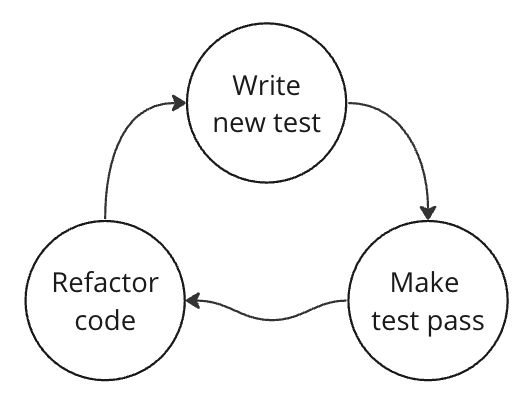
It is generally assumed that TDD are usual tests but written before implementation. But this is not quite true. TDD is a culture of writing code. This approach implies a certain order of solving a task and a specific way of thinking. TDD implies solving a task using loops or iterations.
Formally, the cycle consists of three phases:
- Writing a test that gives something to the input and checks the output. In this case, the test doesn’t pass.
- Writing the simplest implementation with which the test passes.
- Refactoring. Changing the code without changing the test.
The cycle repeats itself until the problem is solved.
I use a slightly different algorithm. In my approach, refactoring is most often the cycle. That is, I write the test, and then I write the code. Next, I write the test again and write the code because refactoring still often requires editing to the test (various mocks, generation of instances, links to existing modules, etc.), but not always.

I think I won’t describe it as it is done in textbooks. I'll just show you an example of how it works for me.
Example
Imagine we got a task. No matter how it is described, we can clarify it ourselves, coordinate it with the customer, and solve it. Let’s suppose that the task is described something like this:
"Add an endpoint that returns the current time and user information (id, first name, last name, phone number). Also, it is necessary to sign this information based on a secret key."
I will not complicate the task to demonstrate it. But in real life, you may need to make a full-fledged digital signature and supplement it with encryption, and this endpoint needs to be added to an existing project. For academic purposes, we will have to create it from scratch. Let's do it using FastAPI.
Most programmers just start working on this task without detailed study. They keep everything they can in their head. After all, such a task does not need to be divided into subtasks since it is quite simple and quickly implemented. While working on it, they clarify the requirements of stakeholders and ask questions. And at the end, they write tests anxiously.
But we will do it differently. It may seem unexpected, but let's take something from the Agile methodology.
Firstly, this task can be divided into logically completed subtasks. You can immediately clarify all the requirements. Secondly, it can be done iteratively, having something working at each step (even incorrectly) that can be demonstrated.
Planning
Let’s start with the following partition.
The First Subtask
Make an empty FastAPI app work with one method.
Acceptance Criteria
- There is a FastAPI app, and it can be launched.
- The GET request
"/my-info"returns a response with code200and body{} - empty json.
The Second Subtask
Add a model/User object. At this stage, it will just be a pedantic scheme for the response. You will have to agree with the business on the name of the fields and whether it is necessary to somehow convert the values (filter, clean, or something else).
Acceptance Criteria
- The GET request
"/my-info"returns a response with code200and body{"user":{"id":1,"firstname":"John","lastname":"Smith","phone":"+995000000000"}}.
The Third Subtask
Add the current time to the response. Again, we need to agree on the time format and the name of the field.
Acceptance Criteria
- The GET request
"/my-info"returns a response with code200and body{"user":{added earlier},"timestamp":1691377675}.
The Fourth Subtask
Add a signature. Immediately, some questions to the business appear:
- Where to add?
- How to form it?
- Where to get the key?
- Where to store?
- Who has access?
- And so on…
As a result, we use a simple algorithm:
- We get base64 from the JSON response body.
- We concatenate with the private key. First, we use an empty string as a key.
- Then, we take md5 from the received string.
- We add the result to the X-Signature header.
Acceptance Criteria
- The GET request
"/my-info" returns a response described earlier without changes, but with an additional header:"X-Signature":"638e4c9e30b157cc56fadc9296af813a"
For this step, the X-Signature is calculated manually. Base64 = eyJ1c2VyIjp7ImlkIjoxLCJmaXJzdG5hbWUiOiJKb2huIiwibGFzdG5hbWUiOiJTbWl0aCIsInBob25lIjoiKzk5NTAwMDAwMDAwMCJ9LCJ0aW1lc3RhbXAiOjE2OTEzNzc2NzV9.
Note that the endpoint returns hard-coded values.
To what level tasks should be split is up to you. This is just an example. The most important thing will be described further.
These four subtasks result in the endpoint that always returns the same response.
But there is a question: why have we described the stub in such detail? Here is the reason: these subtasks don’t have to be physically present. They are just steps. They are needed to use the TDD practice. However, their presence on any storage medium other than our memory will make our work much easier.
So, let’s begin.
Implementation
The First Subtask
We add the main.py file to the app directory.
from fastapi import FastAPI

app = FastAPI()


@app.get("/my-info")
async def my_info():
    return {}
Right after that, we add one test. For example, to the same directory: test_main.py.
from fastapi.testclient import TestClient
from .main import app

client = TestClient(app)


def test_my_info_success():
    response = client.get("/my-info")
    assert response.status_code == 200
    assert response.json() == {}
As a result of the first subtask, we added just a few lines of code and a test. At the very beginning, a simple test appeared. It does not cover business requirements at all. It checks only one case — one step. Obviously, writing such a test does not cause much negativity. And at the same time, we have a working code that can be demonstrated.
The Second Subtask
We add JSON to the verification. To do this, replace the last line in the test.
result = {
    "user": {
        "id": 1,
        "firstname": "John",
        "lastname": "Smith",
        "phone": "+995000000000",
    },
}
assert response.json() == result
❌ Now, the test fails. We change the code so that the test passes.
We add the schema file.
from pydantic import BaseModel


class User(BaseModel):
    id: int
    firstname: str
    lastname: str
    phone: str


class MyInfoResponse(BaseModel):
    user: User
We change the main file.
We add import.
from .scheme import MyInfoResponse, UserWe change the router function.
@app.get("/my-info", response_model=MyInfoResponse)
async def my_info():
    my_info_response = MyInfoResponse(
    user=User(
        id=1,
        firstname="John",
        lastname="Smith",
        phone="+995000000000",
    ),
)
return my_info_response
✅ Now, the test passes. And we got a working code again.
The Third Subtask
We add "timestamp": 1691377675 to the test.
result = {
    "user": {
        "id": 1,
        "firstname": "John",
        "lastname": "Smith",
        "phone": "+995000000000",
    },
    "timestamp": 1691377675,
}
❌ The test fails again. We change the code so that the test passes. To do this, we add timestamp to the scheme.
class MyInfoResponse(BaseModel):
    user: User
    timestamp: int
We add its initialization to the main file.
my_info_response = MyInfoResponse(
    user=User(
        id=1,
        firstname="John",
        lastname="Smith",
        phone="+995000000000",
    ),
    timestamp=1691377675,
)
✅ The test passes again.
The Fourth Subtask
We add the "X-Signature" header verification to the test: "54977504fbe6c7aec318722d9fbcaec8".
assert response.headers.get("X-Signature") == "638e4c9e30b157cc56fadc9296af813a"❌ The test fails again.
We add this header to the application's response. To do this, we add middleware. After all, we will most likely need a signature for other endpoints of the application. But this is just our choice, which in reality can be different so as not to complicate the code. Let's do it to understand this.
We add import Request.
from fastapi import FastAPI, RequestAnd the middleware function.
@app.middleware("http")
async def add_signature_header(request: Request, call_next):
    response = await call_next(request)
    response.headers["X-Signature"] = "638e4c9e30b157cc56fadc9296af813a"
    return response
✅ The test passes again.
At this stage, we have received a ready-made working test for the endpoint. Next, we will change the application, converting it from a stub into a fully working code while checking it with just one ready-made test. This step can already be considered as refactoring. But we will do it in exactly the same small steps.
The Fifth Subtask
Implement signature calculation. The algorithm is described above, as well as the acceptance criteria, but the signature should change depending on the user's data and timestamp. Let's implement it.
✅ The test passes, and we don't do anything to it at this step. That is, we do a full-fledged refactoring.
We add the signature.py file. It contains the following code:
import base64
import hashlib


def generate_signature(data: bytes) -> str:
    m = hashlib.md5()
    b64data = base64.b64encode(data)
    m.update(b64data + b"")
    return m.hexdigest()
We change main.py.
We add import.
from fastapi import FastAPI, Request, Response
from .signature import generate_signature
We change middleware.
@app.middleware("http")
async def add_signature_header(request: Request, call_next):
    response = await call_next(request)
    body = b""
    async for chunk in response.body_iterator:
    body += chunk
    response.headers["X-Signature"] = generate_signature(body)
    return Response(
        content=body,
        status_code=response.status_code,
        headers=dict(response.headers),
        media_type=response.media_type,
    )
Here is the result of our complication, which wasn’t necessary for us to do. We did not get the best solution since we have to calculate the entire body of the response and form our own Response. But it is quite suitable for our purposes.
✅ The test still passes.
The Sixth Subtask
Replace timestamp with the actual value of the current time.
Acceptance Criteria
timestampin the response returns the actual current time value.- The signature is generated correctly.
To generate the time, we will use int(time.time())
First, we edit the test. Now, we have to freeze the current time.
Import:
from datetime import datetime
from freezegun import freeze_time
We make the test look like the one below. Since freezegun accepts either an object or a string with a date, but not unix timestamp, it will have to be converted.
def test_my_info_success():
    initial_datetime = 1691377675
    with freeze_time(datetime.utcfromtimestamp(initial_datetime)):
        response = client.get("/my-info")
    assert response.status_code == 200
    result = {
        "user": {
            "id": 1,
            "firstname": "John",
            "lastname": "Smith",
            "phone": "+995000000000",
        },
        "timestamp": initial_datetime,
    }
    assert response.json() == result
    assert response.headers.get("X-Signature") == "638e4c9e30b157cc56fadc9296af813a"
Nothing has changed. ✅ That’s why the test still passes. So, we continue refactoring.
Changes to the main.py code.
Import:
import timeIn the response, we replace the time-hard code with a method call.
timestamp=int(time.time()),✅ We launch the test — it works.
In tests, one often tries to dynamically generate input data and write duplicate functions to calculate the results. I don’t share the idea of this approach as it can potentially contain errors and requires testing as well. The simplest and most reliable way is to input and output data prepared in advance. The only thing that can be used at the same time is configuration data, settings, and some proven fixtures. Now, we will add the settings.
The Seventh Subtask
Add a private key. We will take it from the settings environment variables.
Acceptance Criteria
- There is a private key (not an empty string).
- It is part of the signature generation process according to the algorithm described above.
- The application gets it from the environment variables.
For the test, we use the private key: 6hsjkJnsd)s-_=2$%723
As a result, our signature will change to: 479bb02f0f5f1249760573846de2dbc1
We replace the signature verification in the test:
assert response.headers.get("X-Signature") == "479bb02f0f5f1249760573846de2dbc1"❌ Now, the test fails.
We add file settings.py to get the settings from environment variables.
from pydantic_settings import BaseSettings


class Settings(BaseSettings):
    security_key: bytes


settings = Settings()
We add the code for using this key to signature.py.
Import:
from .settings import settingsAnd we replace the string with concatenation with:
m.update(b64data + settings.security_key)❌ Now, the test fails.
Now, before running the tests, we need to set the environment variable with the correct key. This can be done right before the call, for example, like this:
export security_key='6hsjkJnsd)s-_=2$%723'
✅ Now, the test passes.
I would not recommend setting the default value in the settings.py file. The variable must be defined. Setting a default incorrect value can lead to hiding an error in production if the value of this variable is not set during deployment. The application will start without errors, but it will give incorrect results. However, in some cases, a working application with incorrect functionality is better than error 503. It's up to you as a developer to decide.
The next steps may be replacing the stub of the User object with real values from the database writing additional validation tests and negative scenarios. In any case, you will have to add more acceptance tests at the end.
The most important thing here is dividing the task into micro-tasks, writing a simple test for each subtask, and then writing the application code, and after that, if necessary, refactoring.
This order in development really helps:
- Focus on the problem
- See the result of the subtask clearly
- Be able to quickly verify the written code
- Reduce negativity when writing tests
- Always have at least one test per task
As a result, the number of situations when a programmer "overdoes it" and spends much more time solving a problem than he could with a structured approach decreases. Thus, the development time of the feature is reduced, and the quality of the code is improved. In the long term, changes, refactoring, and updates of package versions in the code are easily controlled and implemented with minimal losses.
And here is what’s important: TDD should improve development, make it faster, and strengthen it. This is what the word Driven in the abbreviation means. Therefore, it is not necessary to try to write a complete test or acceptance test of the entire task before the start of development. An iterative approach is needed. Tests are only needed to verify the next small step in development.
TDD helps answer the question: how do I know that I have achieved my goal (I mean, that the code fragment I wrote works)?
Opinions expressed by DZone contributors are their own.
Comments